TIBCO Scribe® Online Connector For NetSuite (CData)
The TIBCO Scribe® Online Connector for NetSuite (CData) is based on the CData driver for NetSuite. This Connector supports source and target operations on more than one hundred NetSuite entities. It offers native query using standard SQL syntax for filtering and joining tables. Use the NetSuite (CData) Connector to integrate your CRM system with NetSuite ERP or to integrate your marketing automation system with NetSuite CRM.
Use the NetSuite (CData) Connector as a source or target Connection for On schedule or On event apps. This Connector is based on Scribe.Connector.AdoNet library and CData NetSuite ADO.NET provider.
Connector Specifications
This Connector supports up to version 2020.1 of the NetSuite API.
| Supported | |
|---|---|
|
Agent Types |
|
| Connect on-premise | X |
| Connect cloud | X |
|
Data Replication Apps |
|
| Source | |
| Target | |
|
On Schedule Apps |
|
| Source | X |
| Target | X |
|
On Event Apps |
|
| Source | X |
| Target | X |
|
Flows |
|
| Integration | X |
| Request-Reply | X |
| Message | |
Supported Entities
The CData ADO.NET Provider for NetSuite models NetSuite entities in relational Tables, Views, and Stored Procedures. The table definitions are dynamically obtained based on your NetSuite account. See Data Model in the CData documentation for a complete list of supported entities.
Setup Considerations
The user specified in the TIBCO Cloud™ Integration - Connect Connection dialog must have permissions on the specified AccountId to connect through NetSuite Web services.
User Roles For Data Integration
NetSuite roles are sets of permissions that can be assigned to one or more users. For data integration, you could assign users the Administrator role, which would give broad enough permissions to access anything in NetSuite. However, for security purposes, best practice is to limit permissions to the minimum required. In NetSuite Manage Roles under Permissions -> Setup, configure one or more roles with access to the following:
- SOAP Web Services — Requires Full access.
- Custom Body Fields
- Custom Column Fields
- Custom Entity Fields
- Custom Event Fields
- Custom Item Fields
- Custom Transaction Fields
- Custom Record Types
- Other Custom Fields
In addition, configure specific permissions for any NetSuite objects you want to integrate, such as access to Customer Lists or Sales Order Transactions. Set permission levels, such as Full access or View Only access, for each object based on what you need your users to accomplish.
Token-Based Authentication
To use Token-Based Authentication, create an Integration in NetSuite with the following enabled:
- Token-Based Authentication —
- Token-Based Authentication
- TBA:Authorization Flow
- Callback URL — For the TIBCO Cloud™ Integration - Connect production environments, use https://online.scribesoft.com/OAuthAuthorizationResponse.aspx and for the Sandbox environment, use https://sandbox.scribesoft.com/OAuthAuthorizationResponse.aspx
- OAuth 2.0
- Authorization Code Grant
- Redirect URI — For the TIBCO Cloud™ Integration - Connect production environments, use https://online.scribesoft.com/OAuthAuthorizationResponse.aspx and for the Sandbox environment, use https://sandbox.scribesoft.com/OAuthAuthorizationResponse.aspx
- Scope — Enable Restlets and REST Web Services.
API Usage Limits
The NetSuite API limits each NetSuite account to a set number API connections or sessions based on the license purchased. If the number of sessions associated with your account is not high enough to sustain multiple connections to the API, TIBCO Cloud™ Integration - Connect apps can fail if other calls are made to the NetSuite API using the same account.
The authentication type and API version configured in the Connection dialog affect whether or not the Connector can access the maximum number of concurrent sessions configured for a NetSuite account as follows:
- User Credentials — Can only be used for a maximum of one concurrent session. For this authentication type, NetSuite does not support using the maximumconcurrentsessions connection property to increase the number of concurrent sessions.
- Token Based Authentication —
- If you have configured NetSuite API version 2020.1 or higher in the Connection dialog, the Connector uses the Concurrency Limit from the NetSuite Integration associated with the Connection.
- If you have configured a NetSuite API version lower than 2020.1 in the Connection dialog, the Connector cannot determine the Concurrency Limit from the NetSuite Integration associated with the Connection. A default value of three is used. You can override the default by setting a value for the maximumconcurrentsessions connection property in the Additional Parameters field on the Connection dialog.
- NetSuite allows up to 25 active access tokens per user. If you exceed 25, you may receive a 400 Bad Request error. To resolve this issue, revoke older unneeded access tokens in NetSuite.
When running a TIBCO Cloud™ Integration - Connect app that uses a NetSuite (CData) Connection, any one of the following actions also makes a Connection to the NetSuite API and may cause the running app to fail:
- Running another app that connects to NetSuite using the same account.
- Debugging a flow that connects to NetSuite.
- Creating more than one NetSuite (CData) Connection using the same account.
- Selecting OK on the Edit Connection dialog for your NetSuite (CData) Connection.
- Testing the NetSuite (CData) Connection.
- Refreshing metadata for NetSuite (CData).
- Retrieving metadata for a new flow that connects to NetSuite.
Some options to prevent your NetSuite (CData) apps from failing include:
- Upgrading your NetSuite account to allow more Concurrent User Sessions.
- Choosing an authentication type and API version that allow the Connector to determine the number of concurrent sessions configured for your account.
- Pausing NetSuite (CData) apps when you need to do other work that connects to NetSuite.
- Using a single app that contains all of your NetSuite (CData) flows, so they never execute at the same time.
- Scheduling apps to run at staggered intervals to prevent them from trying to access the API at the same time.
For more details see The NetSuite Help Center. To open the Help Center, log in to NetSuite and click the Help link in the upper right corner.
Selecting An Agent Type For NetSuite (CData)
Refer to TIBCO Cloud™ Integration - Connect Agents for information on available agent types and how to select the best agent for your app.
Connecting To NetSuite
- Select Connections from the menu.
- From the Connections page select Create
 to open the Create a connection dialog.
 - Select the Connector from
the list to open the Connection dialog, and then enter the following information for this Connection:
- Name — This can be any meaningful name, up to 25 characters.
- Alias — An alias for this Connection name. The alias is generated from the Connection name, and can be up to 25 characters. The Connection alias can include letters, numbers, and underscores. Spaces and special characters are not accepted. You can change the alias. For more information, see Connection Alias.
- Select and configure an Authentication Type for this Connection.
- User Credentials —
- AccountID — NetSuite Account ID found in NetSuite under Setup > Company > Company Information.
Example: TSTDRV1167940
- User — User associated with the Web Service role. Required for the User Credentials Authentication Type.
- Password — Password for the Web Service role User. Required for the User Credentials Authentication Type.
- RoleID — Optional. ID of the Web Services role used in the current session, if the Web Services role is not the default for the user.
- Api Version — Select the version of the NetSuite API to access from the list of supported versions. Setting the version of the API using Additional Parameters overrides this setting.
- AccountID — NetSuite Account ID found in NetSuite under Setup > Company > Company Information.
- Token-Based Auth (TBA) —
- AccountID — NetSuite Account ID found in NetSuite under Setup > Company > Company Information.
Example: TSTDRV1167940
- Client ID — Consumer Key displayed on the Confirmation page when an Integration record is created in NetSuite for Token Based Authentication. Note: This Key is displayed only once when the Integration is created.
- Client Secret — Consumer Secret displayed on the Confirmation page when an Integration record is created in NetSuite for Token Based Authentication. Note: This Secret is displayed only once when the Integration is created.
- RoleID — Optional. ID of the Web Services role used in the current session, if the Web Services role is not the default for the user.
- Api Version — Select the version of the NetSuite API to access from the list of supported versions. Setting the version of the API using Additional Parameters overrides this setting.
- Authenticate — When the Connection configuration is complete, including the Additional Parameters section, use the Authenticate button to authenticate with NetSuite. If you are not logged into NetSuite, you are asked to log in. A NetSuite permissions dialog displays. To continue the authentication process select Allow, which allows TIBCO Cloud™ Integration - Connect to access your NetSuite data. Select Close on the confirmation dialog.
Tip: Do not test the Connection until the message at the top of the Connection dialog reads Authentication complete. Note that it may take a few minutes for this message to display. - AccountID — NetSuite Account ID found in NetSuite under Setup > Company > Company Information.
- User Credentials —
- Additional Parameters — Optional field where you can specify one or more connection string parameters. See the Connection String Options section of the CData documentation for a list of parameters that can be used and their default values. Note that in some cases the CData ADO.NET Provider For NetSuite does not fully support all of the possible parameters.
Syntax for the Additional Parameters field is as follows:
- All blank characters, except those within a value or within quotation marks, are ignored
- Preceding and trailing spaces are ignored unless enclosed in single or double quotes, such as Keyword=" value"
- Semicolons (;) within a value must be delimited by quotation marks
- Use a single quote (') if the value begins with a double quote (")
- Use a double quote (") if the value begins with a single quote (')
- Parameters are case-insensitive
- If a KEYWORD=VALUE pair occurs more than once in the connection string, the value associated with the last occurrence is used
- If a keyword contains an equal sign (=), it must be preceded by an additional equal sign to indicate that the equal sign is part of the keyword
- The Parameters listed below default to true. If you see any permissions errors associated with these Parameters, they can be set to false using the Additional Parameters field.
- Include Child Tables
- Include Custom Field Columns
- Include Custom List Tables
- Include Custom Record Tables
- Parameters that are handled by other fields or default settings in the Connection dialog are ignored if used in the Additional Parameters field, including:
- AccountID
- User
- Password
- RoleID
- Logfile — To enable logging enter a value for the verbosity parameter in the Additional Parameters field. The default log file size is a maximum of 10MB. When the log file reaches 10MB a new log file is started, up to a maximum of five files. Once there are five files, the oldest file is deleted as needed. Any CData log files generated by this setting are stored in the default Connect on-premise Agent Logs directory, C:\Program Files (x86)\Scribe Software\TIBCO Scribe® Online Agent\logs\.
- MaxLogFileCount — This parameter is set by the Connector to a maximum of five files.
- MaxLogFileSize — This parameter is set by the Connector to a maximum of 10MB.
- Other
- RTK
- UseConnectionPooling
- Select Test to ensure that the agent can connect to your database. Be sure to test the Connection against all agents that use this Connection. See Testing Connections.
- Select OK/Save to save the Connection.
Metadata Notes
Naming
Connection metadata must have unique entity, relationship, and field names. If your Connection metadata has duplicate names, review the source system to determine if the duplicates can be renamed.
NetSuite (CData) Connector As An App Source
Consider the following when using the NetSuite (CData) Connector as an app source.
- Hierarchical data is not supported.
- Relationships are not supported.
Query
Date and DateTime fields are in DateTime format. NetSuite returns dates offset based on your user timezone preferences. This applies only to Dates, and not to Datetimes, which are always returned the same way no matter your preferences. See User Timezone Offset in the CData documentation.
Net Change
When a datetime is configured on the Query block on the Block Properties Net Change Tab to query for new and updated records, that configuration is treated as an additional filter. The Net Change datetime filter is applied as an AND after any other filters specified on the Block Properties Filter Tab. TIBCO Cloud™ Integration - Connect builds a query combining both the Net Change filter and the filters on the Filter tab. See Net Change And Filters for an example.
Some Connectors for TIBCO Cloud™ Integration - Connect only support one filter. For those Connectors you can use either Net Change or one filter on the Filter tab, not both.
Filtering
- Filtering support varies by entity. For additional details, see the Data Model section of the CData documentation .
- Filtering by custom fields is supported.
- Filtering by NULL is not supported
- In some child tables all filter operator on boolean fields interpret as equal, this is an issue in NetSuite WebApi search.
Native Query
The NetSuite (CData) Connector supports SQL queries in Native Query Blocks to create customized queries for NetSuite. You can use SELECT, UPDATE, and INSERT clauses. With enabled support for Enhanced SQL it is also possible to use JOINs and Aggregate Functions. See the SQL Compliance section of the CData documentation.
After entering the SQL query, you must select Test to validate the query. Invalid queries are not accepted by the Connector. See Native Query Block and Creating Native Queries For Microsoft SQL Server for additional information.
When testing a Native Query in a flow, if the source datastore does not return any data, TIBCO Cloud™ Integration - Connect cannot build the schema for the underlying metadata and the flow cannot be saved. To allow TIBCO Cloud™ Integration - Connect to build the schema, do the following:
- Create a single temporary record in the source datastore that matches the Native Query.
- Test the Native Query and ensure that it is successful.
- Save the flow.
- Remove the temporary record from the source datastore.
NetSuite RESTlets
RESTlets allow you to create custom endpoints in NetSuite and call them from another application. The NetSuite (CData) supports using RESTlets to query NetSuite data.
RESTlet Configuration
- Open the restlet_search_script.js file and save it in an easily accessible location. This file is used when configuring RESTlets in NetSuite.
- Follow the instructions in the CData RESTlets documentation for configuring RESTlets in NetSuite. When the instructions ask you to upload the SuiteScript file, use the restlet_search_script.js file. Ignore any sections that do not pertain directly to the NetSuite user interface, such as sections about Authentication, creating a Schema, and executing the RESTlet. Those portions of the instructions are handled by the Connector or a flow in TIBCO Cloud™ Integration - Connect.
- In TIBCO Cloud™ Integration - Connect, configure a temporary flow with a Query block that is filtered to return only one record and an Execute block that executes the CreateRestletSchema stored procedure to create a schema for your RESTlet, as follows:
- Add a new app and flow.
- In the flow designer, add the NetSuite (CData) Connection.
- Drag the NetSuite (CData) Query block onto the flow.
- Configure the Query block with an entity, such as Customer, and use the Filters tab to filter the query so that it only returns one record. For example, you could filter by Email and enter the value for a single customer email address.
- Add a For Each Result block with an Execute block inside.
- Configure the Execute block with the CreateRestletSchema stored procedure in the Entity field on the Block Properties General tab.
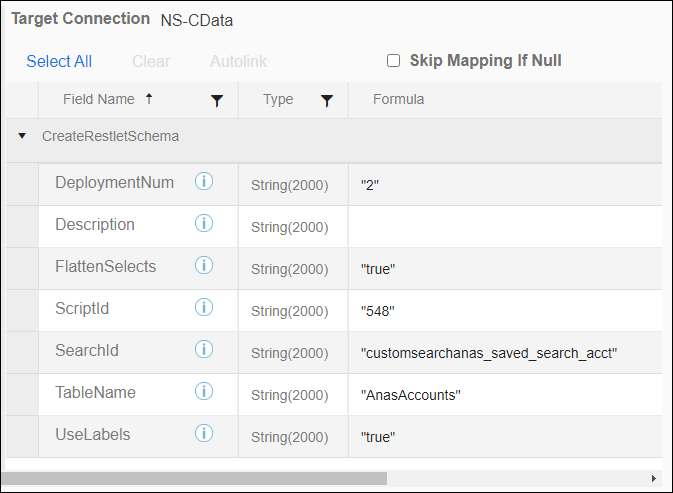
- On the Execute block Fields tab, configure the following target fields. See CreateRestletSchema in the CData documentation for additional details.
- DeploymentNum — Deployment number of the RESTlet schema. The default value is 1. To determine the number for your deployment, in NetSuite go to Customization > Scripting> Script Deployments and open the deployment you created. The Deployment number is included in the External URL, next to deploy=.
- FlattenSelects — Configure this field as "true" for best results.
- ScriptId — ScriptId of the NetSuite RESTlet that is the basis for the schema. To find the ScriptId, in NetSuite go to Customization > Scripting> Script Deployments and open the deployment you created. The ScriptId is included in the External URL, next to script=.
- SearchId — ID of the NetSuite search to use as displayed in the NetSuite (CData) UI. To find the SearchId, in NetSuite go to Lists > Search > Saved Searches and locate the Search you created. The SearchId is in the ID column in the list of Searches in a format similar to customsearch713.
- TableName — User-defined name for the schema created by this block. Stored as an .rsd file.
- UseLabels — This field is optional. Default value is true. Indicates whether or not to use labels for column names.

- Save the Execute block.
- Save the flow.
- Run the flow to generate the RESTlet schema file. An.rsd file with the name specified in the Table Name field of the Execute block is generated and saved in the SuiteTalk folder under the NetSuite (CData) Connector folder in the agent directory. The default installation directory for the Connect on-premise agent is C:\Program Files (x86)\Scribe Software\TIBCO Scribe® Online Agent\. Remember to disable the flow once it has run successfully. You should not need to run it again, unless the schema is removed.
- Reset metadata for the NetSuite (CData) Connection to retrieve the new schema and make it available in the metadata. See Resetting Metadata.
- You can now use this schema in a different flow by selecting the Table Name configured in the Execute block as a source entity in a Query, Lookup, or Fetch block.
RESTlet Notes
- RESTlets become invalid and TIBCO Cloud™ Integration - Connect generates errors, if any of the following configuration items are removed from NetSuite.
- Deploy
- Script
- Saved Search
If any of these artifacts have been removed from NetSuite, reset metadata for the NetSuite (CData) Connection. When metadata is reset TIBCO Cloud™ Integration - Connect validates the RESTlets and removes the associated RESTlet schemas for those that are invalid. You must configure a new RESTlet to use in TIBCO Cloud™ Integration - Connect.
- Each RESTlet is associated with the NetSuite (CData) Connection used to create it. To access a RESTlet schema in a flow, you must add the Connection used to create that schema. If you switch to a different NetSuite (CData) Connection, the RESTlet is not shown in the metadata for that second Connection. Follow the configuration instructions to create a new RESTlet for your second NetSuite (CData) Connection.
NetSuite (CData) Connector As An App Target
Consider the following when using the NetSuite (CData) Connector as an app target.
- Supports Create, Update, and Delete.
- For Update and Delete, if more than one record matches the match criteria, an error is generated.
- Batch processing is not supported.
- Required fields are not marked in bold on the Field mapping tab of the target operation Blocks.
Record Matching By Record ID
When a record is created or updated the ID for that record is not being returned to TIBCO Cloud™ Integration - Connect in the target operation results making it unavailable for use later. For example, in many cases users update the source record with the record ID of the target record for future record matching. Without access to the record ID, you may need to match using a unique value other than ID. If there is no other unique value, you can work around the issue as follows:
- Create a custom field in the source data for the entity, such as ExternalID that is populated with either the NetSuite record ID or some other unique value. Use a Lookup Block in your flow to find the NetSuite record ID and return it to update the source record. Then, use that ExternalID field for record matching.
- Create a custom field in NetSuite, such as ExternalID that is populated with the source record ID or some other unique value. Use that ExternalID field for record matching.
See Result Fields for more information on operation results and Lookup Block for more information on looking up data.
Notes On Standard Entities
- Supports custom fields.
Address
- Supports Query only.
- Does not support target operations.
- Addresses are created and updated through the Customer and Contact entities using the CustomeraddressbookList and Contact_addressbookList entities.
Customer_addressbookList And Contact_addressbookList
InternalId — The InternalId field on a Customer_addressbookList or Contact_addressbookList record corresponds to the associated Customer or Contact. The addressbookList_InternalId is the unique identifier for a specific address. Neither the InternalId nor the addressbookListInternalId is available in the operation results for the Create Block. See Record Matching By Record ID for more information.
- Create —
- If no InternalId is specified, a new Customer or Contact record and an address record are created. In addition to address information, basic Customer or Contact information is also created.
- If an InternalId is specified, a new address record is added to an existing Customer or Contact record.
- Delete — Deleting a Customer_addressbookList or Contact_addressbookList record does not delete the corresponding Customer or Contact.
If you delete a Customer or Contact Entity record, all corresponding addressbookList records are deleted.
Invoice_itemList
The Invoice_itemList and Invoices entities function in a similar fashion to the SalesOrder_itemList entity.
SalesOrder_itemList
InternalId — The InternalId field on a SalesOrder_itemList record corresponds to the associated SalesOrder. The ItemList_LineUniqueKey is the unique identifier for a specific line item. A combination of the InternalId and the ItemList_LineUniqueKey can be used to identify a specific line item in a SalesOrder. Neither the InternalId nor the ItemList_LineUniqueKey is available in the operation results for the Create Block. See Record Matching By Record ID for more information.
- Create —
- If no InternalId is specified, a new SalesOrder record and the first SalesOrder_itemList record are created. In addition to line item information, basic SalesOrder information is also created.
- If an InternalId is specified, a SalesOrder_itemList record is added to an existing SalesOrder record.
- Delete — Deleting a SalesOrder_itemList record does not delete the corresponding SalesOrder.
If you delete a SalesOrder record, all corresponding SalesOrder_itemList records are deleted.
TIBCO Cloud™ Integration - Connect API Considerations
To create connections with the TIBCO Cloud™ Integration - Connect API, the NetSuite (CData) Connector requires the following information:
|
Connector Name |
NetSuite (CData) |
|
Connector ID |
07494989-1380-4F86-A9FD-B125D24E9849 |
TIBCO Cloud™ Integration - Connect Connection Properties
In addition, this Connector uses the Connection properties shown in the following table.
| Name | Data Type | Required | Secured | Usage |
|---|---|---|---|---|
| AuthType |
String |
Yes |
No |
|
| AccountId |
String |
Yes |
No |
|
| User |
String |
Yes |
No |
|
| Password |
String |
Yes |
Yes |
|
| RoleId |
String |
No |
No |
|
| ConnectionString |
String |
Yes |
No |
Property is required in the Connection model but specifying a value is not required. |
|
Version |
String |
Yes |
No |
Add a supported NetSuite API version, such as 2019.2. |
License Agreement
The TIBCO End User License Agreement for the NetSuite (CData) Connector describes TIBCO and your legal obligations and requirements. TIBCO suggests that you read the End User License Agreement.
More Information
For additional information on this Connector, refer to the Knowledge Base and Discussions in the TIBCO Community.