TIBCO Scribe® Online Connector For Microsoft Dynamics 365 / CRM
Use the TIBCO Scribe® Online Connector for Microsoft Dynamics 365 / CRM to work with Microsoft Dynamics 365 Sales, Customer Service, Field Service and Project Service modules as well as Microsoft Dynamics CRM. It supports custom fields and custom entities, relationships between entities, and supports Microsoft Dynamics 365 API’s bulk load method for higher performance. Use the Connector to automate resource-intensive processes like sales order processing and quote approvals or to automate your prospect to lead conversion between your marketing applications.
Connector Specifications
| Supported | |
|---|---|
|
Agent Types |
|
| Connect on-premise | X |
| Connect cloud | X |
|
Data Replication Apps |
|
| Source | X |
| Target | |
|
On Schedule Apps |
|
| Source | X |
| Target | X |
|
On Event Apps |
|
| Source | X |
| Target | X |
|
Flows |
|
| Integration | X |
| Request-Reply | X |
| Message | |
Setup Considerations
Microsoft Dynamics 365 Or Microsoft Dynamics CRM Versions
This Connector requires a Microsoft Dynamics 365 or Microsoft Dynamics CRM Organization with one of the following versions of Microsoft Dynamics 365 or Microsoft Dynamics CRM:
- Microsoft Dynamics 365
- Microsoft Dynamics CRM On-premise 2011 and higher
- Partner-Hosted (IFD) Microsoft Dynamics CRM
If your company is considering adding Microsoft Dynamics 365 to use with TIBCO Cloud™ Integration - Connect, you can obtain a Microsoft Dynamics 365 trial version. For more information about Microsoft Dynamics 365, talk to your Microsoft reseller or see the Microsoft Dynamics 365 website at https://www.microsoft.com/en-us/dynamics365/what-is-crm.
Permissions
Your Microsoft Dynamics 365 account must have appropriate permissions to allow TIBCO Cloud™ Integration - Connect to perform Create, Read, Update, Delete, and Batch or non-Batch operations. Contact your Microsoft Dynamics 365 administrator for assistance.
Run As User
Microsoft Dynamics 365 provides the ability for a user to perform all operations as if a different user were performing them. In the Connection, this alternate user is the Run As User. The user named in the User ID field is the "login user".
Assume that as the login user, you have administrator credentials, but you set the Run As User to be a salesperson. You then run an app that imports contacts. In this case, all the contacts appear to have been entered by the Run As User. In addition, all operations run in the context of the roles and privileges held by the Run As User.
Selecting An Agent Type For Microsoft Dynamics 365
Refer to TIBCO Cloud™ Integration - Connect Agents for information on available agent types and how to select the best agent for your app.
Connecting To Microsoft Dynamics 365
Deployment Types
There are three deployment types for the Microsoft Dynamics 365 Connector that provide different authentication methods. Follow the link for the deployment type you plan to use for step-by-step configuration instructions:
- On-Premise — Select if you are accessing a local version of Microsoft Dynamics 365.
- Connection String — Select to create custom Connection Strings for specific authentication types, including:
- AD
- Partner Hosted (IFD)
- Client Secret
- Certificate
- Office 365
- Azure AD — Select to use OAuth authentication with Active Directory.
The following deployment types will be removed in a future release.
- OnlineNote: Use of regional discovery services is being retired by Microsoft in the very near future. This means that the Online Deployment option will no longer work. In addition, Microsoft has announced that it will retire the use of Office 365 credentials in April 2022. See this Microsoft Notification. Best practice is to use Azure AD instead. See Azure AD for step-by-step connection instructions. The Online option will be removed from the User Interface in a future release.
- Partner-Hosted (IFD)Note: Microsoft is deprecating WS-Trust. This means that the Partner-Hosted (IFD) deployment option will no longer work. See this Microsoft Notification. Best practice is to move to the Connection String deployment type before April 2022. The Partner-Hosted (IFD) option will be removed from the User Interface in a future release.
On-Premise
- Select Connections from the menu.
- From the Connections page select Create
 to open the Create a connection dialog.
 - Select the Connector from
the list to open the Connection dialog, and then enter the following information for this Connection:
- Name — This can be any meaningful name, up to 25 characters.
- Alias — An alias for this Connection name. The alias is generated from the Connection name, and can be up to 25 characters. The Connection alias can include letters, numbers, and underscores. Spaces and special characters are not accepted. You can change the alias. For more information, see Connection Alias.
- Deployment — Select On-Premise if your site uses an on-premise version ofMicrosoft Dynamics CRM.Note: On-Premise Connections only work with a Connect cloud agent if the on-premise endpoint is public.
When you select the Dynamics CRM deployment, TIBCO Cloud™ Integration - Connect displays the appropriate Connection parameters.
- URL — The URL (web address) for your Microsoft Dynamics 365 instance.
- Organization — The Microsoft Dynamics 365 or Microsoft Dynamics CRM Organization you want to access. You can use either the friendly name or the unique name. Names are case-sensitive, therefore a best practice is to copy the name from your Microsoft Dynamics CRM instance and paste it into the Connection dialog. Note: The Microsoft Dynamics 365-friendly Organization name is the Organization name that appears in the upper right hand corner of Dynamics 365.
- User ID/Password — Your fully qualified Microsoft Dynamics User ID including the domain name in the format Domain\UserID and password.
Note: For On-Premise Authentication, if the login user is not a member of the Active Directory
PrivUserGroupunder the organization where Dynamics CRM is installed, the following error occurs when the app runs:Not enough privilege to access the Microsoft CRM object or perform the requested operation. - Run As User ID — Optionally, specify the valid User ID of a user to serve as the Run As User.
- Maximum Batch Size — Maximum number of records to include in a single call to the Microsoft Dynamics 365 API when Batch Processing is enabled for a target operation. Default is 500, minimum is 1, and maximum is 1000. Setting to 0 disables the Test button. Setting to a value higher than 1000 defaults to 1000, but continues to display the higher number.Note: Receiving Timeout errors is an indication that the number of records per call has exceeded the default setting for your Microsoft Dynamics 365 Organization and you should decrease this number.
Modifying or requesting modification of the default setting by Microsoft or your hosting partner may allow for a higher value. See the following Microsoft Knowledge Base Article: Service Protection API Limits and the Microsoft D365 CRM/CE request limits/allocations and API Limits article in the TIBCO Knowledge Base.
- Maximum Batch Threads — Number of simultaneous calls to the Microsoft Dynamics 365 API when Batch Processing is enabled for a target operation, such as Delete. Default is 2, minimum is 1, and maximum is 32. Setting to 0 disables the Test button. Setting to a value higher than 32 defaults to 32, but continues to display the higher number.Note: Receiving any of the following errors, is an indication that the number of calls or threads has exceeded the default setting for your Microsoft Dynamics 365 Organization and you should decrease this number.
- Server busy
- The following error has occurred in the Dynamics 365 Connector: System.ObjectDisposedException: Cannot access a disposed object.
- Generic SQL errors
Modifying or requesting modification of the default setting by Microsoft or your hosting partner may allow for a higher value. See the following Microsoft Knowledge Base Article: Service Protection API Limits and the Microsoft D365 CRM/CE request limits/allocations and API Limits article in the TIBCO Knowledge Base.
- Include Picklist Display Names select this option if you want to include the display names for any picklist, status, or state fields that you are replicating. When the entity is recreated, TIBCO Cloud™ Integration - Connect adds a new field in the format fieldname _displayname for each qualifying field, where _displayname is the text description rather than the numeric value.
See Picklists below for more information.
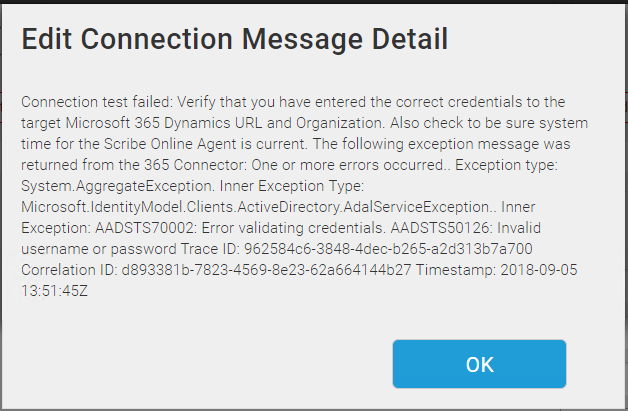
- Select Test to ensure that the agent can connect to your database. Be sure to test the Connection against all agents that use this Connection. See Testing Connections. If the Test fails, an error similar to the following is displayed. Correct the issue outlined in the error and try the test again.

- Select OK/Save to save the Connection.
Connection String
- Select Connections from the menu.
- From the Connections page select Create to open the Create a connection dialog.
- Select the Connector from
the list to open the Connection dialog, and then enter the following information for this Connection:
- Name — This can be any meaningful name, up to 25 characters.
- Alias — An alias for this Connection name. The alias is generated from the Connection name, and can be up to 25 characters. The Connection alias can include letters, numbers, and underscores. Spaces and special characters are not accepted. You can change the alias. For more information, see Connection Alias.
- Deployment — Select Connection String. When you select a Dynamics CRM deployment, TIBCO Cloud™ Integration - Connect displays the appropriate Connection parameters.
- Authentication Type — When using Connection String as your Deployment type, you must select an Authentication Type. The subsequent fields on the Connection dialog change based on the type selected. Types include:
- AD
- IFD
- ClientSecret
- Certificate
- Office 365
- URL — The URL (web address) for your Microsoft Dynamics 365 instance. This URL varies depending on the type of authentication selected.
- AD — Use either the discovery server URL with the Skip Discovery checkbox disabled or the organization server URL with the Skip Discovery checkbox enabled.
- Domain — Applies only to AD and IFD authentication. Enter your Microsoft Dynamics 365 domain.
- User ID/Password — User ID and password requirements vary depending on the authentication type selected.
- AD — Your fully qualified Microsoft Dynamics User ID including the domain name in the format Domain\UserID and password.
Note: For On-Premise Authentication, if the login user is not a member of the Active Directory
PrivUserGroupunder the organization where Dynamics CRM is installed, the following error occurs when the app runs:Not enough privilege to access the Microsoft CRM object or perform the requested operation. - Office 365 — A valid Windows Live ID or Office 365 user ID and password.
- AD — Your fully qualified Microsoft Dynamics User ID including the domain name in the format Domain\UserID and password.
- Home Realm URL — Applies only to IFD authentication. The URL of your third party authentication server used when Partner-Hosted IFD is selected as the Authentication type and third party authentication is required.
-
Client ID — Applies only to ClientSecret and Certificate authentication. Enter the Client ID, also known as the Application ID, generated when you registered the Azure Active Directory (AAD) App.
-
Client Secret — Applies only to ClientSecret authentication. Enter the Client Secret generated when you registered the Azure Active Directory (AAD) App.
-
Thumbprint — Applies only to Certificate authentication. Enter the thumbprint for the certificate associated with your Microsoft Dynamics 365 installation.
- Skip Discovery — If enabled, the Connector does not use the Discovery Service. Provide your Organization server URL instead. If disabled, provide the Discovery URL. In some cases these may be the same URL.
- Run As User ID — Optionally, specify the valid User ID of a user to serve as the Run As User.
- Maximum Batch Size — Maximum number of records to include in a single call to the Microsoft Dynamics 365 API when Batch Processing is enabled for a target operation. Default is 500, minimum is 1, and maximum is 1000. Setting to 0 disables the Test button. Setting to a value higher than 1000 defaults to 1000, but continues to display the higher number.Note: Receiving Timeout errors is an indication that the number of records per call has exceeded the default setting for your Microsoft Dynamics 365 Organization and you should decrease this number.
Modifying or requesting modification of the default setting by Microsoft or your hosting partner may allow for a higher value. See the following Microsoft Knowledge Base Article: Service Protection API Limits and the Microsoft D365 CRM/CE request limits/allocations and API Limits article in the TIBCO Knowledge Base.
- Maximum Batch Threads — Number of simultaneous calls to the Microsoft Dynamics 365 API when Batch Processing is enabled for a target operation, such as Delete. Default is 2, minimum is 1, and maximum is 32. Setting to 0 disables the Test button. Setting to a value higher than 32 defaults to 32, but continues to display the higher number.Note: Receiving any of the following errors, is an indication that the number of calls or threads has exceeded the default setting for your Microsoft Dynamics 365 Organization and you should decrease this number.
- Server busy
- The following error has occurred in the Dynamics 365 Connector: System.ObjectDisposedException: Cannot access a disposed object.
- Generic SQL errors
Modifying or requesting modification of the default setting by Microsoft or your hosting partner may allow for a higher value. See the following Microsoft Knowledge Base Article: Service Protection API Limits and the Microsoft D365 CRM/CE request limits/allocations and API Limits article in the TIBCO Knowledge Base.
- Include Picklist Display Names select this option if you want to include the display names for any picklist, status, or state fields that you are replicating. When the entity is recreated, TIBCO Cloud™ Integration - Connect adds a new field in the format fieldname _displayname for each qualifying field, where _displayname is the text description rather than the numeric value.
See Picklists below for more information.
- Select Test to ensure that the agent can connect to your database. Be sure to test the Connection against all agents that use this Connection. See Testing Connections. If the Test fails, an error similar to the following is displayed. Correct the issue outlined in the error and try the test again.
- Select OK/Save to save the Connection.
Azure AD
The Microsoft Dynamics 365 Connector supports connecting to your Microsoft Dynamics 365 instance using Azure AD authentication. This authentication method requires a different configuration when you establish a connection from TIBCO Cloud™ Integration - Connect.
- In Microsoft Dynamics 365 make sure that you are an Admin user.
- In TIBCO Cloud™ Integration - Connect, select Connections and then select Create .
- Select the Microsoft Dynamics 365 / CRM Connector to open the Connection dialog.
- Enter a Connection Name and an Alias.
- In the Deployment field select Azure AD.
- In the D365 Instance URL field, enter the URL for your Microsoft Dynamics 365 instance. Example: https://<yourcompany>.crm.dynamics.com Note: The D365 Instance URL is case sensitive when testing the Connection, but not when authenticating. Best practice is to copy the URL from your Microsoft Dynamics 365 instance and paste it into the Connection dialog.
- Select the Authenticate button. This launches a new browser tab with a Sign in page. Enter your Sign in information and select Next.
- On the Password dialog, enter your password and select Sign In.
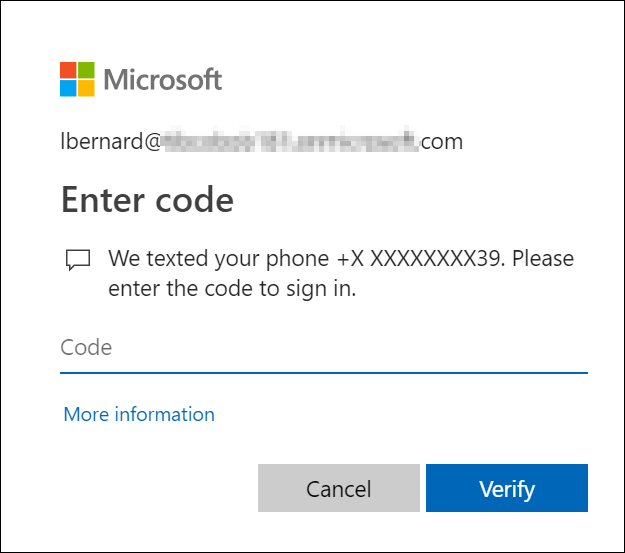
- If you have enabled multi-factor authentication in your Microsoft Dynamics 365 Organization, the Enter code dialog displays. Enter the code you received and select Verify.
- A permissions page is displayed.

- Select Accept to grant permission for TIBCO Cloud™ Integration - Connect to access this instance Microsoft Dynamics 365. The Success page is displayed.

- On the Success page select Close. This returns you to TIBCO Cloud™ Integration - Connect.
- Organization — The Microsoft Dynamics 365 or Microsoft Dynamics CRM Organization you want to access. You can use either the friendly name or the unique name. Names are case-sensitive, therefore a best practice is to copy the name from your Microsoft Dynamics CRM instance and paste it into the Connection dialog. Note: The Microsoft Dynamics 365-friendly Organization name is the Organization name that appears in the upper right hand corner of Dynamics 365.
- Maximum Batch Size — Maximum number of records to include in a single call to the Microsoft Dynamics 365 API when Batch Processing is enabled for a target operation. Default is 500, minimum is 1, and maximum is 1000. Setting to 0 disables the Test button. Setting to a value higher than 1000 defaults to 1000, but continues to display the higher number.Note: Receiving Timeout errors is an indication that the number of records per call has exceeded the default setting for your Microsoft Dynamics 365 Organization and you should decrease this number.
Modifying or requesting modification of the default setting by Microsoft or your hosting partner may allow for a higher value. See the following Microsoft Knowledge Base Article: Service Protection API Limits and the Microsoft D365 CRM/CE request limits/allocations and API Limits article in the TIBCO Knowledge Base.
- Maximum Batch Threads — Number of simultaneous calls to the Microsoft Dynamics 365 API when Batch Processing is enabled for a target operation, such as Delete. Default is 2, minimum is 1, and maximum is 32. Setting to 0 disables the Test button. Setting to a value higher than 32 defaults to 32, but continues to display the higher number.Note: Receiving any of the following errors, is an indication that the number of calls or threads has exceeded the default setting for your Microsoft Dynamics 365 Organization and you should decrease this number.
- Server busy
- The following error has occurred in the Dynamics 365 Connector: System.ObjectDisposedException: Cannot access a disposed object.
- Generic SQL errors
Modifying or requesting modification of the default setting by Microsoft or your hosting partner may allow for a higher value. See the following Microsoft Knowledge Base Article: Service Protection API Limits and the Microsoft D365 CRM/CE request limits/allocations and API Limits article in the TIBCO Knowledge Base.
- Include Picklist Display Names select this option if you want to include the display names for any picklist, status, or state fields that you are replicating. When the entity is recreated, TIBCO Cloud™ Integration - Connect adds a new field in the format fieldname _displayname for each qualifying field, where _displayname is the text description rather than the numeric value.
See Picklists below for more information.
- Select Test to ensure that the agent can connect to your database. Be sure to test the Connection against all agents that use this Connection. See Testing Connections. If the Test fails, you must reauthenticate. Correct the issue outlined in the error and try the test again.Note: The D365 Instance URL is case sensitive when testing the Connection, but not when authenticating. If the test fails, check the case on the Dynamics Instance URL to make sure it is correct.
- Select OK/Save to save the Connection.


Azure AD Best Practices
If you authenticate using Azure AD, there are some timing issues to take into consideration to prevent errors.
- Avoid re-authenticating an Azure AD connection while running an app using the connection. There is a narrow window where this could cause the app to fail and may generate an exception similar to the following:
Authorization Code already Redeemed
- Avoid re-authenticating an Azure AD connection while resetting metadata or when metadata is being loaded in an app or flow. There is a narrow window where this could result in an exception similar to the following:
Key not found Exception
- Avoid hitting Cancel on the Connection dialog after successfully testing a connection: Due to the nature of this authentication type, testing credentials modifies the credentials whether you cancel or not.
Metadata Notes
Filter, Match Criteria, Lookup, And Target Operations
Leading and trailing spaces in string field values are trimmed when used in a filter, matching criteria, or lookup criteria, or when writing those values during target operations, such as Create or Update.
Naming
Connection metadata must have unique entity, relationship, and field names. If your Connection metadata has duplicate names, review the source system to determine if the duplicates can be renamed.
Custom Decimal Fields
When adding custom decimal fields to entities in Microsoft Dynamics 365 with a precision of 0, the precision is not being honored.
Picklists
In Microsoft Dynamics 365, some fields are generated via a picklist. Picklists include both a text value that displays in Microsoft Dynamics 365 and an internal code. By default, TIBCO Cloud™ Integration - Connect uses the text value when running an app. However, you can choose to exclude the text value that displays in the Microsoft Dynamics 365 interface by disabling the Include Picklist Display Names option in the Microsoft Dynamics 365 Connection configuration. When this option is enabled, an additional field is created in your Microsoft Dynamics 365 datastore to contain the text value.
For example, if you have a picklist field, shippingmethod, where the picklist values include available shipping methods of DHL, FedEx, UPS, or USPS, and the Include Picklist Display Names option is enabled, both the picklist value and the picklist_displayname columns display for that entity in the database, as shown:
| Picklist value | shippingmethod _displayname |
|---|---|
|
1 |
DHL |
|
2 |
FedEx |
|
3 |
UPS |
|
4 |
USPS |
Including Picklist Display Names
When you create a new Microsoft Dynamics 365 Connection, the Include Picklist Display Names option is selected by default. Picklist, state, and status fields include a _displayname column. You can choose to include or exclude the _displayname by editing the Connection.
- From the Connections page, edit the Microsoft Dynamics 365 Connection you want to change.
- Select Include Picklist Display Names.
To exclude the _displayname, make sure this option is not selected.
- Select Test and then select OK to save the changes to the Connection.
Changing Picklist Entities
When you make changes in Microsoft Dynamics 365 to entities with picklists, the source and target are affected as follows:
- If you add a new picklist value for a particular entity definition, the new value is added to the target the next time the app runs.
- If you delete an existing picklist value for a particular entity definition, no change is made in the target. Existing records in the target datastore still have the deleted value or code/display name.
- If you update the definition of an existing picklist value, the change is made the next time the app runs only if:
- New records are added in Microsoft Dynamics 365 that include the picklist value.
- Another field in that record is updated.
Existing records with no changes display the new updated display name in the Microsoft Dynamics 365 source; but the target data contains the old display name.
- New picklist custom fields are automatically included in subsequent runs of the app.
Using Picklists With Apps
When using picklist values with apps, because the display names are not actual fields in the source or target entity, the following caveats apply:
- Picklist display names are not available as Filters or Match Field criteria.
- You can map picklist display fields from a Microsoft Dynamics 365 source to any valid target field. However, you cannot map a source field to a picklist display field in the target.
Multi-Select Option Sets
Multi-select option sets are picklists that allow a Microsoft Dynamics 365 user to select more than one value for a picklist for a single record. For example, a multi-select option set named Countries Visited where the user could select one or more countries instead of a single country.
- Picklist display names are enabled or disabled on the Microsoft Dynamics 365 Connection dialog.
- Filtering and Match Criteria for multi-select values is not supported.
- When writing multi-select values to a target they must be formatted as a comma separated list of values.
- When querying records with multi-select values, values are returned as a comma separated list of values.
- Updating multi-select values on a record, overwrites existing values. To append new values to an existing record, use a Lookup Block to get the existing values and append the new values to the existing list.
- Picklist values are case sensitive.
- A combination of names and numeric picklist values can be used when mapping to a multi-select field.
Ignored Entities
The following entities are not available through the Microsoft Dynamics 365 / CRM Connector.
| Ignored Microsoft Dynamics 365 Entities | ||
|---|---|---|
|
applicationfile asyncoperation attributemap bulkoperation clientupdate constraintbasedgroup displaystring duplicaterule entitymap import importdata importfile importjob importlog importmap integrationstatus |
isvconfig mailmergetemplate metadatadifference new_scribechangehistory new_scribepublisherqueue pluginassembly plugintype plugintypestatistic relationshiprole report resourcespec resourcegroupexpansion savedquery savedqueryvisualization sdkmessage sdkmessagefilter |
sdkmessagepair sdkmessageprocessingstep sdkmessageprocessingstepimage sdkmessageprocessingstepsecureconfig sdkmessagerequest sdkmessagerequestfield vsdkmessageresponse sdkmessageresponsefield serviceendpoint solutioncomponent usersettings webwizard wizardaccessprivilege wizardpage workflow workflowlog |
Microsoft Dynamics 365 / CRM Connection As A Data Replication App Source
Microsoft Dynamics 365 can be used as a data source for Data replication apps. See Managing Data Replication Apps.
When using an on-premise version of Microsoft Dynamics 365 as a source, the Connector accesses the Microsoft Dynamics 365 backend SQL database via the Microsoft Dynamics 365 API. It does not access the database directly. The metadata returned from the Microsoft Dynamics 365 API is used by the target Connection to define the entities and fields on the target datastore. For example, if the target is a Microsoft SQL Server Server database, the Microsoft Dynamics 365 metadata is sent to the Microsoft SQL Server Connection and is used to create database tables and fields in SQL.
Recommended Entities
When you select the Recommended entities option in the Data replication app, TIBCO Cloud™ Integration - Connect replicates entities for which you have the appropriate permissions, including custom entities.
Entities In Recommended List
| Microsoft Dynamics 365 Entities Included In Recommended List | ||
|---|---|---|
|
account annotation appointment bookableresource bookableresourcebooking bookableresourcebookingheader bookableresourcecategory bookableresourcecategoryassn bookableresourcecharacteristic bookableresourcegroup bookingstatus businessunit businessunitnewsarticle calendar campaign campaignactivity campaignresponse cardtype category characteristic competitor competitoraddress connection connectionrole contact contract contractdetail customeraddress customeropportunityrole customerrelationship discount discounttype entitlement |
entitlementchannel entitlementcontacts entitlemententityallocationtypemapping entitlementproducts equipment fax feedback goal incident incidentresolution interactionforemail internaladdress invoice invoicedetail kbarticle knowledgearticle knowledgearticleviews lead leadaddress letter list mailbox metric opportunity opportunityclose opportunityproduct opportunitysalesprocess orderclose phonecall phonetocaseprocess position post pricelevel processsession |
product productpricelevel publisher publisheraddress quote quoteclose quotedetail recurringappointmentmaster reportcategory reportentity reportlink reportvisibility role salesliterature salesliteratureitem salesorder salesorderdetail service serviceappointment sharepointdocumentlocation sharepointsite site sla slaitem socialactivity socialprofile subject systemuser task territory topichistory topicmodel transactioncurrency uom uomschedule |
When you select either the Recommended entities or the Selected entities option in the Data replication app, the internal entities below are not included, but can be replicated if you use the Select All option.
Storage Guidelines For Data Replication
The amount of storage required to replicate to a Microsoft SQL Server Server database depends on the amount of data you are replicating. While TIBCO cannot provide precise numbers, the following examples may provide guidelines for you to determine your site's requirements:
- A Microsoft Dynamics 365 organization that contains only the default demo data shipped by Microsoft may use 50 MB.
- A Microsoft Dynamics 365 organization with 177 accounts and approximately 30,000 activity party records may use 95 MB.
- A Microsoft Dynamics 365 organization with approximately 64,000 accounts and 64,000 contacts may use 250-300 MB.
Net Change Filters
Data replication apps have Net Change filters enabled by default to replicate only new and updated records. The source Connector automatically chooses the datetime field to be used for the Last Modified Date for each table. When the Data replication app runs it selects new or updated source records based on that datetime field, and only replicates those records. In some cases, the datetime field does not contain milliseconds. To ensure that all records are replicated, the Connector subtracts one second from the most recent Last Modified Date, which could cause a small number of records to be reprocessed.
For example, if the last record written had a Last Modified Date of 09/04/2018 10:10:20, the next Replication starts with data that has a Last Modified Date of 09/04/2018 10:10:19. Any records that were already processed between 09/04/2018 10:10:19 and 09/04/2018 10:10:20 are processed again.
Deleted Records In Microsoft Dynamics 365
- When a record is deleted from the Dynamics 365 source:
- TIBCO Cloud™ Integration - Connect adds an entry to the scribechangehistory custom entity in Dynamics 365, which records the delete.
- The TIBCO Cloud™ Integration - Connect agent registers a plug-in assembly in Microsoft Dynamics 365 to publish these delete operations from the scribechangehistory custom entity into the Microsoft SQL Server Server database during replication.
Note: The Delete operation is asynchronous, and may not appear immediately.
- The next time the Data replication app runs, TIBCO Cloud™ Integration - Connect selects deleted records based on the datetime value in the scribechangehistory CreatedOn field. In the Microsoft SQL Server Server target database, TIBCO Cloud™ Integration - Connect creates an entry for that record in the Scribe_DeletedOn column that exists for every TIBCO Cloud™ Integration - Connect table in the Microsoft SQL Server Server database.
- Records in the scribechangehistory table are purged 60 days after the last modified date.
Deactivate ScribeChangeHistory plugins in Dynamics 365 for entities you are not replicating.
Replicated Entities
- TIBCO Cloud™ Integration - Connect does not replicate all entities. Replicated entities are chosen based on dependencies between entities and criteria such as, whether or not the entity has a Last Modified date. TIBCO Cloud™ Integration - Connect ensures that you replicate all of the data needed without replicating internal tables and other target-specific data. You can select additional entities to replicate from the Select Source Entities option on the App Details page.
- The activitymimeattachment entity is not replicated due to its size. To move activitymimeattachment data into another datastore, such as Microsoft SQL Server, use an On schedule app instead of a Data replication app.
- Deletes are not recorded for the activitypointer entity. For the initial replication, all activitypointer records are replicated. For subsequent replications, new and updated records are added. Delete the entire activitypointer table from the target replication datastore and rerun the Data replication app to remove the unwanted records.
- For entities that do not include a LastModifiedOn field, the CreatedOn field is used to determine whether the entity has already been replicated during a prior run. Currently, only the Audit entity uses the CreatedOn field in this manner.
- Rollup Fields, Calculated Fields — Values displayed in rollup and calculated fields in the interface or queried through the API are calculated dynamically, based on other field values. However, the dynamically calculated values that appear in the interface may not be picked up by the Replication process.
For example, if an OrderTotal field in one entity is calculated based on the value in an ItemTotal field in a different entity, changes made to ItemTotal do not update the ModifedOn date value in the Microsoft Dynamics 365 entity that contains the OrderTotal field, and so do not trigger the record to be picked up by the Replication process. However, the next time a change is made that does trigger the record to be picked up, the query of the records recalculates the values and the recalculated OrderTotal value is picked up.
Custom Objects
During replication, TIBCO Cloud™ Integration - Connect automatically creates any corresponding tables for custom entities in the target datastore. Select the entities you want to replicate from the Entities option on the Data replicationApp Details page.
If your Microsoft Dynamics 365 organization contains custom entities:
- The custom entities are replicated and no action is needed if they exist when the app first runs.
- If you add custom entities later, TIBCO Cloud™ Integration - Connect includes the new customizations the next time the data is replicated. If you select specific entities to replicate, be sure to include the new entity. If you are replicating either Recommended or All entities, your custom entity is automatically included.
- If you add a custom field to existing entities, the new field is added to the existing replicated table. However:
- The new field does not replicate until you reset the metadata for the Microsoft Dynamics 365 Connection.
- When the new field is created in Microsoft Dynamics 365, the corresponding field values in the target datastore are set to NULL until you update them in Microsoft Dynamics 365 and rerun the Data replication app.
Microsoft Dynamics 365 / CRM Connection As An App Source
Relationships
Hierarchical data is not supported. See Hierarchical Data for additional information.
Query And Native Query
When using a Native Query Block with FetchXML or a standard Query Block to return related entities, only the first 1000 child entities can be returned for a single parent record. If more than 1000 child entities are returned, an error similar to the following is generated:
Unable to get the next page of data. Dynamics 365 has not advanced the page cookie for Entity: <entity name>, PagingCookie: <paging cookie>".
To work around this issue, modify your Query to exclude child entities, then add a Fetch Block for each result to retrieve all children for the Entity selected in the Query.
When using a Native Query Block with FetchXML or a standard Query Block to return multiple records, if those records include milliseconds in the modifiedon field, the Connector may return the same page of data over and over again without advancing to the next set and generate an error similar to the following:
Unable to get the next page of data. Dynamics 365 has not advanced the page cookie for Entity: <entity name>, PagingCookie: <paging cookie>
To workaround this issue contact Microsoft for assistance in determining the cause.
Using an Order by function for a child entity in Fetch XML in a Native Query Block limits the number of records returned to 12000. If the query exceeds 12000 records, an error similar to the following is generated:
Paging cookie is required when trying to retrieve a set of records on any high pages.
To work around this issue, modify your Query to exclude child entities, then add a Fetch Block for each result to retrieve all children for the Entity selected in the Query.
When testing a Native Query in a flow, if the source datastore does not return any data, TIBCO Cloud™ Integration - Connect cannot build the schema for the underlying metadata and the flow cannot be saved. To allow TIBCO Cloud™ Integration - Connect to build the schema, do the following:
- Create a single temporary record in the source datastore that matches the Native Query.
- Test the Native Query and ensure that it is successful.
- Save the flow.
- Remove the temporary record from the source datastore.
FetchXML
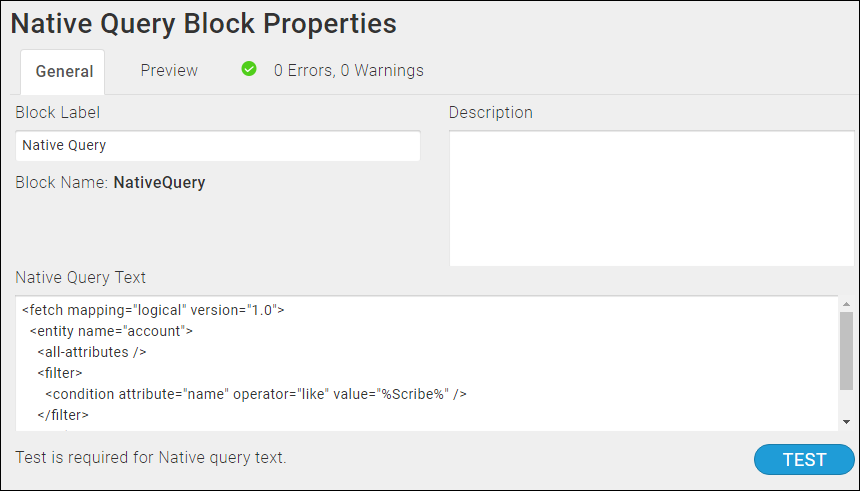
The Microsoft Dynamics 365 / CRM Connector supports using the FetchXML query language in a Native Query Block to create customized queries for Microsoft Dynamics 365 / CRM entity records and associated child records. The query can be as simple or complex as you need it to be; however, it should return a single result set.
After entering the FetchXML query, you must select Test to validate the query. Invalid XML is not accepted by the Connector.
You should understand the FetchXML query language before attempting to use the Native Query Block to access your Microsoft Dynamics 365 / CRM data. For assistance with FetchXML, see Build queries with FetchXML on the Microsoft developer site.
Using FetchXML in a Native Query Block includes support for sorting, grouping, filtering, and relationships. See the examples below for each option.
Simple Query
The example below returns all accounts and associated accountid and name values.
<fetch mapping='logical'>
    <entity name='account'>
     <attribute name='accountid'/>
     <attribute name='name'/>
    </entity>
</fetch>
Sorting
The example below sorts returned records by the value of the creditlimit field.
<fetch mapping="logical" version="1.0">
    <entity name="Account">
      <all-attributes />
      <order attribute="creditlimit" />
    </entity>
</fetch>
Grouping
The example below groups returned records by the value of the address1_city field.
<fetch mapping="logical" aggregate="true" version="1.0">
    <entity name="account">
      <attribute name="accountid" alias="COUNT_accountid" aggregate="countcolumn" />
      <attribute name="address1_city" groupby="true" />
    </entity>
</fetch>
Filtering
The example below returns records where the name field contains Scribe.
<fetch mapping="logical" version="1.0">
    <entity name="account">
      <attribute name="name" />
      <attribute name="accountid" />
      <filter>
        <condition attribute="name" operator="like" value="%Scribe%" />
      </filter>
    </entity>
Alias
If you have more than one entity with the same name, you must alias the entity names to distinguish the entities from each other.
Relationships
When parent and child records are returned, they are flattened and treated as a single set of records with the parent information repeated for each child. In this case, you cannot use a For Each Child Block. When mapping parent and child records, all fields for both the parent and the child records display as a single result set in the source side of the operation Block Properties Fields tab. If the parent and child entities have the same name and/or the same field names, such as a parent Account with multiple child Accounts, TIBCO Scribe® differentiates them by adding an alias to the entity or field name in the format entityalias_fieldname.
The example below performs an inner join on the account and SystemUser entities and returns System Users where the ownerid of the account matches the systemUserID of the SystemUser.
<fetch mapping="logical" version="1.0">
    <entity name="account">
      <attribute name="name" />
      <link-entity name="SystemUser" from="systemUserId" to="ownerid" alias="s" link-type="inner" />
    </entity>
</fetch>
Query Block Filtering
When a datetime is configured on the Query block on the Block Properties Net Change Tab to query for new and updated records, that configuration is treated as an additional filter. The Net Change datetime filter is applied as an AND after any other filters specified on the Block Properties Filter Tab. TIBCO Cloud™ Integration - Connect builds a query combining both the Net Change filter and the filters on the Filter tab. See Net Change And Filters for an example.
Some Connectors for TIBCO Cloud™ Integration - Connect only support one filter. For those Connectors you can use either Net Change or one filter on the Filter tab, not both.
Microsoft Dynamics 365 / CRM Connection An App Target
Batch Processing
- The following operations support Batch Processing for apps:
- Insert
- Update
- Delete
- Upsert
- The maximum Batch size is 1000 records.
- Only two concurrent Batch requests are supported. Sending more than two simultaneous Batch requests to the Microsoft Dynamics 365 online server causes a server busy error to occur.
- Batch processing is supported when using Alternate Keys.
For information about using Batch processing, see Batch Processing, Create Block, Update Block, or Delete Block.
Id And Idtype
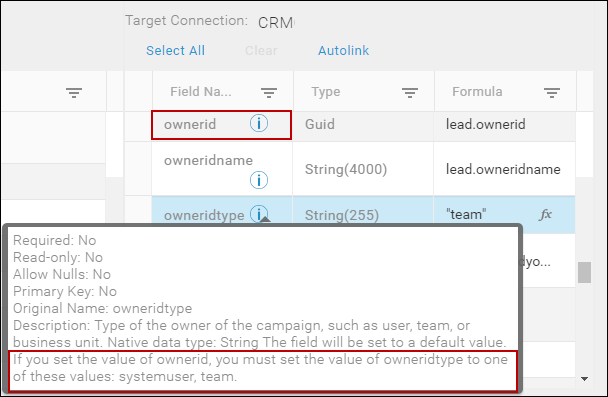
For Microsoft Dynamics 365 target Connections, if you map an id field, such as ownerid, you may also need to set the corresponding owneridtype to the value of the id base field.
To determine if you need to map the owneridtype, see the Description of the field displayed by selecting the Info icon ![]() for the Entity.See Block Properties Fields Tab.
for the Entity.See Block Properties Fields Tab.
Ownerid And Owneridtype
For Microsoft Dynamics 365 target Connections, both the ownerid and owneridtype fields may need to be mapped:
- Create — If you are mapping the ownerid field during a Create or a create through an Upsert, you must also map the owneridtype field. Otherwise, an error occurs and the record is not assigned to any user type.
- Update — If you are performing an Update or an update through an Upsert, mapping the owneridtype field is optional. If it is not mapped, Microsoft Dynamics 365 assigns the type based on the ownerid GUID value.Note: If you perform an Update or an update through an Upsert, provide an ownerid without an owneridtype, and the ownerid does not match any existing systemuser or team, the following error occurs:
systemuser not found.
Example
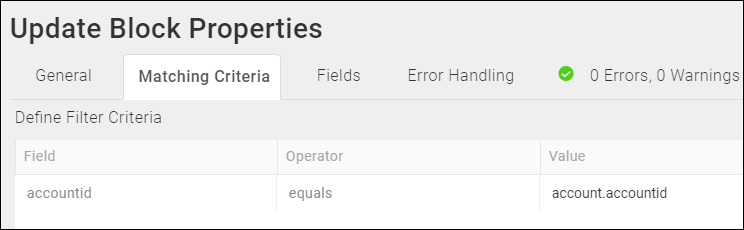
For example, in the image below, the Description indicates that if you map the ownerid field, you must also set a value for the ownertypeid field.
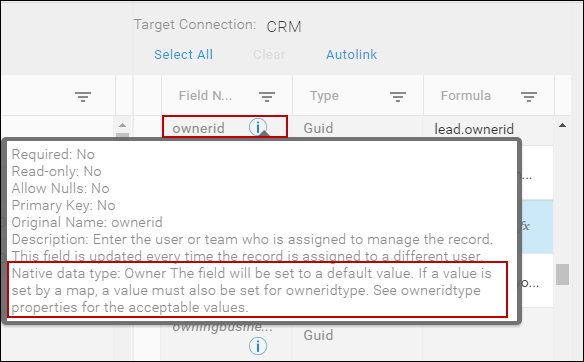
In the image below, the Description for the owneridtype field specifies the possible base entities and values: systemuser, team. To set this value, enter the name of the base field type in quotation marks into the Formula field.
Microsoft Dynamics 365 Merge Block Functionality
The Merge Block and the virtual merge entity support the Microsoft Dynamics 365 merge functionality to merge account, contact, lead, or incident records.
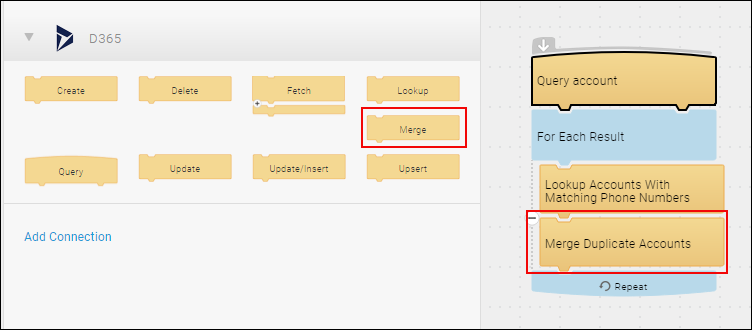
- When using merge, note the following:
- Only two records can be merged in each operation: one target record and one subordinate record.
- After the merge:
- The target record is the master of the subordinate record.
- The subordinate record is deactivated.
- The children of the subordinate record are merged with the children of the target record.Note: If you are merging records and performing any relationship processing on the child records, use separate Maps for the merge processing and the relationship processing. Otherwise, the merged child records may not be included in the relationship processing.
- The contents of the fields in the subordinate record are not merged.
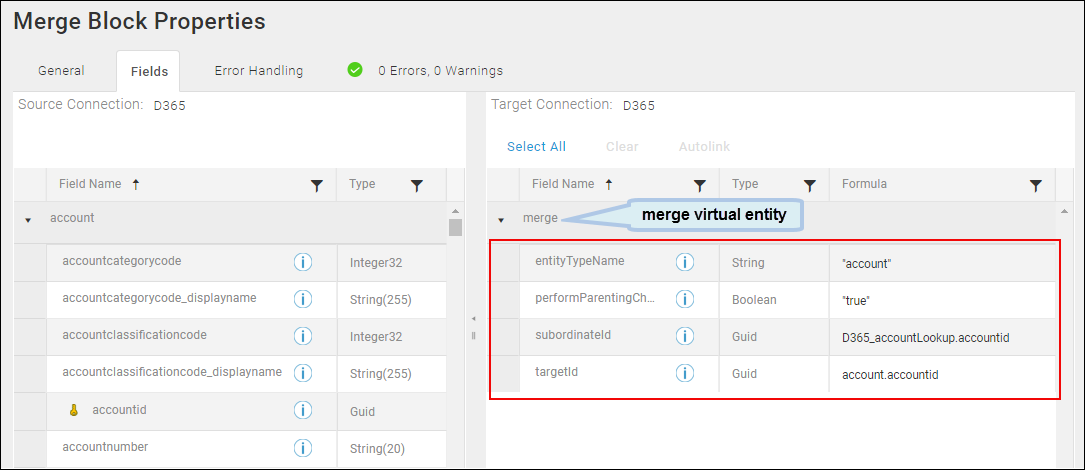
- The virtual merge entity includes the following fields that can be mapped on the Merge Block Properties Fields tab:
- entityTypeName — Name of the entity type of the records you are merging. This value must be one of:
- account
- contact
- lead
- incident
- targetId — ID of the target record. After the merge, the target record is made master of the subordinate record and parent to all child records of the subordinate record.
- subordinateId — ID of the subordinate record. After the merge, this record is deactivated.
- performParentingChecks — If set, generates an error when there is a conflict merging the parents of the target and the subordinate. If not set, no error is generated.
- entityTypeName — Name of the entity type of the records you are merging. This value must be one of:
Alternate Keys
An Alternate Key is an optional, unique ID value you define in Microsoft Dynamics 365. Any decimal, integer, or string field can be used to define either a simple Alternate Key, defined by a single field, or a complex Alternate Key, defined by multiple fields.
An Alternate Key has both a display name that appears in the interface, and a key name that Microsoft Dynamics 365 uses to identify the field. By default, the key name is the display name with a new_ prefix. For example, if you define the display name as MyKey, the key name assigned by Microsoft Dynamics 365 is new_MyKey.
When you define an Alternate Key, it is validated for uniqueness for existing records within the Microsoft Dynamics 365 entity for which the Alternate Key is defined. The status of that validation determines the state of the Alternate Key, which can be any of the following:
- Pending — Key value is being validated.
- Active — Key value has been validated.
- Inactive — Key value failed validation.
Defining Alternate Keys
To define the alternate keys:
- Log into Microsoft Dynamics 365.
- Select Settings > Customizations.
- Select Customize the System > Components > Entities > Entity <X> > Keys.
- Select New.
- On the form, fill in the required fields, Display Name and Name.
- Then choose and add the fields to the key.
For additional information on defining Alternate Keys, refer to these Microsoft articles: Define alternate keys to reference Dynamics 365 records and Define alternate keys for an entity.
Using Alternate Keys With TIBCO Cloud™ Integration - Connect
- Batch processing is supported when using Alternate Keys.
- Requires Dynamics CRM 2015 Update 1 or higher to use this feature.
- alternatekeyname —
- A new virtual field provided on the target side of the target operation Block Fields tab to define the Alternate Key name used by the Microsoft Dynamics 365 entity as the external ID/Match Criteria for the operation. This field must contain the key name of the Alternate Key, such as new_MyKey, not the display name.
- All fields defined in the Alternate Key must be mapped on the Fields tab or the Matching Criteria tab of the target operation Block.
- Displays for any entity that supports the Upsert operation.
Alternate Key behavior differs for the Delete, Update, and Upsert operations:
- Update or Delete — TIBCO Cloud™ Integration - Connect uses an Alternate Key to more efficiently identify the record you want to update or delete. For example, if you define First Name and Title as a complex Alternate Key with an Update or Delete operation:
- If you define the Match Criteria for this operation with just the Alternate Key fields, First Name and Title, your app uses the Alternate Key and performs the specified operation on all records where both those fields match the specified criteria.
- For the Update operation, if the skipseekunder virtual field is mapped, the Connector does not need to perform a Lookup first, which improves performance. See SkipSeekUnder below for additional information.
- For the Delete operation, the skipseekunder field is not required to prevent a Lookup.
- If you define the Match Criteria for this operation with only one of the Alternate Key fields, Title, your app:
- Performs a lookup on the records and returns all the records matching the specified field value.
- Performs the Update or Delete operation on those returned records.
- If you define the Match Criteria for this operation with the Alternate Key fields and another field, First Name, Title, and State, your app:
- Performs a lookup on the records and returns all the records matching the combination of these three field values.
- Performs the Update or Delete operation on those returned records matching the above criteria.
Only an active key can be used. Pending and inactive Alternate Keys are ignored, and the operation is performed as if no Alternate Key were defined, as in the third scenario in the example above.
- If you define the Match Criteria for this operation with just the Alternate Key fields, First Name and Title, your app uses the Alternate Key and performs the specified operation on all records where both those fields match the specified criteria.
- Upsert —You must map all the fields defined in this Alternate Key in the Upsert Block. Only an active key can be used. Pending and inactive Alternate Keys cause errors.

If you do not provide an Alternate Key in this virtual field, the primary key is used as the external ID/match criteria for the Upsert operation. The primary key is always available for subsequent Blocks whether it is mapped or not.
- If you map a non-existent, pending, or inactive key name to alternatekeyame, the following error occurs:
Cannot find the unknown_key_name alternate key.
- If you provide an existing key name to alternatkeyname, but only map part of the Alternate Key, the following error occurs:
Value required for field alt_key_name to satisfy the specified alternate key.
- If you provide an existing key name to alternatekeyame and also map a primary key, the following error occurs:
Cannot specify both a primary key and a alternatekeyname value on an upsert operation.
- If you map a non-existent, pending, or inactive key name to alternatekeyame, the following error occurs:

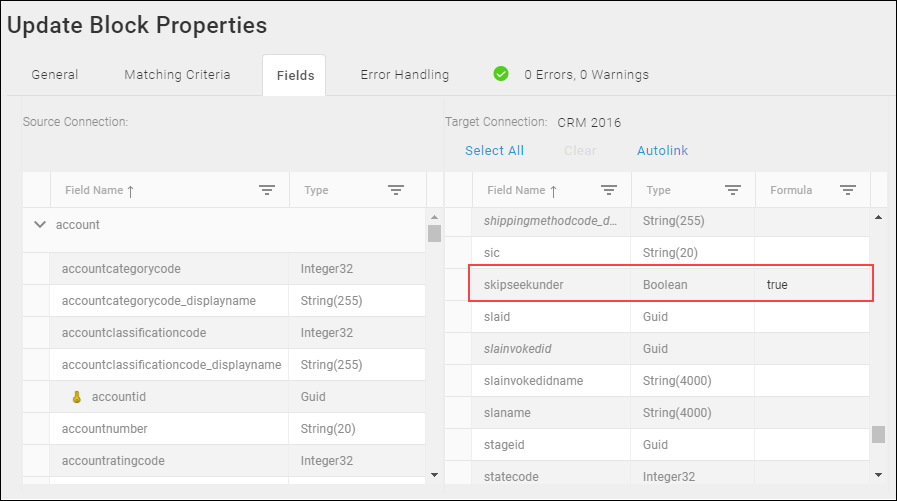
SkipSeekUnder
Seek Under is a lookup process where the Microsoft Dynamics 365 Connector uses the Matching Criteria on a target operation Block to locate a record. The Connector then returns the entire record from the data store and builds the updated record with any fields that were mapped on the Fields tab. This process provides a greater degree of accuracy in locating the correct record and provides unmapped data for use in subsequent operations. For example, if telephone number is not one of the mapped fields on the Fields tab, it is still available for use in an operation later in the Map. However, because the target datastore is accessed twice, once to return the record and again to perform the target operation, there is an impact to performance.
The skipseekunder virtual field on the Fields tab of the target operation Block is used to enable or disable the Seek Under process. Use skipseekunder when you do not need access to additional fields for the selected entity and you are sure that the fields you provided in Matching Criteria are sufficient to locate the correct record. When using skipseekunder, note the following:
- Mapping skipseekunder to true, disables the Seek Under process. The default setting for this field is false, which allows the Seek Under process to run.
- When set to true, you must configure a primary key id or alternate key field on the Matching Criteria tab to ensure that the correct record is found.
- For the Upsert operation, when skipseekunder is mapped to true, you must map the primary key id or the alternatekeyname and corresponding alternate key fields.
- The setting for skipseekunder is ignored and the Seek Under process runs when:
- There is no primary key id configured on the Matching Criteria tab.
- Multiple fields are configured on Matching Criteria tab.
- For Upsert, if the primary key id or the alternatekeyname and corresponding alternate key fields are not mapped.
- Attempting to skip the Seek Under process by setting skipseekunder to true, while simultaneously trying to use an entity reference field without the corresponding type, such as parentcustomerid and parentcustomeridtype, may cause the Connector to fail with an error similar to the following:
Error in calling Operation Update: Operation failed. Label: Update contact, Name: contactUpdate, Message: -2147220970:An unexpected error occurred. : System.NullReferenceException: Microsoft Dynamics CRM has experienced an error. Reference number for administrators or support: #C1CE39CD
See Id And Idtype for additional information.
- Supported for all entities and the following operations:
- Upsert
- Update
- Insert
- Delete — The skipseekunder field cannot be mapped for this operation. The Seek Under process is automatically skipped when Batch Processing is enabled, and the primary key or a complete alternate key is configured on the Matching Criteria tab. If Batch Processing is disabled, Seek Under is always used.
Notes On Standard Entities
ActivityParty
- Batch processing is not supported for this entity.
- Running more than one flow concurrently that updates this entity can cause data loss on target ActivityParty records.
AccountLeads
- This entity does not support Update operations because the LeadId and AccountId fields are read only.
CalendarRule
- This entity is always a child of a Calendar.
- Batch processing is not supported for this entity.
- Simple CalendarRule
- Although simple CalendarRules do not appear in the Microsoft Dynamics 365 interface, these entities are seen as children.
- isSimple — When True, defines the CalendarRules entity as a simple entity.
CloneProduct
This virtual entity isused to support complex product catalog integration requirements for products.
- Uses the Execute operation is to clone products.
- Batch Processing is not supported for this entity.
PublishProductHierarchy, RevertProductHierarchy
These virtual entities are used to support complex product catalog integration requirements for products, product families, and product bundles.
- The Execute operation is available to publish or revert publication of a product hierarchy using the following virtual entities:
- PublishProductHierarchy — Supports publishing product hierarchy.
- RevertProductHierarchy — Supports reverting a product hierarchy.
- Batch Processing is not supported for these entities.
Salesorder
- If you change the status of an order to Fulfilled, you can populate the datefulfilled field with a user-specified date instead of the datetime stamp of when the record was changed, which provides a mechanism for entering historical data.
Systemuser
- When moving a user from one Business Unit to another, the Microsoft Dynamics 365 API requires an ID for the new owner of the user's assets. Assets include Accounts or Contacts. Two virtual fields, reassignprincipalidtype and reassignprincipalid, are available to provide the user type and ID of the new owner. To assign assets back to the original user, enter that user's ID in the reassignprincipalid field and enter systemuser into the reassignprincipalidtype field.
If you populate the reassignprincipalidtype and reassignprincipalid virtual fields, but do not change the Business Unit for the user, the user's assets are unaffected.
Miscellaneous
Errors
You may receive one of the following errors when using Microsoft Dynamics 365.
Fatal Error
If you receive a fatal error that contains either of the following messages, make sure the credentials for your target Microsoft Dynamics 365 URL and Organization are correct. In addition, make sure the system time for the computer where the TIBCO Cloud™ Integration - Connect agent resides is correct.
Metadata contains a reference that cannot be resolved: 'https://example.com'
Verify that the Connection URL is correct and that you can connect to the same URL from the system running the Scribe Online Agent.
Security Time Stamp Error
This error is the result of an issue in the way Microsoft Dynamics 365 tracks time. The Microsoft Dynamics 365 Server, which is set to UTC/GMT, cannot generate a timestamp if the minutes value on the computer where the TIBCO Cloud™ Integration - Connect Connect on-premise agent is installed differs by more than 5 minutes from the Microsoft Dynamics 365 Server time.
The Microsoft Dynamics 365 Server uses your local time zone. Therefore, this problem only occurs if the minutes, not hours, are off by more than 5 minutes known as the skew time. To ensure that you do not get this message, make sure the minutes on the computer where the TIBCO Cloud™ Integration - Connect Connect on-premise agent is installed reflect the same minutes value as UTC/GMT time.
Unable To Insert Error
If you create a flow using Microsoft Dynamics 365 as a target and see the error shown below, it may be caused by populating a field in the target that requires an associated field to also be populated. If the second field upon which the first one depends is either not linked or is being populated by a null or invalid value, the error can occur.
Unable to insert data into the XYZ entity. An unexpected error occurred.
For example, populating the businesscustomerid field and not populating the businesscustomeridtype in the Contract entity in Microsoft Dynamics 365 results in this error. To resolve this issue, map both fields with valid non-null values.
TIBCO Cloud™ Integration - Connect API Considerations
To create Connections with the TIBCO Cloud™ Integration - Connect API, the Microsoft Dynamics 365 Connector requires the following information:
|
Connector Name |
Microsoft Dynamics 365/CRM |
|
Connector ID |
E9BD9381-7D29-4E5C-A367-366626A821D9 |
TIBCO Cloud™ Integration - Connect Connection Properties
In addition, this Connector uses the Connection properties shown in the following table.
| Name | Data Type | Required | Secured | Usage |
|---|---|---|---|---|
|
DeploymentType |
String |
Yes |
No |
Must be Online, OnPremise, PartnerHosted |
|
Url |
String |
Yes |
No |
|
|
UserId |
String |
Yes |
No |
|
|
Password |
String |
Yes |
Yes |
|
|
HomeRealmUri |
String |
No |
No |
Required only if DeploymentType is PartnerHosted and a third party authentication server is being used. |
|
Organization |
String |
Yes |
No |
|
|
Domain |
String |
No |
No |
Only required if DeploymentType is OnPremise |
|
DisplayPickListNames |
Boolean |
No |
No |
Defaults to false if empty |
|
RunAsUserName |
String |
No |
No |
Username of the user making Microsoft Dynamics 365 API requests |
|
BulkBatchSize |
String |
No |
No |
Defaults to 500 if empty. |
|
BulkConcurrentCalls |
String |
No |
No |
Defaults to 2 if empty. |
License Agreement
The TIBCO End User License Agreement for the Microsoft Dynamics 365 Connector describes TIBCO and your legal obligations and requirements. TIBCO suggests that you read the End User License Agreement.
More Information
For additional information on this Connector, refer to the Knowledge Base and Discussions in the TIBCO Community.