
cleverbridge Connector For TIBCO Scribe® Online
Use the cleverbridge Connector for TIBCO Scribe® Online to integrate data into lead, contact, account, and opportunity data in CRM systems or create subscribers and manage subscriber lists in Marketing systems.
Use Cases
- Create and Update lead, contact, account, order, quote, and opportunity data in Salesforce based on transactions processed in cleverbridge.
- Populate and process cleverbridge carts directly from Salesforce transaction objects such as Opportunities, Quotes and Orders.
- Integrate with Salesforce CPQ for a seamless online buying experience for your customers.
- Create and manage subscribers and subscriber lists in Salesforce Marketing Cloud based on changes made in cleverbridge.
Connector Specifications
This Connector supports the cleverbridge REST API.
| Supported | |
|---|---|
|
Agent Types |
|
| On Premise | X |
| Cloud | X |
|
Replication Services |
|
| Source | |
| Target | |
|
Integration Services |
|
| Source | X |
| Target | X |
|
Migration Services |
|
| Source | X |
| Target | X |
|
Maps |
|
| Integration | X |
| Request-Reply | X |
| Message | x |
Note: This Connector is available from the TIBCO Scribe® Online Marketplace. See Marketplace TIBCO Scribe® Certified Connectors for more information.
Supported Entities
The cleverbridge Connector supports the following entities. Click a linked entity name for additional information when using that entity in TIBCO Scribe® Online. For a list of additional operations by entity see Special Operations.
Standard Operations
| Entity | Query | Create | Update | Delete | Upsert |
|---|---|---|---|---|---|
|
|
|
X |
|
|
|
|
|
X |
|
|
|
|
|
X |
|
|
|
|
|
|
X |
|
|
|
|
|
|
|
|
X |
|
|
|
|
|
X |
X |
|
|
Special Operations
- CreateWith — Container Block used with hierarchical data to add a parent record that contains one or more child records. This Block collects all of the data for a single record before writing the entire record to the target. See CreateWith Block.
- UpdateWith — Container Block used with hierarchical data. Use this Block to update a parent record that contains one or more child records. This Block collects all of the data for a single parent record before writing the record to the target. See UpdateWith Block.
- Add — Used for hierarchical data to add child records to the parent selected in a CreateWith or BuildWith Block. See Add Block.
| Entity | Operations |
|---|---|
|
-Execute |
|
|
-Execute |
|
|
-Wait for Message |
|
|
-Wait for Message |
|
|
-CreateWith |
|
|
-Wait for Message |
|
|
-Execute |
|
|
-Add |
|
|
-UpdateWith |
|
|
-Remove |
Setup Considerations
The cleverbridge Connector requires that you have a cleverbridge user account with API privileges enabled to configure the Connection.
Notifications
To use cleverbridge Notifications to send messages to TIBCO Scribe® Online based on actions in cleverbridge Commerce Assistant:
- Your cleverbridge user account must have any one of the following privileges enabled:
- Administrator
- E-commerce Manager
- Quality Assurance Manager
- Top-level Management
- Make sure that your firewall accepts traffic from cleverbridge.
- In TIBCO Scribe® Online, go to More > Security and configure a Security Rule with Event Solution Access. See Setting Security Options for more information.
- Add one or more Notifications in cleverbridge Commerce Assistant under Tools > Notifications that require the following:
- Name — Enter a name for the Notification.
- Transport layer — Select HTTP POST.
- URL — Add the TIBCO Scribe® Online endpoint for the Wait For Message Block that should receive the Notification message. See Wait For Message Block.
- Document type — Select JSON.
- Char encoding — Select Unicode (UTF-8).
- Interval — Select Real-time.
- Language — Select English.
- Events — Select the Event or Events that should trigger this Notification.
Note: Each cleverbridge Event is associated with a specific entity in TIBCO Scribe® Online. The correct entity must be selected in the Wait For Message Block or the inbound message cannot be processed. See Notes On Notifications below for more information.
API Usage Limits
cleverbridge limits the number of API calls in any 24 hour period to 10,000 across all cleverbridge customers. Refer to the cleverbridge API documentation for exact limits.
Selecting An Agent Type For cleverbridge
Refer to TIBCO Scribe® Online Agents for information on available Agent types and how to select the best Agent for your Solution.
Connecting To cleverbridge
Note: Best practice is to create Connections with credentials that limit permissions in the target system, following the principle of least privilege. Using Administrator level credentials in a Connection provides Administrator level access to the target system for TIBCO Scribe® Online users. Depending on the entities supported, a TIBCO Scribe® Online user could alter user accounts in the target system.
- Select More > Connections from the menu.
- From the Connections page select Add
 to open the Add a New Connection dialog.
 - Select the Connector from
the drop-down list in the Connection Type field, and then enter the following information for this Connection:
- Name — This can be any meaningful name, up to 25 characters.
- Alias — An alias for this Connection name. The alias is generated from the Connection name, and can be up to 25 characters. The Connection alias can include letters, numbers, and underscores. Spaces and special characters are not accepted. You can change the alias. For more information, see Connection Alias.
- Username — Username for your cleverbridge account.
- Password — Password for your cleverbridge account.
- Select Test to ensure that the Agent can connect to your database. Be sure to test the Connection against all Agents that use this Connection. See Testing Connections.
- Select OK/Save to save the Connection.
Metadata Notes
Naming
Connection metadata must have unique entity, relationship, and field names. If your Connection metadata has duplicate names, review the source system to determine if the duplicates can be renamed.
Retry Logic
The cleverbridge Connector retries connection and operation calls when 503, Service Unavailable, or 504, GatewayTimeout, errors are received. When one of these errors is generated by the cleverbridge API, the Connector retries up to three times with a one, two, and three second interval between retries respectively.
cleverbridge Connector As IS Target
Consider the following when using the cleverbridge Connector as an IS target.
Batch Processing
Batch processing is not supported.
Wait For Message Block
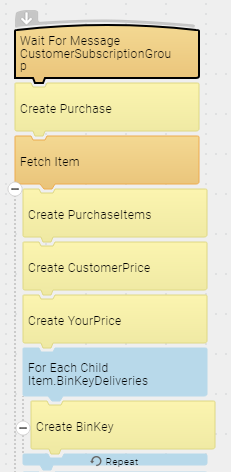
The Wait For Message Block displays all entities that support Query, Create, Update, or Delete operations. However, only the following entities are supported for the Wait For Message Block: CustomerSubscriptionGroup, RefundGroup, and CustomerDataGroup. Other entities displayed in the Wait for Message Block should be ignored.
Hierarchical Messages
When using the Wait For Message Block with the CustomerSubscriptionGroup or RefundGroup entities, messages sent to TIBCO Scribe® Online may have hierarchical data with a parent record and multiple child records. If the message contains hierarchical data, the cleverbridge Connector assigns a NotificationId to both the parent and child records.
To process the child records, do the following:
Use a Fetch Block to select the entity for the child records.

Use the NotificationId as a filter to match the child records with the parent record.

Select the any children of the child entity, or grandchildren, on the Fetch Block Include tab.

Use a For Each Child Block to process all of the child records.
Notes On Standard Entities
AlignSubscriptions
Execute
- Requires that the following fields be mapped in the target side of the Fields tab:
- AlignToCurrentInterval
- GetCustomerPricePreviewOnly — When set to true, the alignment does not take place in cleverbridge, however results in TIBCO Scribe® Online are populated with what would have happened if the alignment had been successful. These results are available to subsequent operations.
- PrimarySubscriptionId
- SecondarySubscriptionId
Contact
Update
- Matching Criteria — Requires either SubscriptionId and ContactType or CustomerreferenceId and ContactType.
- Contacttype cannot be updated for a Contact.
- Requires that the following fields be mapped in the target side of the Fields tab:
- CountryId
- LanguageId
- OverrideEmptyParameter —
- When set to false, only populated fields are updated. The default value is false.
- When set to true, all fields are updated and any field that is not populated is set to NULL.
CustomerDataGroup
- Only supports the Wait for Message Block.
- For a list of supported Events see cleverbridge Events Supported By Entity.
CustomerSubscriptionGroup
- Only supports the Wait for Message Block.
- Message data may be hierarchical. See Hierarchical Messages.
- For a list of supported Events see cleverbridge Events Supported By Entity.
DeactivateSubscriptionItems
Execute
- When the data type of the target field is List of Integers, such as the RunningNumbers field, use the TOLIST function in a formula to convert the source data to a List of Integers before sending it to the target. See TOLIST.
- The GenerateMail field defaults to true if left blank.
- Requires that the following fields be mapped in the target side of the Fields tab:
- AllowReinstate — When set to false, the status is changed and the item cannot be reinstated.
- RunningNumbers
- SubscriptionId
ProcessCart
CreateWith
- Use the Add operation to add at least one cart item to the process cart request.
- Add x-parameters at both the cart level and cart item level.
Purchase
Query
- Filtering by the Id field is required.
- Filtering by the ReimbursementId field is not required, but if not used as a filter, the Connector sends a value of 0 for that field.
- This entity is hierarchical. Use the Include Tab on the Query Block Properties to select children and grandchildren of the Purchase entity. See Block Properties Include Tab — Hierarchical Entities for additional information on selecting related entities.
Filtering
- Using Net Change to filter for new and updated records is not supported for this entity.
- Only the equals operator is supported.
- Only ANDs are supported for complex filters.
PurchaseList
Query
- Filtering by either StartDateTime and EndDateTime or by StartPurchaseId and EndPurchaseId is required. You cannot combine date and purchase ID filters.
- Filtering by PurchaseStatusID is always required.
Filters
- Using Net Change to filter for new and updated records is not supported for this entity.
- Filter fields include:
- PurchaseStatusId — Requires at least one PurchaseStatusId.
- StartDateTime — Maximum date range is 7 days. Requires filtering by EndDateTime field also.
- EndDateTime — Maximum date range is 7 days. Requires filtering by StartDateTime field also.
- StartPurchaseId — Requires filtering by EndPurchaseId field also.
- EndPurchaseId — Requires filtering by StartPurchaseId field also.
- Only the equals operator is supported.
RefundGroup
- Only supports the Wait for Message Block.
- Message data may be hierarchical. See Hierarchical Messages.
- For a list of supported Events see cleverbridge Events Supported By Entity.
ReinstateSubscriptionItems
Execute
- When the data type of the target field is List of Integers, such as the RunningNumbers field, use the TOLIST function in a formula to convert the source data to a List of Integers before sending it to the target. See TOLIST.
- The GenerateMail field defaults to true if left blank.
- Requires that the following fields be mapped in the target side of the Fields tab:
- RunningNumbers
- SubscriptionId
SubscriptionItem
Create
- The GenerateMail field defaults to true if left blank.
- The CustomerPriceCurencyId, CustomerPriceIsGross, and CustomerPriceValue fields are not required. However, if you map any one of them, then you must map all three fields.
- The SubscriptionItem being created must have a BillingInterval that aligns with that of the underlying Subscription.
- Required fields are not marked as required in the Fields tab of the Create Block, however, it is noted in the Field description for required fields. Required fields include:
- AlignToCurrentInterval
- GetCustomerPricePreviewOnly — When set to true, the create does not take place in cleverbridge, however results in TIBCO Scribe® Online are populated with what would have happened if the operation had been successful. These results are available to subsequent operations.
- ProductId
- Quantity
- SubscriptionId
Update
- The GenerateMail field defaults to true if left blank.
- Matching Criteria — Requires the RunningNumber and SubscriptionId fields. They also display as target fields on the Fields tab, but any values mapped to these fields are ignored.
- Required fields are not marked as required in the Fields tab of the Update Block, however, it is noted in the Field description for required fields. Required fields include:
- AlignToCurrentInterval
- GetCustomerPricePreviewOnly — When set to true, the update does not take place in cleverbridge, however results in TIBCO Scribe® Online are populated with what would have happened if the operation had been successful. These results are available to subsequent operations.
- ProductId
- Quantity
- UpdateAction
Update/Insert
- The Update/Insert operation is not supported for the SubscriptionItem entity.
Remove
- When you remove a SubscriptionItem, all target fields except GenerateMail are ignored.
- Matching Criteria — Requires the RunningNumber and SubscriptionId fields.
SubscriptionNextBillingDate
Update
- Matching Criteria —Requires SubscriptionId.
- The SubscriptionId field is available in the list of target fields on the Fields tab, but should not be mapped.
- If the time is not included in a datetime source value, the time defaults to midnight when written to a target datetime field.
SubscriptionParameterItem
Add
- Use the Add Block inside the UpdateWith Block to add one or more SubscriptionParameterItem child records to a SubscriptionParameters parent record.
SubscriptionParameters
UpdateWith
- This hierarchical entity requires that the SubscriptionParameterItem child entity be selected on the Include tab of the UpdateWith Block. See Block Properties Include Tab — Hierarchical Entities for additional information on selecting related entities.
- Requires at least one child record or the parent SubscriptionParameters record cannot be updated.
Notes On Notifications
Use cleverbridge Notifications to send a JSON message containing data to TIBCO Scribe® Online when data in cleverbridge Commerce Assistant has changed, and trigger appropriate changes in a target datastore.
cleverbridge Notifications are used to upload data exports of transactional data on a regular basis for use in your internal systems. Real-time notifications are sent the instant the event occurs. There is only one notification per event, which you can set in the Notification Events section of the Notifications portal in the cleverbridge Commerce Assistant client.
See Using cleverbridge Notifications To Update Customer Contact Information for an example.
cleverbridge Events Supported By Entity
|
Entity |
Event |
|---|---|
|
CustomerDataGroup |
• Subscription profile data changed |
|
CustomerSubscriptionGroup |
• Awaiting offline payment • Awaiting release • Customer contact data changed • New quote • Paid • Payment declined • Purchase order • Registration • Subscription billing date extended • Subscription deactivated • Subscription on grace • Subscription on hold • Subscription reinstated • Subscription reminder charge • Subscription reminder offline payment • Subscription reminder payment expired |
|
RefundGroup |
• Chargeback • Partially refunded • Refunded • Returned direct debit |
Using cleverbridge Notifications To Update Customer Contact Information
- Make sure you have met the requirements for cleverbridge Notifications outlined in the Setup Considerations section of this document.
- In TIBCO Scribe® Online, configure a Connection to your cleverbridge account. See Connecting To cleverbridge.
- Add an Integration Event Solution.
- Add a Message Map to that Solution. See Defining An Event Message Map.
- In the Map add the cleverbridge Connection.
- Drag a Wait for Message Block on to the Map canvas.
- Configure the Wait for Message Block with the CustomerSubscriptionGroup entity, for this example. See Wait For Message Block.
- Save the Block and the Map to generate the TIBCO Scribe® Online endpoint where cleverbridge can send a message.
- Open the Map and open the Wait for Message Block to display the TIBCO Scribe® Online endpoint for that Block. Copy the endpoint URL.
- In cleverbridge Commerce Assistant, navigate to Tools > Notifications and select your Notification to open it.
- In the URL field, paste in the TIBCO Scribe® Online endpoint you copied from the Wait for Message Block.
- Make sure that your Notification is completely configured as outlined in the Setup Considerations section of this document. For this example, make sure that you select the Customer contact data changed event on the Events tab of the Notification.
- Return to TIBCO Scribe® Online and complete the Event Map to write the updated Customer Contact data to a target datastore.
TIBCO Scribe® Online API Considerations
To create connections with the TIBCO Scribe® Online API, the cleverbridge Connector requires the following information:
|
Connector Name |
cleverbridge |
|
Connector ID |
06C8E267-425B-41AC-B12C-B1704AF7F860 |
TIBCO Scribe® Online Connection Properties
In addition, this Connector uses the Connection properties shown in the following table.
Note: Connection property names are case-sensitive.
| Name | Data Type | Required | Secured | Usage |
|---|---|---|---|---|
|
Username |
String |
Yes |
No |
|
|
Password |
String |
Yes |
Yes |
|
More Information
For additional information on this Connector, refer to the Knowledge Base and Discussions in the TIBCO Community.