
TIBCO Scribe® Online Connector For Oracle Database
Use the native Oracle Database Connection to connect directly to an Oracle data source.
Connector Specifications
| Supported | |
|---|---|
|
Agent Types |
|
| On Premise | X |
| Cloud | |
|
Replication Services |
|
| Source | |
| Target | X |
|
Integration Services |
|
| Source | X |
| Target | X |
|
Migration Services |
|
| Source | X |
| Target | X |
|
Maps |
|
| Integration | X |
| Request-Reply | X |
| Message | |
Note: This Connector is available from the TIBCO Scribe® Online Marketplace. See Marketplace TIBCO Scribe® Certified Connectors for more information.
Special Operations
| Entity | Operations |
|---|---|
|
Execute |
|
|
Execute |
Setup Considerations
- The Oracle Database Connector is only supported with Oracle Database 11g Release 2, Oracle Database 12c, and Oracle Database 18c.
- While TIBCO believes that this Connector should be compatible with other Oracle 11g Release 2 Editions, TIBCO tested this Connector only against the Oracle 11g Release 2 Enterprise Edition.
- A TIBCO Scribe® Online On-Premise Agent and the Oracle Database server should be installed on the same computer. If they are not on the same computer, you must modify your configuration. See Installing The TIBCO Scribe® Online Agent On A Remote Computer.
- Only Oracle Clients with Net Manager and Development Tools are supported.
- Modify the tnsnames.ora file as needed or copy an existing one. TNSNAMES.ORA is a SQL*Net configuration file that defines databases addresses for establishing connections to those databases. This file usually resides in the Oracle client folder under \network\admin.
- Create an Environment Variable named TNS_ADMIN that specifies the path to the tnsnames.ora folder. If you do not create this variable, TIBCO Scribe® Online cannot use the Network Alias defined in the tnsnames.ora file to connect to the Oracle database, forcing you to enter all of the connection parameters instead. See Creating The TNS_ADMIN Environment Variable below for additional information.
Creating The TNS_ADMIN Environment Variable
The tns_admin variable specifies the location of the tns administration files, such as tnsnames.ora and listener.ora. In the image below the location is C:\Oracle\app\MSMITH\product\11.2.0\client_1\network\admin .

- On the Server where the TIBCO Scribe® Online Agent is installed, navigate to the Windows Control Panel.
- Select System.
- Select Advanced System Settings.
- On the Advanced tab of the System Properties dialog, select the Environment Variables... button.
- Under User variables select New.
- Enter the Variable name as TNS_ADMIN.
- In the Variable value field enter the path to the tnsnames.ora folder.
- Select OK.
- In the Environment Variables dialog, make sure the variable and associated path display correctly, then select OK.
- Select OK on the System Properties dialog.
Selecting An Agent Type For Oracle
Refer to TIBCO Scribe® Online Agents for information on available Agent types and how to select the best Agent for your Solution.
Connecting To An Oracle Database
Note: Best practice is to create Connections with credentials that limit permissions in the target system, following the principle of least privilege. Using Administrator level credentials in a Connection provides Administrator level access to the target system for TIBCO Scribe® Online users. Depending on the entities supported, a TIBCO Scribe® Online user could alter user accounts in the target system.
Note: The default connection protocol is Oracle 12c, with backwards compatibility for Oracle11g.
- Select More > Connections from the menu.
- From the Connections page select Add
 to open the Add a New Connection dialog.
 - Select the Connector from
the drop-down list in the Connection Type field, and then enter the following information for this Connection:
- Name — This can be any meaningful name, up to 25 characters.
- Alias — An alias for this Connection name. The alias is generated from the Connection name, and can be up to 25 characters. The Connection alias can include letters, numbers, and underscores. Spaces and special characters are not accepted. You can change the alias. For more information, see Connection Alias.
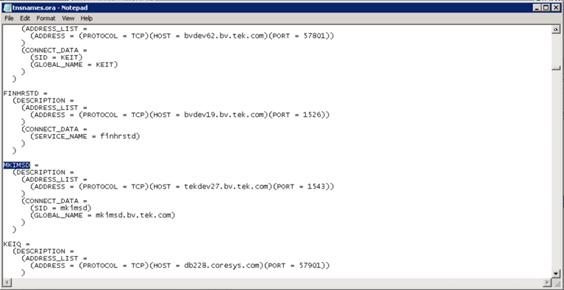
- Network Alias— Information for the Oracle Server to which you want to connect. Open the tnsnames.ora file in the Service Naming folder of your Oracle Net Manager application. This file defines database addresses to allow external connections. Locate the section for your Oracle database, by looking for the database name. If you have configured an Environment Variable to this file, enter the name of the database as shown in the tnsnames.ora file. If you have not configured the variable, copy the connection information into the Network Alias field. For example:
Database name:
MyOracleDB
Or
Connection information:
(DESCRIPTION=(ADDRESS=(PROTOCOL=TCP)(HOST=QA-ORA11G.testserver.scribesoft.com)(PORT=8000))(CONNECT_DATA=(SERVICE_NAME=BF)))
- Username — The user name for this Oracle Database Connection.
You can create multiple Connections for different Oracle users using the same network alias. For instructions on how to do so, contact your Oracle database administrator.
- Password — The password for this Username.
- Properties — Optionally, you can specify one or more properties to turn the ability to filter on the following objects on or off:
- ShowSynonyms
- ShowTables
- ShowViews
By default, all of these properties are set to TRUE; that is, they are available unless you explicitly change them. To turn off access or explicitly provide access to one or more objects, add them in the Properties window. For example:
ShowSynonyms = FALSE; ShowTables = TRUE;
- Select Test to ensure that the Agent can connect to your database. Be sure to test the Connection against all Agents that use this Connection. See Testing Connections.
- Select OK/Save to save the Connection.
Retry Logic
When a timeout occurs, the Oracle Database Connector retries three times before failing.
Metadata Notes
Naming
Connection metadata must have unique entity, relationship, and field names. If your Connection metadata has duplicate names, review the source system to determine if the duplicates can be renamed.
Data Types
The following data types are not supported:
- BFILE
- INTERVAL
Oracle Database Connector As RS Target
Consider the following when using the Oracle Database Connector as a TIBCO Scribe® Online RS target.
Oracle Naming Limitations
Due to Oracle Database entity and field naming limitations, for TIBCO Scribe® Online RS, any entity or field names that are replicated into Oracle are truncated to 23 characters, followed by a $ sign and a 2-digit numeric value.
For example, for the following source field names:
- SampleLongFieldNameToBeReplicated1
- SampleLongFieldNameToBeReplicated2
The resulting field names in the Oracle target will be:
- SampleLongFieldNameToBe$00
- SampleLongFieldNameToBe$01
Oracle Database Connector As IS Source
Native Query
This Connector supports the Native Query Block. Use this Block to define queries using SQL statements. For more information, see Native Query Block.
- Executing Stored Procedures is not supported.
- Ending queries with a semicolon (;) is not supported because the Native Query Block does not support multiple statements. If you end a query with a semicolon an error similar to the following is generated:
SQL Command not properly ended.
- Join statements using tables that have one or more fields with duplicate names are not supported. Update the field names in the tables to ensure that there are no duplicates.
When testing a Native Query in a Map, if the source datastore does not return any data, TIBCO Scribe® Online cannot build the schema for the underlying metadata and the Map cannot be saved. To allow TIBCO Scribe® Online to build the schema, do the following:
- Create a single temporary record in the source datastore that matches the Native Query.
- Test the Native Query and ensure that it is successful.
- Save the Map.
- Remove the temporary record from the source datastore.
Oracle Database Connector As IS Target
Batch Processing
Batch processing is not supported.
Notes On Standard Entities
NonQuery
Used with the Execute Block to run the ADO.NET SqlCommand ExecuteNonQuery. This method is used to execute SQL statements that do not return any results, such as update data. It does return the number of records affected by the statement.
Scalar
Used with the Execute Block to run the ADO.NET SqlCommand ExecuteScalar. This method is used to execute SQL statements that return a single value from a database after the execution of a SQL statement, such as "select SysDate from Dual" to return the current system date.
Note: The Execute NonQuery and Execute Scalar do not support executing Stored Procedures.
Miscellaneous
Installing The TIBCO Scribe® Online Agent On A Remote Computer
When the TIBCO Scribe® Online Agent is installed on the same computer as the Oracle Database server, no additional setup is required. However, if your TIBCO Scribe® Online Agent is installed on a different computer, some configuration changes are required, as follows:
Configuring The Oracle Database Server Computer
Set the listener to IP address 0.0.0.0, as follows:
- Launch the Oracle Net Manager application.
- Select the Listeners folder.
- Change the Host IP address of the existing LISTENER to 0.0.0.0.
- The default port is 1521.
This configures the Oracle Database server to listen to any computer where the TIBCO Scribe® Online Agent is installed.
- Disable the firewall configuration for your server to allow access to computers with remote TIBCO Scribe® Online Agents.
Configuring The Computer Where The TIBCO Scribe® Online On-Premise Agent Is Installed
- Install the Oracle Client Application for theTIBCO Scribe® Online supported Oracle Database version that you are using on this computer.
- After installing the Oracle client, configure the Network Alias for this Oracle client computer, as follows:
- Launch the Oracle Net Manager.
- Select the Service Naming node and click on the + icon to add a new service name.
- Enter the Service Name and IP Address of the Oracle Database Server to which you are connecting. The default port is 1521.
Note: TIBCO recommends that you use the same service name as the Oracle Server to which you are connecting, for example: orcl.
- Test the Connection with a valid username and password.
- When you are done, select Save Network Configuration from the File menu to save the new configuration.
- When you configure the Oracle Database Connection, use the net service name that you just defined as the Network Alias in the TIBCO Scribe® Online Connection dialog.
Connection Errors
Follow the steps below to troubleshoot connection errors.
Note: Any changes you make to your Oracle configuration require you to stop and restart your TIBCO Scribe® Online Agent Windows service before testing your Connection again. If you do not restart your Agent, the following errors are generated:
Test Connection error:
Connection test failed: Length cannot be less than zero. Parameter name: length
Query or Target Runtime error:
ERROR: Exception Type : ArgumentOutOfRangeException
Message : Length cannot be less than zero.
Parameter name: length
Correct Agent
Fields for configuring the Connection to Oracle do not display on the Add a New Connection dialog unless either the Oracle Database server or the Oracle Client is installed on the same computer as the TIBCO Scribe® Online Agent. The following error message is generated.

Unable to display this connection's properties. Please contact Scribe Support.
Test The Service
If you are using a remote server, review Installing The TIBCO Scribe® Online Agent On A Remote Computer.
- Launch the Oracle Net Manager application.
- Select the Service Naming node and expand it.
- Select the Oracle Database Server to which you are connecting.
- Test the connection with a valid username and password.
Ping The Oracle Service
From a command prompt, you should be able to ping the Oracle service you have created on the machine, which connects to the Oracle database/Oracle server Service. This should return the TNSNAMES adapter used to resolve the alias.
Example: tnsping orcl
Verify Variables
Make sure that your Environmental Variables are correct.
Note: Changing Environmental Variables may affect other services running on that machine.
- Make sure that TNS_ADMIN is pointing to the correct tnsnames.ora location, especially if that file is not in its default location. Always use the UNC path.
Example: TNS_ADMIN = C:\app\NKeefe\product\11.2.0\client_2\network\admin
Example: TNS_ADMIN = \\differentserver\Oracle\11.2.0\client_2\network\admin
- ORACLE_HOME points to the directory where the Oracle Client is installed.
Example: ORACLE_HOME = C:\app\NKeefe\product\11.2.0\client_2
- PATH should include your Oracle Home location
Example: PATH = C:\app\NKeefe\product\11.2.0\client_2\bin;…
Error Number
- Google the error number or title, such as ORA-12154, to find more helpful troubleshooting resources.
See the following Knowledge Base Article for additional trouble-shooting information: Using Oracle With TIBCO Scribe® Online.
TIBCO Scribe® Online API Considerations
To create Connections with the TIBCO Scribe® Online API, the native Oracle Connector requires the following information:
|
Connector Name |
Oracle |
|
Connector ID |
B135FF6A-9E65-4335-8C41-5BE050796C07 |
TIBCO Scribe® Online Connection Properties
In addition, this Connector uses the Connection properties shown in the following table.
Note: Connection property names are case-sensitive.
| Name | Data Type | Required | Secured | Usage |
|---|---|---|---|---|
|
Network Alias |
String |
Yes |
No |
|
|
Username |
String |
Yes |
No |
|
|
Password |
String |
Yes |
Yes |
|
|
Properties |
String |
No |
No |
Add a field to receive miscellaneous connection properties. |
License Agreement
The TIBCO Scribe® Online End User License Agreement for the Oracle Connector describes TIBCO and your legal obligations and requirements. TIBCO suggests that you read the End User License Agreement.
More Information
For additional information on this Connector, refer to the Knowledge Base and Discussions in the TIBCO Community.