
TIBCO Scribe® Online Connector For Salesforce Bulk API 2.0
The TIBCO Scribe® Online Connector for Salesforce Bulk API 2.0 supports bulk and batch processing for higher performance and fewer API hits. Use the connector to insert or upsert large data sets in your Salesforce Organization asynchronously.
Salesforce Bulk API 2.0 is based on REST principles and is optimized for working with large sets of data and extends the functionality of Bulk API 1.0. Any data operation that includes more than 2,000 records is a good candidate for Bulk API 2.0 to successfully prepare, execute, and manage an asynchronous workflow that makes use of the Bulk framework.
Connector Specifications
This connector supports version 2.0 of the Salesforce BulkAPI.
| Supported | |
|---|---|
|
Agent Types |
|
| On Premise | X |
| Cloud | X |
|
Replication Services |
|
| Source | |
| Target | |
|
Integration Services |
|
| Source | X |
| Target | X |
|
Migration Services |
|
| Source | |
| Target | |
|
Maps |
|
| Integration | X |
| Request-Reply | X |
| Message | X |
This Connector is available from the TIBCO Scribe® Online Marketplace. See Marketplace TIBCO Scribe® Certified Connectors for more information.
Standard Operations
This connector supports the following standard operations:
- Insert
- Upsert
Setup Considerations
Salesforce Bulk Organization
To enable the Expense, ExpenseReport, ExpenseReportEntry entities in Salesforce Bulk, activate the Field Service Lightning functionality in the Salesforce Bulk organization as follows:
-
From the Salesforce Bulk User menu, select Setup. The Setup menu is displayed on the left side of the page.
-
Select Build > Customize > Field Service > Field Service Settings.
-
Enable the Field Service button on the right side of the page.
Salesforce Bulk User Account
Use an existing Salesforce Bulk account or request a trial account from www.salesforce.com. For information about configuration, see your Salesforce Bulk administrator.
Configure the account to use either:
- A trusted IP address
- A security token
Configure API settings:
- Developer Salesforce Bulk accounts have Salesforce Bulk API enabled by default.
- Trial Salesforce Bulk accounts have Salesforce Bulk API disabled by default.
API Usage Limits
Salesforce Bulk limits the number of API calls in any 24-hour period for every Salesforce Bulk organization. Refer to the Salesforce Bulk documentation for exact limits.
Note: Refreshing metadata for the Connector consumes API calls.
If you are an administrative user, you can view the number of API requests your organization has used in the last 24 hours, as follows:
- From the Salesforce Bulk User menu, select Setup. The Setup menu displays on the left side of the page.
- Select Administer > Company Profile > Company Information.
- The API Requests, Last 24 Hours field displays the current number of API requests along with the maximum available to your organization.
Note: These steps may vary in the Salesforce Bulk Lightning configuration.
For more information on Salesforce Bulk API 2.0 limits and allocations, see Bulk API Limits and Allocations.
Selecting An Agent Type For Salesforce Bulk
Refer to TIBCO Scribe® Online Agents for information on available Agent types and how to select the best Agent for your Solution.
Authentication
This connector supports the following authentication methods:
- OAuth - Supports Single Sign-on and Multi-factor authentication.
OAuth Authentication
To use OAuth Authentication, a Connected App in Salesforce Bulk is required. You can use the TIBCO OAuth App or you can create a new Connected OAuth App in Salesforce Bulk. To create a new Connected OAuth App, enable the following:
- Enable the OAuth Settings checkbox
- Callback URL — For the TIBCO Scribe® Online production environments, use https://online.scribesoft.com/OAuthAuthorizationResponse.aspx and for the Sandbox environment, use https://sandbox.scribesoft.com/OAuthAuthorizationResponse.aspx
- Enable the Require Secret for Web Server Flow checkbox
- Enable the Require Secret for Refresh Token Flow checkbox
- Set Refresh Token Policy as Refresh Token is valid until revoked
Once the app is created, you can find Client Id and Client Secret under the API>Enable OAuth Settings section.
Important: A maximum of four connections can be configured to a single Salesforce Bulk Connected app because each Connected app only supports four active Access/Refresh token pairs. If you exceed four separate connections, the Access/Refresh Token pairs are revoked as the active connections go beyond four even though the Refresh Token Policy for the app is set to Refresh token is valid until revoked.
Testing the connection generates the following error:
"Failed to re-authenticate user. Please open your connection, authenticate and save the connection."
Do not exceed the limit or configure another Connected App in Salesforce Bulk.
Connecting To Salesforce Bulk
Note: Best practice is to create Connections with credentials that limit permissions in the target system, following the principle of least privilege. Using Administrator level credentials in a Connection provides Administrator level access to the target system for TIBCO Scribe® Online users. Depending on the entities supported, a TIBCO Scribe® Online user could alter user accounts in the target system.
- Select More > Connections from the menu.
- From the Connections page select Add
 to open the Add a New Connection dialog.
 - Select the Connector from
the drop-down list in the Connection Type field, and then enter the following information for this Connection:
- Name — This can be any meaningful name, up to 25 characters.
- Alias — An alias for this Connection name. The alias is generated from the Connection name, and can be up to 25 characters. The Connection alias can include letters, numbers, and underscores. Spaces and special characters are not accepted. You can change the alias. For more information, see Connection Alias.
- Select and configure an Authentication Type for this Connection.
- For OAuth —
- SalesforceURL — The web address that your site uses to reach the Salesforce Bulk web services API.
- For Connected OAuth App —
- SalesforceURL — The web address that your site uses to reach the Salesforce Bulk web services API.
- Client Id/Client Secret — The Salesforce Bulk Consumer Key and Consumer Secret.
Note: Use the TIBCO connect app or create a new app to connect to Salesforce Bulk. Client Id and Client Secret are required only when using your own Salesforce Bulk Connect App. See the OAuth Authentication section for information on where to find Client Id and Client Secret.
Note: If you are connecting to a Salesforce Bulk sandbox, replace login.salesforce.com with your sandbox URL in the Salesforce URL field. Be sure to use the appropriate User name for the sandbox. For more information, see your Salesforce Bulk administrator.
- For OAuth —
- Authenticate — Applies to OAuth and Connected OAuth authentication. When the Connection configuration is complete, use the Authenticate button to authenticate with Salesforce Bulk. If you are not logged into Salesforce Bulk, you are asked to log in. A Salesforce Bulk authentication dialog displays. To continue the authentication process enter login credentials, which allows TIBCO Cloud ™ Integration - Connect to access your Salesforce Bulk data. Select Close on the confirmation dialog.
Tip: Do not test the Connection until the message at the top of the Connection dialog reads Authentication complete. Note that it may take a few minutes for this message to display.
- Select Test to ensure that the Agent can connect to your database. Be sure to test the Connection against all Agents that use this Connection. See Testing Connections.
Important: When using OAuth Authentication, testing the connection immediately saves the values on the Connection dialog. Selecting Cancel does not restore the prior configuration values.
- Select OK/Save to save the Connection.
Metadata Notes
Naming
Connection metadata must have unique entity, relationship, and field names. If your Connection metadata has duplicate names, review the source system to determine if the duplicates can be renamed.
Salesforce Bulk Connector Target
Insert Operation
A sample map depicting the flow of an Insert operation is shown below.
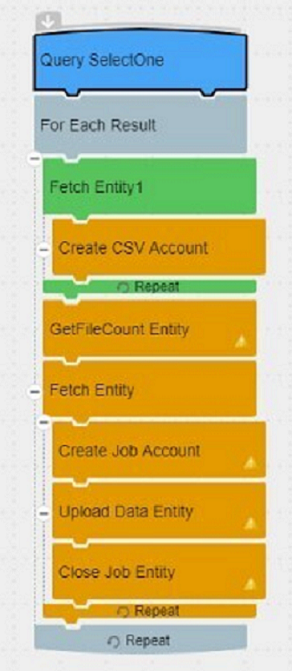
- Fetch data from the source connection and create CSV files as follows:
- Use the Fetch block to get data from the source connection and provide it to the bulk job. After the data is fetched from the source connection, it can be mapped to fields in the target connection. You can specify a condition that helps you narrow down the records to be fetched and uploaded to Salesforce Bulk.
Use the Create CSV block to create the actual data in CSV files. You can manually specify the data in the target connection or map it from the source connection to the target connection.
-
Use the GetFileCount block to get a count of the number of CSV files created.
- For each CSV file created:
- Use the Fetch block of the Salesforce Bulk Connector to get the CSV file created.
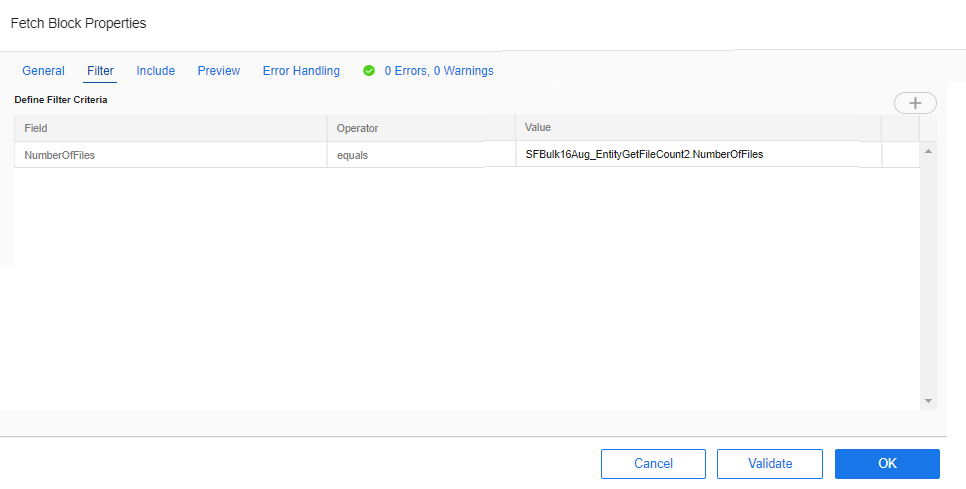
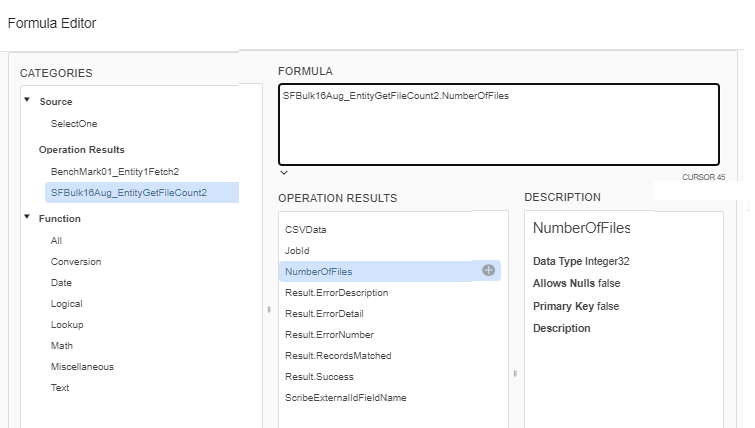
- Add the filter criteria in the FetchBlock of the Salesforce Bulk Connector. Set NumberOfFiles equal to the NumberOfFiles from GetFileCountEntity block as shown in the following screenshots.
- Use the Create Job block to create a job representing a bulk operation and its associated data that is sent to Salesforce Bulk for asynchronous processing. Select the object name from the Entity drop down.
- Use the Upload Data block to upload data of a job using CSV data created by using the Create CSV block to Salesforce Bulk. The Upload Data block is available for an entity of type Entity. The following fields are mandatory:
- JobId field - In the Fields tab of the Upload Data block, map the JobId field from the source connection to the target connection.
- CSVData - CSV data from Salesforce Bulk Fetch block is mapped.
- Use the Close Job block to close the bulk job. This job notifies the Salesforce Bulk server that the upload of job data is complete and it is ready for processing by Salesforce Bulk. In the Fields tab of the Close Job block, map the JobId field from Create Job block of source connection to the target connection. The Close Job block is available for an entity of type Entity.
Upsert Operation
For Salesforce Bulk Connections, where you can map to an external ID, a Lookup field, or another ID field, select the Upsert operation to perform the following single-step operation:
- If a matching record is not found in the target, insert a new record.
- If a matching record is found, update the existing record.
- If more than one match is found, none of the matching records is updated and an error is generated.
Note: The ID field must be unique to the entity and correspond to that Salesforce Bulk system.
An external ID field is a custom field created in Salesforce Bulk. If you map to multiple external ID fields, the Connector needs to know which ID takes priority when attempting to match records. To indicate which external ID field takes priority, enter the name of the external ID field in the ScribeExternalIDFieldName virtual field. When using an Upsert Block, note the following:
- Only one external ID field is used for the Upsert operation.
-
If you have entered the API name of the external ID field you want to use in the ScribeExternalIdFieldName virtual field of the UPSERT JOB block, that ID is used.
- If the ScribeExternalIdFieldName virtual field is blank, the ExternalId with oldest field is used.
A sample map depicting the flow of an Upsert operation is shown below.
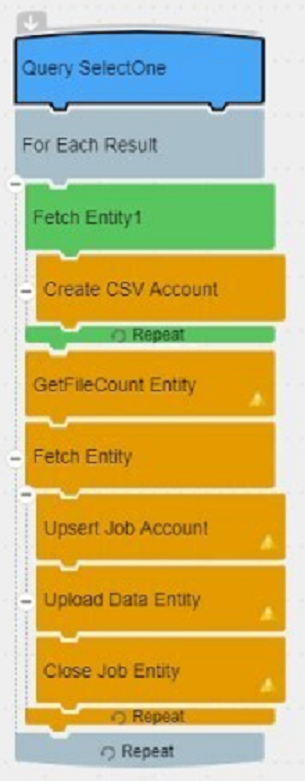
- Fetch data from the source connection and create CSV files as follows:
- Use the Fetch block to get data from the source connection. After the data is fetched from the source connection, it can be mapped to fields in the target connection. You can specify a condition that helps you narrow down the records to be fetched and inserted in Salesforce Bulk.
- Use the Create CSV block to create or modify the actual data in CSV files. You can manually specify the data in the target connection or map it from the source connection to the target connection. Provide the following values in the Create CSV block:
- Value of the external ID to be used in the target connection
- Value of the fields that you want to insert or modify in the target connection
-
Use the GetFileCount block to get a count of the number of CSV files created.
- For each CSV file created:
- Use the Fetch block of the Salesforce Bulk Connector to get the CSV file created.
- Add the filter criteria in the FetchBlock of Salesforce Bulk Connector. Set NumberOfFiles equal to the NumberOfFiles from GetFileCountEntity block as shown in the following screenshots.
- Use the Upsert Job block to insert or update existing records based on the External ID. Select the object name from the Entity drop down.
-
Use the Upload Data block to upload data of a job using CSV data created by using the Create CSV block to Salesforce Bulk. The Upload Data block is available for an entity of type Entity. The following fields are mandatory:
- The JobId - In the Fields tab of the Upload Data block, map the JobId field from the source connection to the target connection.
- The CSVData field - The CSV data from the Salesforce Bulk Fetch block is mapped.
- Use the Close Job block to close the bulk job. This job notifies the Salesforce Bulk server that the upload of job data is complete and it is ready for processing by Salesforce Bulk. In the Fields tab of the Close Job block, map the JobId field from Create Job block of source connection to the target connection. The Close Job block is available for an entity of type Entity.
Query Operation
Use the Query Block to see how records are processed in Salesforce Bulk.
For example, even if invalid data is specified using the Create CSV block, a "Completed Successfully" message is returned in the Status column of the Execution History section of the Connector dashboard. However, a "Record Failed" message is visible in Salesforce Bulk.
- In Salesforce Bulk, from the Monitoring tab > Bulk Data Load Jobs, obtain the JobId of the job.
- In the Query block of your map, Filter tab, add the following filters:
- JobId filter — specify the value of the JobId obtained from Salesforce Bulk
- ResultType filter — specify the type of result. For example, if you want to filter based on Failed records, specify Failed as the value. Valid values are Successand Failed.
The values of ResultType are case-sensitive. If other values (such as pass, passed, fail, failed, and so on) are specified, only records with value as Success are retrieved.
-
See the SF_Error field in the target connection. This field provides the exact details of the error.
Miscellaneous
Errors
You may receive one of the following record errors when using Salesforce Bulk:
Status Code: REQUIRED_FIELD_MISSING || Error: Required fields are missing: XYZ
Resolution: There is a required field in your data that has not been mapped. Check the field mappings in your Map to make sure that all target fields in bold are properly mapped.
Status Code: DUPLICATE_VALUE || Error: Duplicate external id specified: XYZ field = ABC field
Resolution: You are trying to upsert data to a target entity with records that use the same external ID. If you are using the Upsert operation to a Salesforce Bulk target, make sure that all external ID fields are unique. This error is also generated if you are using Batch Processing and your source data contains more than one record with the same external ID within a single batch.
TIBCO Scribe® Online API Considerations
To create Connections with the TIBCO Scribe® Online API, the Salesforce Bulk Connector requires the following information:
|
Connector Name |
Salesforce Bulk |
|
Connector ID |
8ADD76FC-525F-4B4B-B79E-945A6A762792 |
TIBCO Scribe® Online Connection Properties
In addition, this Connector uses the Connection properties shown in the following table.
Note: Connection property names are case-sensitive.
| Name | Data Type | Required | Secured | Usage |
|---|---|---|---|---|
|
Url |
string |
Yes |
No |
|
License Agreement
The TIBCO Scribe® Online End User License Agreement for the Salesforce Bulk Connector describes TIBCO and your legal obligations and requirements. TIBCO suggests that you read the End User License Agreement.
More Information
For additional information on this Connector, refer to the Knowledge Base and Discussions in the TIBCO Community.