
Importing Or Exporting Lookup Tables
TIBCO Scribe® Online Lookup Table values can be exported to a file in a CSV format or appended to an existing Lookup Table from a CSV file. If you have more than one TIBCO Scribe® Online Organization, you can export Lookup Table values from one Organization and add them to an existing Lookup Table in another Organization. The process of creating Lookup Tables can be sped up significantly by entering the data in an Excel spreadsheet and then adding the data to an existing Lookup Table.
Requirements For Appending Lookup Table Values
CSV files used for add Lookup Table values to an existing Lookup Table have the following requirements and restrictions:
- File must contain a header row with these two headings exactly as shown:
- Value1
- Value2
- There cannot be any empty rows between rows of data.
- Only the first two columns in the file are imported. If you have more than two columns, column three and higher are ignored.
- Values for each Lookup Table must be contained in a single CSV file. See Sample CSV Files for an example.
- The Value1 field should contain one of the two parameters being looked up, such as, an ID number that corresponds to a named item. For example, if Value1 contains ID 100, Value2 might contain a product name such as Chocolate Candy.
- The Value2 field should contain the second of the two parameters being looked up, such as a product name.
- Leading or trailing white space in Value fields is trimmed.
- Maximum number of records in the CSV file is 5000.
- Export of lookup table data is not permitted if the data starts with the following characters. The entire export fails with an error message informing you of potentially harmful data in the lookup table.
- Equals to ("=")
- Plus ("+")
- Minus ("-")
- At ("@")
Note: If you have exported Lookup Table values to CSV and plan to edit the file, then append them to an existing Lookup Table, do not edit the CSV file in NotePad. The CSV file is exported with newline characters (/n) that do not display correctly in NotePad. Edit the CSV files in Excel.
Editing CSV Files
TIBCO recommends editing the CSV file in Excel. Excel handles the comma field delimiter and the required carriage return at the end of a record for you. If there are commas or double quotes within a field, when you save the CSV file, Excel surrounds those fields with the appropriate double quotes required by the import process.
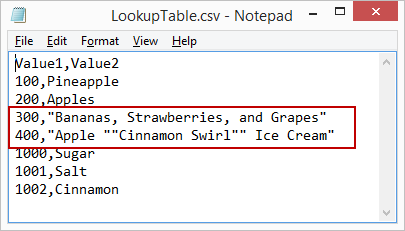
- Each field must be separated by a comma and each row by a carriage return.
- If a field contains a comma, that field must be enclosed in double quotes.
- If a field contains one or more double quotes, each double quote must be repeated, and the field itself must be surrounded in double quotes. See Sample CSV Files for examples of working with commas and double-quotes.
Sample CSV Files

CSV File In Excel
CSV File In NotePad
In the sample CSV files shown above, note how the items that contain commas and double-quotes are treated. It is important to use double quotes correctly or the import may fail.
Append Lookup Table Values From A CSV File
- From the Menu bar, select More > Lookup Tables.
- From the Lookup Tables page, select Add
 to create a new Lookup Table. TIBCO Scribe® Online creates an empty Lookup Table and opens the Edit Lookup Table dialog.
 - Modify the default name for this Lookup Table, and optionally, enter a description. Only alphanumeric characters, underscore, and dash are supported in these two fields.
Note: Consider using the Description field to call out the entities and fields you are using for this Lookup Table.
- From the Menu
 , select Append.
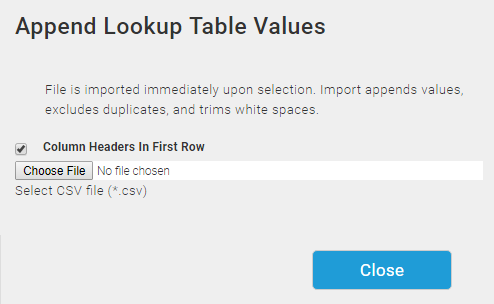
- On the Append Lookup Table Values dialog, make sure the Column Headers In First Row option is enabled.
- Browse to the location of your CSV file, select the file and select Open.
Note: CSV files are appended immediately. There is no confirmation dialog. If the table contains duplicate values, all values are included. All values are appended to the existing list of values.
- When the process is complete the Append Lookup Table Values dialog displays the following message: Lookup table values successfully appended. Select Close.
- Select Close on the Edit Lookup Tables dialog.
Note: Changes to Lookup Tables are saved immediately and cannot be canceled.
Export Lookup Table Values
Note: Each export contains the values for a single Lookup Table. Multiple tables cannot be exported at the same time or to the same export file.
- From the Menu bar, select More > Lookup Tables.
- Open the Lookup Table with the values you want to Export.
- From the Menu , select Export. TIBCO Scribe® Online generates the export file and saves it to the default Downloads folder for your browser. The default name of the export file is the name of the table followed by Lookup_<datetime>.csv, for example, Products Lookup_2-1-2017 8-11-51 PM.csv