
Managed Connectors
Note: If you are not publishing your own Connectors, when you access the Managed Connectors page, the following message is displayed:
Your Organization has not published any Connectors that require Management.
Vendor-Configured Connectors
Use the Managed Connectors page to provide custom Connectors to TIBCO Scribe® Online users. These Connectors, configured using the TIBCO Scribe® Online CDK, provide your users with the tools to perform a wide variety of tasks. It is up to you, as a Connector vendor, to determine what your Connector does.
TIBCO Scribe® Online provides two levels of customer access to Connectors:
- Marketplace — These Connectors are available from the Marketplace. Customers can install them from the Marketplace Connectors page.
- Restricted — These Connectors are only available directly from the vendor. To use this Connector, the vendor must grant access to a specific Organization. Access can be granted from the Managed Connectors page as described in Adding Customers. Once access has been granted, the Connector is installed and displays on the Customer's Connectors page with the Restricted icon (
 ).
).
Customers
From the Managed Connectors page:
- See which Organizations or Customers have installed the Connectors for which you are the vendor.
- Provide access to Restricted Connectors developed by your company to specific Organizations.
- Remove access to a Connector that you own for an Organization.
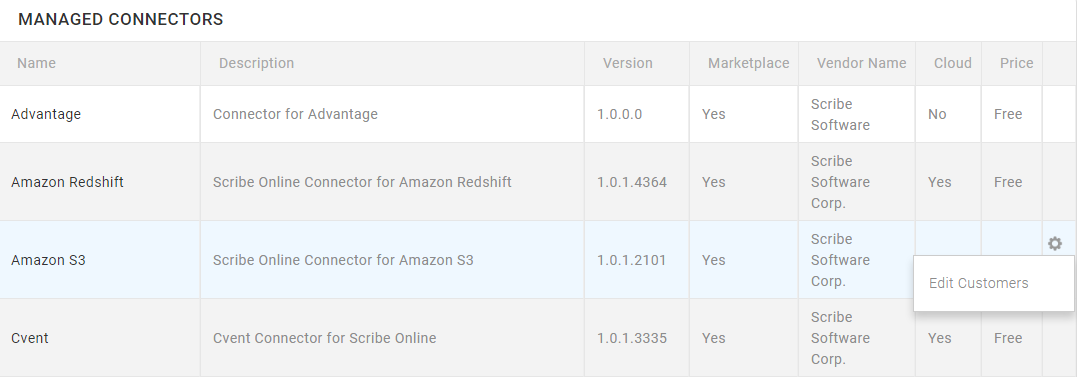
Managed Connectors
The Customers page provides the following information:
| Field | Definition |
|---|---|
|
Connector |
|
|
Name |
Connector name that displays in the Marketplace Connectors page. |
|
Description |
Description for this Connector that displays in the Marketplace Connectors page hover text. |
|
Version |
Version number of this Connector. |
|
Marketplace |
Indicates whether the Connector is currently available from the Marketplace. • Yes— Connector is visible in the Marketplace Connectors page for all TIBCO Scribe® Online users. • No— Connector is restricted. It only displays in the Marketplace Connectors page when the vendor has installed the Connector on behalf of an Organization. |
|
Vendor Name |
Name of the vendor or company that has provided this Connector. The vendor name displays in the Type drop-down list in the Add or Edit Connections dialog. |
|
Cloud |
Indicates whether the Connector supports Cloud Services. • Yes— Connector is available for Cloud Services and the Cloud Services icon ( • No — Connector requires an On-Premise Agent. |
|
Price |
Displays whether this Connector is Free or Not free. |
|
Gear Menu |
Gear Menu |
|
Edit Customers |
Add or delete customer access to the selected Connector. |
|
Organization |
|
|
Organization |
Name of the Organization where this Connector is installed. |
|
Organization ID |
Organization number of the Organization where this Connector is installed. |
|
Installed By |
User name or email address, of the person who installed the Connector for the Organization shown in the Organization column: • For Connectors installed from the Marketplace — The username of the person at the customer's Organization. • For Restricted Connectors — The username of the person in your Organization who provided access to this Connector. |
|
Date Acquired |
Date and time the Connector was installed. |
Edit Customers
Use the Edit dialog to manage the customers that have access to the selected Connector. To access the Edit dialog, select Edit Customers from the Gear menu ![]() for the Connector you want to modify.
for the Connector you want to modify.
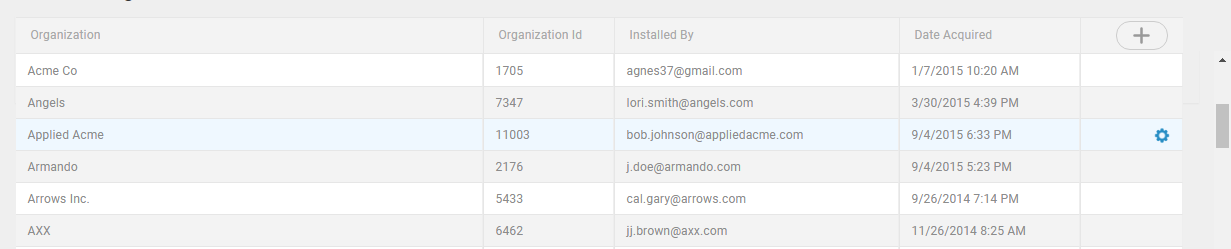
The Edit dialog provides the following information:
| Field | Definition |
|---|---|
|
Organization |
|
|
Organization |
Name of the Organization where this Connector is installed. |
|
Organization ID |
Organization number of the Organization where this Connector is installed. |
|
Installed By |
User name or email address, of the person who installed the Connector for the Organization shown in the Organization column: • For Connectors installed from the Marketplace — The username of the person at the customer's Organization. • For Restricted Connectors — The username of the person in your Organization who provided access to this Connector. |
|
Date Acquired |
Date and time the Connector was installed. |
|
|
Button to add a Customer to provide access to the Connector. |
|
Gear Menu |
Gear Menu |
|
Delete Customer |
Deletes the selected customer to remove access to the Connector. |
Adding Customers
Use the Add Customer dialog to provide access to a Connector for an Organization.
Note: The Add Customer dialog box is the only way to provide access to a Restricted Connector for an Organization.
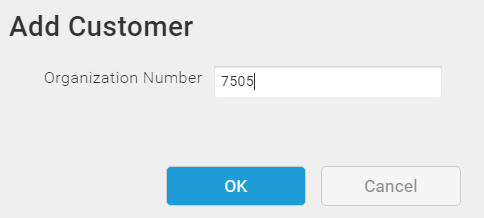
Managed Connectors — Add Customer Dialog
- From the Menu select More > Managed Connectors.
- Select a Connector from the list.
- From the Gear menu
 for that Connector select Edit Customer. The Edit dialog displays.
 - Select the Add
 button at the top of the grid to display the Add Customer dialog.
 - On the Add Customer dialog, enter the Organization Number for this Organization.
- Select OK. After a few minutes:
- The Connector displays on the Marketplace page as Installed for this Organization.
Note: Restricted Connectors do not display in the Marketplace until access has been granted.
- Any users in the selected Organization can see and select this Connector in the Type drop-down list of the Add Connection dialog.
- The Connector displays on the Marketplace page as Installed for this Organization.
Deleting Customers
- From the Menu select More > Managed Connectors.
- Select a Connector from the list.
- From the Gear menu for that Connector select Edit Customer. The Edit dialog displays.
- Select the Customer to delete.
- From the Gear menu for that Customer, select Delete Customer. The Customer is deleted immediately. Users in this Organization no longer have access to that Connector.
Note: If there are any Solutions in this Organization using this Connector, an error displays in the Execution History whenever the Solution runs.