
Configure A Text Source Connection
Integration Solution Tutorial
Connections in TIBCO Scribe® Online are global and can be used in multiple Maps. Connections contain the credentials and instructions needed to access a particular datastore. In this section of the tutorial you learn how to configure a Connection to a source text file stored on your local drive. The source text file referenced in these steps is a sample text file installed with the Agent in the ..\Program Files (x86)\Scribe Software\TIBCO Scribe® Online Agent\DataExchange\Sample Leads folder.
Text files are the equivalent of tables in a database or entities in TIBCO Scribe® Online. The header row at the top of the text file contains the field names and subsequent rows contain the data. Text files must exist before you configure a Text Connection.
Text files are a special type of datastore. You cannot filter data in a text file. Text Connections contain information about the configuration of the specific text files to which they connect.
You can create additional text files and folders under the \DataExchange\ folder referenced above, but you must add those folders to the FolderAccess.txt file. See Providing Access To Local Text Files.
Objectives
Learn how to:
- Create a Connection to a text source file.
- Define the format of the data in that file so it can be parsed.
- Test the Connection.
Add A Text Source Connection

Connections Page
- Select Marketplace from the menu.
- On the Marketplace page scroll down to the Text file as a source Connector and select it.
- Select install in the panel on the right. The Connector is installed on your Agent.
- Select More > Connections from the menu.
- From the Connections page select Add
 to open the Add a New Connection dialog.
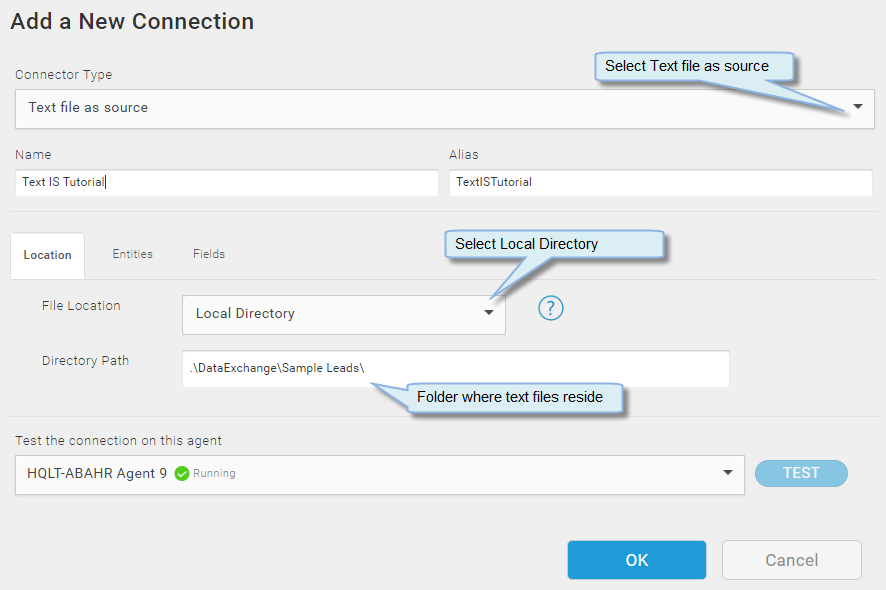
 - Select the Connection Type drop-down and select Text file as a source.
- In the Name field, type Text IS Tutorial. The Alias field is automatically completed.
- Under File Location select Local Directory. This indicates that the text file used for this Connection is located on the hard drive of your computer.
Text Source Connection — Location Tab
- The Directory Path field contains the default path .\DataExchange\. This indicates where the text file is located on the hard drive of your computer. Append Sample Leads\ to the end of the existing path. The entire path should be as follows:
.\DataExchange\Sample Leads\
- Select the Entities tab to specify the names of the entities, associated text files, text file format, and post processing options for this Connection. Each Entity name represents the individual text file or sets of related files that contain your Lead data for this tutorial. The Entity names on the Entities tab do not need to match the text file names.
- To add an entity, select Add . A new row displays in the Entities column, labeled NewEntity.
- Select NewEntity in the Entities column on the left. The Entity properties display on the right. If you have multiple Entities listed on the Entities tab, you must select each one individually and configure parameters for that specific entity. For this tutorial, you only have the Leads entity.
- In the Entity Name field type Leads. Leads displays as the entity name in any Maps that use this Connection and its associated text file.
- In the File Format field make sure that Delimited is selected.
- In the File Name field enter TextLeads.txt. This is the name of the text file that corresponds to the Leads entity.

Text Source Connection — Entities Tab
- In the Field Delimiter field select Tab, because the fields in the sample TextLeads.txt file are separated by tabs.
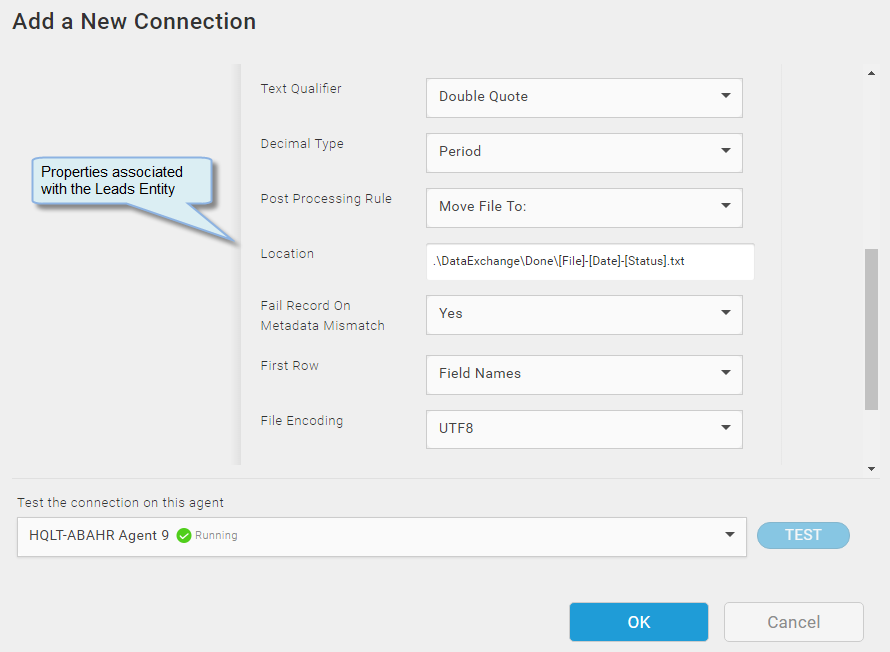
- In the Text Qualifier field select Double quote.
- In the Post Processing Rule field select Move the file to:. In the associated Location field, leave the default file location. This option moves the text file to another directory when TIBCO Scribe® Online runs the Solution and associated Maps to integrate the data in the text file into the target datastore. Moving the file does not guarantee that the data was successfully integrated.
Entity Properties — Entity Tab
- Set the Fail Record On Metadata Mismatch field to Yes. This prevents records that are incorrectly formatted from being processed.
- In the First Row field select Field Names. This indicates that there is a header row in the text file that designates the names of the fields.
- Select the Fields tab.
- Select the Leads entity, and then select the Generate fields schema from your data link in the right pane to display the associated fields.
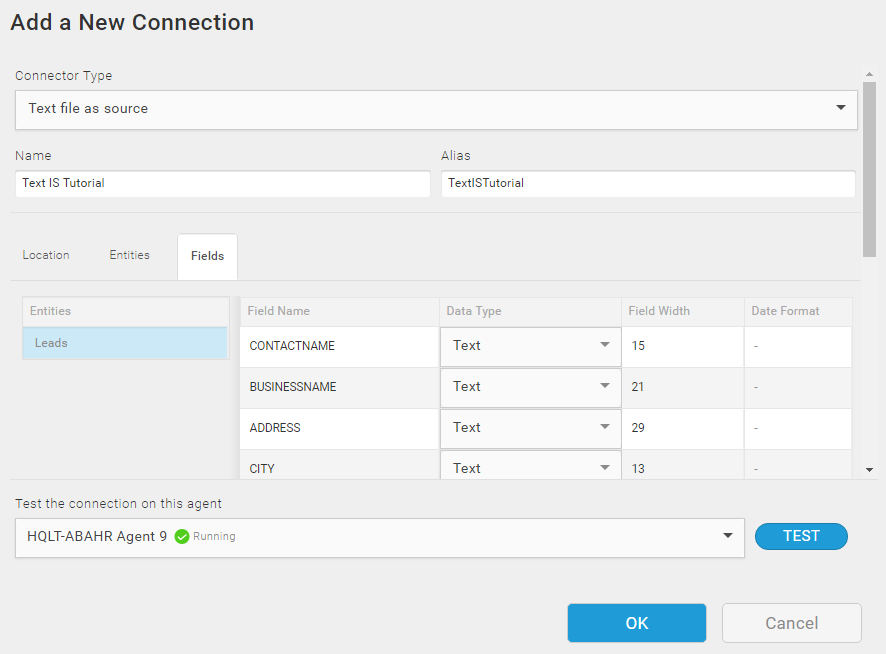
Text Source Connection — Fields Tab
- Select Test to test the Connection between TIBCO Scribe® Online and the text file.
- Once the test is successful, select OK to save the Text Connection.
Return to Integration Solution Hands-On Tutorial to select the next lesson.