
Changing User Email Address
In TIBCO Scribe® Online a user's email address is the unique identifier for that user. As a result, you cannot simply go in and modify a user's email address. Instead, you must invite the user to one or more Organizations using the new email address. Once the new user is configured, you can delete the old user from your Organization. Remember that the old user may exist in more than one Organization.
Inviting New Users To An Organization
As you go through this process, be sure to use the new email address of the user whose email address you want to modify. If the person is currently an Administrator, select the Administrator role.
Note: This option is available only when using Scribe as a stand-alone product, not when using TIBCO Scribe® Online as part of TIBCO Cloud ™ Integration. See TIBCO Scribe® Online And TIBCO Cloud ™ Integration for more information.
As an Administrator, you can invite other users to join your TIBCO Scribe® Online Organization, either as a User or as another Administrator.
If a user does not have a TIBCO Scribe® Online Account, they receive an email containing the steps to create an Account and accept the Invitation to the Organization. Once the Invitation has been sent and accepted, the person you invited has access to this Organization. How they can use TIBCO Scribe® Online and the Organization depends on their role.
Sending An Invitation
- Make sure to select the correct Organization.
- From the menu select More > User Management to open the Users page.
- Select the Add
 button to open the Manage Users: Invite dialog box.
Note: The Add button is only available for Administrators.
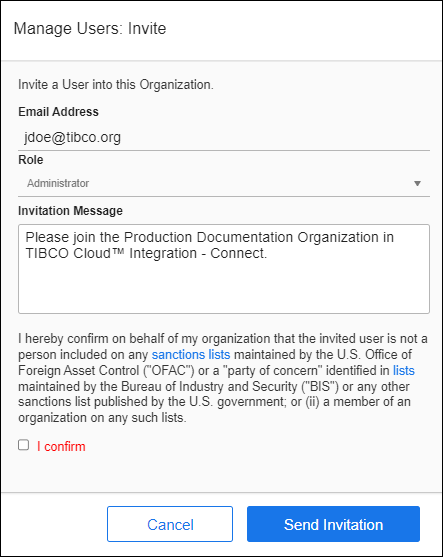
- Enter the email address of the person you want to invite.
- Select the role for this person as Administrator, User, or Read Only User.
- Include a message to this User. This message is included in the invitation email that the User receives.
- Review the statement indicating that the invited user is not on any sanctions lists. If you are not sure, use the links in the statement to confirm that the user is not on any Denied Parties List.
- Once you have reviewed the statement, select I confirm to enable the check box. If the check box is not enabled, you cannot send the invitation to the user.
- Select Send Invitation to invite this User into the Organization.
Note: If you send an invitation to the same email address more than one time, the user only receives the first email. Emails for subsequent invitations are not sent to prevent the receiving email server from treating them as spam.
Deleting The Old Users From An Organization
Once the new user has been added to the Organization with the correct email address, you can delete the old user with the incorrect email address.
Note: This option is available only when using Scribe as a stand-alone product, not when using TIBCO Scribe® Online as part of TIBCO Cloud ™ Integration. See TIBCO Scribe® Online And TIBCO Cloud ™ Integration for more information.
Administrators can delete other Administrators, Users or Read Only Users from an Organization. To delete a User, Read Only User or Administrator from this Organization:
- Make sure to select the correct Organization.
- From the menu select More > User Management to open the Users page.
- Select the user you want to delete.
- Select Remove User from the Gear menu
 .
. - When the confirmation message displays, select Delete to delete the user or select Cancel to keep the user in the Organization.
Note: If you delete yourself from an Organization and you want to return to that Organization, you must ask an Administrator to invite you to the Organization again.
Deleting a User from a Parent Organization also removes that user from associated Child Organizations.