
TIBCO Scribe® Online Connector For REST Web Services
Use the TIBCO Scribe® Online Connector for REST Web Services to connect to REST APIs that adhere to the OpenAPI Specification (OAS) 3.0, also known as Swagger. The REST Web Services Connector reads the API definition to understand metadata and available operations. Many enterprises are adding a REST API layer to legacy applications, and this Connector allows you to integrate those legacy systems with cloud applications.
Connector Specifications
This Connector supports version 3.0 of the OpenAPI Specification. See the OAS 3.0 Specification for more information.
| Supported | |
|---|---|
| Agent Types | |
| On Premise | X |
| Cloud | X |
| Replication Services | |
| Source | |
| Target | |
| Integration Services | |
| Source | X |
| Target | X |
| Migration Services | |
| Source | X |
| Target | X |
| Maps | |
| Integration | X |
| Request-Reply | X |
| Message | |
Note: This Connector is available from the TIBCO Scribe® Online Marketplace. See Marketplace TIBCO Scribe® Certified Connectors for more information.
Supported Entities
The REST Connector derives the entities and operations from the OAS specification for the REST API that you provide when you configure the Connection. Entity names displayed in the Map operation Blocks are built by combining the HTTP method and path. Special characters are not displayed in the UI, such as slashes. For example, using the sample Swagger Petstore API, if you Query Pets, the entity names displayed in TIBCO Scribe® Online are:
- Get_petsfindByStatus
- Get_petsfindByTags
- Get_petspetId
The REST Connector supports Hierarchical Data.
Special Operations
Supported operations are based on the available POST, PUT, and DELETE methods in the API. Operation Blocks display as Post, Put, and Delete.
The foundation of the Post, Put, and Delete Blocks is the CreateWith Block, which is typically used with hierarchical data to add a single record or a parent record that contains one or more child records. In the case of hierarchical data, the Add Block is used to Add child records for the parent record in the CreateWith Block. See CreateWith Block and Add Block.
Note: Operation results are only available for the first level of the hierarchy selected in the target operation Block. For example, if in the Post Block you selected an entity named Country with a related child entity State and a related grandchild entity City, only the fields for Country are available in the operation results for use in subsequent Blocks.
When a Block is added to the Map workspace, the options in the Entity field on the Block Properties General tab define the HTTP method and entity used by the Map. To enter any parameters required by the HTTP method, you must map the appropriate fields on the Fields tab.
- Post — Creates a new record.
- Put — Uses the information mapped on the Fields tab to find a matching record and overwrites the existing record. If no matching record is found, a new record is created.
- Delete — Uses the information mapped on the Fields tab to find a matching record and removes it.
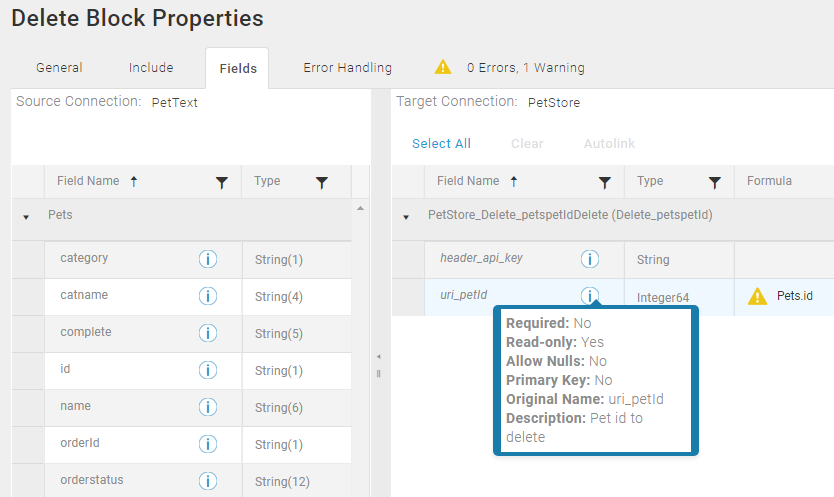
Delete Example
Using the sample Swagger Petstore API, if you wanted to delete Pets, you would do the following:
- Add a Delete Block to your Map.
- Select the Delete_petspetId method for Pets in the Entity field on the Block Properties General tab. From the name of the method you can assume that the ID of the Pet is the parameter needed to locate the correct record. You can also see that it is needed by hovering on the Information icon
 in the Fields tab and reading the Description.
- On the Fields tab, be sure to Map the ID field for the Pet entity. The Delete method uses the ID to locate the correct record.
In the image below, the fields used to locate the record are marked as Read-only and a Warning icon
 is displayed. Ignore the warning and continue building your Map.
 A typical Delete operation has a Matching Criteria tab where you select the field or fields used to locate the record to delete. For the REST Web Services, the Fields tab is used to pass additonal parameters required by the Delete method to locate the correct record.
Setup Considerations
- Supports HTTP Web Services with an OAS 3.0 Specification.
- Swagger extensions are not supported.
- Authentication types supported include the following:
- None
- Basic
- API Key
- OAuth 2.0
- Custom OAuth
- Client Credentials Grant
- Authorization Code Grant
- Implicit Grant
- Password Grant
- Device Code Grant
- If the API requires different types of authentication for different sections or entities in the specification, you may need to set up two or more Connections for the same specification each with a different type of authentication. If you do not need to access all sections of the specification, and the sections you need use the same authentication type, then one Connection is sufficient.
API Usage Limits
Some APIs limit the number of calls you can make. Refer to the documentation for the API you are accessing to determine what the limits are. Providing a Test URI in the Connection dialog consumes API calls when the Connection is tested or saved.
Selecting An Agent Type For REST Web Services
Refer to TIBCO Scribe® Online Agents for information on available Agent types and how to select the best Agent for your Solution.
Connecting To REST Web Services
Note: Best practice is to create Connections with credentials that limit permissions in the target system, following the principle of least privilege. Using Administrator level credentials in a Connection provides Administrator level access to the target system for TIBCO Scribe® Online users. Depending on the entities supported, a TIBCO Scribe® Online user could alter user accounts in the target system.
- Select More > Connections from the menu.
- From the Connections page select Add
 to open the Add a New Connection dialog.
 - Select the Connector from
the drop-down list in the Connection Type field, and then enter the following information for this Connection:
- Name — This can be any meaningful name, up to 25 characters.
- Alias — An alias for this Connection name. The alias is generated from the Connection name, and can be up to 25 characters. The Connection alias can include letters, numbers, and underscores. Spaces and special characters are not accepted. You can change the alias. For more information, see Connection Alias.
- Select the Specification tab and enter the following information for this Connection:
- Base URI — API endpoint to which you are connecting. Typically includes the schemes, host, and basePath; for example "https://petstore.swagger.io/v2/"
- Specification URI or Specification — The Connector uses the OAS Specification for the API to derive entities and operations.
- Upload — You can enter the URI for the Specification and then select the Upload link to retrieve and display the Specification in the Specification field.
- Paste — You can copy the Specification and paste it into the Specification field.
- Test URI — Optional. Used to test authentication when the Test button is selected or a request is sent by the Connector. If a URI is provided a GET is performed against the URI including any Custom Headers or authentication information. Any response other than 200 OK generates an error.
- Select the Authorization tab. Select and configure an Authentication Type for this Connection:
- None — No configuration is required if None is selected.
- Basic — Enter the Username and Password for the API.
- API Key —
- Location — Select whether the key is passed in the Header or the Query.
- Name — API Key name.
- Value — API Key value.
- Custom OAuth — See Connecting Using Custom OAuth for details.
- OAuth2 Client Credentials Grant —
- Client Id — Your Client Id for the API.
- Client Secret — Secret associated with the Client Id for the API.
- Scope — Optional. Available scopes for the OAuth2 security scheme. A map between the scope name and a short description for it.
- Access Token URL —Token URL to use for this flow. Can be relative to the API server URL.
- Refresh Token URL — Optional. URL used for obtaining refresh tokens. Can be relative to the API server URL.
- Client Authentication —— Select how to send credentials when making HTTP requests. Options include:
- Send as Basic Authorization header — Credentials are sent in the header in Basic Authentication format.
- Send as client Credentials in body — Credentials are sent in the body of the request in JSON format
Note: If you have changed your credentials, select Reset to clear the Access Token. A new token is created when you select OK or Test.
- OAuth2 Authorization Code Grant —
- Client Id — Your Client Id for the API.
- Client Secret — Secret associated with the Client Id for the API.
- Scope — Optional. Available scopes for the OAuth2 security scheme. A map between the scope name and a short description for it.
- Authorization Code URL — URL used for obtaining authorization codes.
- Access Token URL —Token URL to use for this flow. Can be relative to the API server URL.
- Refresh Token URL — Optional. URL used for obtaining refresh tokens. Can be relative to the API server URL.
- Client Authentication — Select how to send credentials when making HTTP requests. Options include:
- Send as Basic Authorization header — Credentials are sent in the header in Basic Authentication format.
- Send as client Credentials in body — Credentials are sent in the body of the request in JSON format
Note: Select Authenticate to send credentials to the API and authenticate them. When the authentication process is complete. select OK to validate and save the Connection.
Note: When registering your TIBCO Scribe® Online Connection in a third-party system using Authorization Code Grant (3-legged OAuth2), use one of the following redirect URLs based on your TIBCO Scribe® Online environment.
- Production AWS environments: https://online.scribesoft.com/OAuthAuthorizationResponse.aspx
- Sandbox:https://sandbox.scribesoft.com/OAuthAuthorizationResponse.aspx
Tip: Do not test the Connection until the message at the top of the Connection dialog reads Authentication complete. Note that it may take a few minutes for this message to display.
- OAuth2 Implicit Grant —
- Client Id — Your Client Id for the API.
- Client Secret — Secret associated with the Client Id for the API.
- Scope — Optional. Available scopes for the OAuth2 security scheme. A map between the scope name and a short description for it.
- Audience — Optional. URL of the target or receiving API you want to access.
- Access Token URL —Token URL to use for this flow. Can be relative to the API server URL.
- Refresh Token URL — Optional. URL used for obtaining refresh tokens. Can be relative to the API server URL.
- Client Authentication - Select how to send credentials when making HTTP requests. Options include:
- Send as Basic Authorization header — Credentials are sent in the header in Basic Authentication format.
- Send as client Credentials in body — Credentials are sent in the body of the request in JSON format
Note: Select Authenticate to send credentials to the API and authenticate them. When the authentication process is complete, select OK to validate and save the Connection.
Tip: Do not test the Connection until the message at the top of the Connection dialog reads Authentication complete. Note that it may take a few minutes for this message to display.
- OAuth2 Password Grant —
- Username — Username for the API.
- Password — Password associated with the Username for the API.
- Client Id — Optional. Your Client Id for the API.
- Client Secret — Optional. Secret associated with the Client Id for the API.
- Scope — Optional. Available scopes for the OAuth2 security scheme. A map between the scope name and a short description for it.
- Access Token URL —Token URL to use for this flow. Can be relative to the API server URL.
- Refresh Token URL — Optional. URL used for obtaining refresh tokens. Can be relative to the API server URL.
- Client Authentication — Select how to send credentials when making HTTP requests. Options include:
- Send as Basic Authorization header — Credentials are sent in the header in Basic Authentication format. Uses the values in Client Id and Client Secret.
- Send as client Credentials in body — Credentials are sent in the body of the request in JSON format
Note: If you have changed your credentials, select Reset to clear the Access Token. A new token is created when you select OK or Test.
- OAuth2 Device Code Grant —
- Client Id — Your Client Id for the API.
- Client Secret — Secret associated with the Client Id for the API.
- Grant Type — Enter the unique Code Grant value specific to the API.
- Scope — Optional. Available scopes for the OAuth2 security scheme. A map between the scope name and a short description for it.
- User Code Url — URL used to request a User Code. A User Code is returned when you select the Get User Code button at the bottom of the screen. Copy the User Code and paste it into the appropriate field in the Authentication screen.
- Access Token URL —Token URL to use for this flow. Can be relative to the API server URL.
- Refresh Token URL — Optional. URL used for obtaining refresh tokens. Can be relative to the API server URL.
- Client Authentication - Select how to send credentials when making HTTP requests. Options include:
- Send as Basic Authorization header - Credentials are sent in the header in Basic Authentication format.
- Send as client Credentials in body - Credentials are sent in the body of the request in JSON format
Note: Enter your credentials and select Get User Code. Copy the Code that is returned from the API, then select Authenticate. When the Authenticate screen displays enter your credentials and copy the User Code into the appropriate field to complete the Authentication process.
Tip: Do not test the Connection until the message at the top of the Connection dialog reads Authentication complete. Note that it may take a few minutes for this message to display.
- Select the Custom Headers tab and select the Add button to create any additional headers you need. Custom headers are sent with all HTTP requests made by the Connector. Use custom headers to include additional data required to connect to the API, such as an email address. Note that because custom headers are not encrypted, you should not use them for sensitive information.
- Name — Name of the custom header.
- Value — Value that should be sent in the connection parameters for the API.
- The Information tab contains the Version, Title, and Description for this API from the OAS Specification.
- Select Test to ensure that the Agent can connect to your API. Be sure to test the Connection against all Agents that use this Connection. See Testing Connections.
- Select OK/Save to save the Connection.
Note: If the OAS Specification changes, update the Connection with the new Specification and save it, then reset metadata. See Resetting Metadata.
Larger Specifications may connect more slowly.
Connecting Using Custom OAuth
If you are connecting to an API with special authentication requirements, use the Custom OAuth option to build custom authentication and reset requests. Refer to Connecting To REST Web Services for step-by-step instructions on accessing and configuring the other tabs on the REST Web Services Connection dialog.
Authentication Request Input Settings
Use Authentication Request Input Settings to build the authentication requests sent to the target API.
- Content Encoding — Indicates where the encoding type information is sent in the HTTP request. Options include:
- application/x-www-form-urlencoded — Sets content-type to URLencoded and encodes the content to match.
- application/json — Sets content-type to JSON and encodes the content to match.
- Access Token URL — Token URL to use for this flow. Can be relative to the API server URL.
- Request Inputs — Use the Add button to configure one or more fields for the request. Create a separate field for each piece of authentication information required by the API. Options include:
- Content — JSON / Body
- Query — Query parameter
- Header — Header parameter
- Basic Authentication Header — Requires Username and Password or Client ID and Client Secret. When you enter credentials for this option and select Generate, the Connector uses 32-bit encoding to encode the authentication and sets it to Protected automatically.
For each input type, enter a Name and a Field Value. Enable the Protect check box to encrypt the input if necessary.
Note: Once the Protect check box has been enabled, you cannot disable it. Delete the field and add it again with the updated information.
Refresh Request Input Settings
Use Refresh Request Settings to build the refresh requests sent to the target API.
- Specify Refresh Request — If the API you are accessing does not have a refresh mechanism, do not enable this option or configure this section.
- Refresh Token URL — URL used for obtaining refresh tokens. Can be relative to the API server URL.
- Refresh Request Inputs — Use the Add button to configure one or more fields for the request. Create a separate field for each piece of authentication information required by the API. Options include:
- Content — JSON / Body
- Query — Query parameter
- Header — Header parameter
- Basic Authentication Header — Requires Username and Password or Client ID and Client Secret. When you enter credentials for this option and select Generate, the Connector uses base64 encoding to create a Basic Authentication header and sets it to Protected automatically.
For each Request input type, complete the following:
- Source — Select the source of the information used in the request, either Value or Response.
- Name — Name of the field used in the request.
- Field Value — Value of the field in the request. If the Source is Response, this should be the name of the field in the Response for the Authentication request and the Refresh request that contains the value needed.
- Protect — Enable the Protect check box to encrypt the input if necessary.
Note: Once the Protect check box has been enabled, you cannot disable it. Delete the field and add it again with the updated information.
Authentication Header Settings
Use Authentication Header Settings to identify token and expiration information in the authentication response and specify how the access token is used.
- Token Field — Name of the token field contained in the response.
- Expires In Field — Name of the expiration field in the response.
- Header Schema — Specifies how the access token is used in HTTP calls to the API. Options include:
- Basic — Sends an Authorization header as "Basic <your token>"
- Bearer — Sends an Authorization header as "Bearer <your token>"
Metadata Notes
- Field descriptions display in the Query Block Preview tab and the Fields tab of the target operation Blocks if they are provided in the OAS Specification.
- Parameters that are arrays of arrays, mixed type arrays, or plain text responses are not supported.
Naming
Connection metadata must have unique entity, relationship, and field names. If your Connection metadata has duplicate names, review the source system to determine if the duplicates can be renamed.
Retry Logic
When an error is encountered based on responses with status codes HTTP 408 Request Timeout, HTTP 500 Internal Server Error, or HTTP 504 Gateway Timeout, the Connector retries up to three times before generating a final exception.
REST Web Services Connector As IS/MS Source
Consider the following when using the REST Web Services Connector as an IS/MS source.
Relationships
Hierarchical relationships, such as grandparent, parent, grandchild relationships are supported. See Hierarchical Data for examples.
Filtering
- Using Net Change to filter for new and updated records is not supported.
- The Filter tab on the Query Block only displays the required filters for the selected entity.
- Decimal values that could be valid dates are converted to dates. Use the TODOUBLE function in a formula to prevent this conversion.
- Equals (=) is the only operator supported for filters.
DateTime
DateTime information is defined as a property with type:string and format:date-time.
Query
Null object arrays are not supported, such as:
- A single object returned in the response body and its value is null
- A response body that is an array and any of the members of this array has a value of null
- An array of records where no names or values are provided
REST Web Services Connector As IS/MS Target
Consider the following when using the REST Web Services Connector as an IS/MS target.
- Batch processing is not supported.
- Hierarchical relationships are supported.
- Put and Delete operations use the Block Properties Fields tab to pass additional parameters required to locate the correct record to update or delete. The fields used to locate the record may be marked as Read-only and, when mapped, display a Warning icon . In the case of Read-only fields, ignore the warning and continue building your Map.
- If fields sent by a target operation block do not match the fields returned by the target in the response, the mismatched fields are added to the entity in the format "response_fieldname".
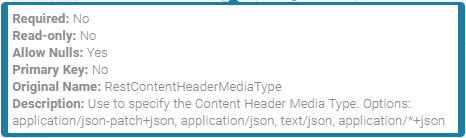
Customizing The Content-Type Header
If you are connecting to a REST API where the specification contains is more than one type of Content-Type header, you can control the Content-Type header you want to use in the Block Properties Fields tab by mapping the virtual field RestContentHeaderMediaType for the target entity selected in the Block. TIBCO Scribe® Online reads the specification you added in the Connection dialog and detects the supported Content-Type headers from the associated endpoints. Those formats are displayed by hovering over the Info icon ![]() to display the field description for the RestContentHeaderMediaType field. Content-Type is appended to the API call. The default format is to send Content-Type header as "application/json".
to display the field description for the RestContentHeaderMediaType field. Content-Type is appended to the API call. The default format is to send Content-Type header as "application/json".
TIBCO Scribe® Online API Considerations
To create connections with the TIBCO Scribe® Online API, the REST Web Services Connector requires the following information:
|
Connector Name |
REST Web Services |
|
Connector ID |
EF6F0AB1-A5B9-4620-B714-5D4D5ADBEE02 |
TIBCO Scribe® Online Connection Properties
In addition, this Connector uses the Connection properties shown in the following table.
Note: Connection property names are case-sensitive.
Warning: Best practice is not to create Connections using the TIBCO Scribe® Online API using the following Authorization types unless you have not other option:
- Custom OAuth
- OAuth2 Device Code Grant
- OAuth 2 Authorization Code Grant
- OAuth2 Implicit Grant
| Name | Data Type | Required | Secured | Usage |
|---|---|---|---|---|
|
BaseUri |
String |
Yes |
No |
|
|
SpecificationUri |
String |
Yes |
No |
|
|
Specification |
String |
Yes |
No |
|
|
TestUri |
String |
Yes |
No |
|
|
CustomHeaders |
String |
No |
No |
|
|
ScribeOnline_ConnectionInfoDBId |
String |
Yes |
No |
|
|
AuthorizationType |
String |
Yes |
No |
Required fields vary based on the Authorization Type selected. Authorization Types include: • Basic • APIKey • Custom OAuth • OAuth2 Client Credentials Grant • OAuth 2 Authorization Code Grant • OAuth2 Implicit Grant • OAuth2 Password Grant • OAuth2 Device Code Grant |
|
Basic |
||||
|
BasicUsername |
String |
Yes |
No |
|
|
BasicPassword |
String |
Yes |
Yes |
|
|
API Key |
||||
|
ApiKeyLocation |
String |
Yes |
No |
|
|
ApiKeyName |
String |
Yes |
No |
|
|
ApiKeyValue |
String |
Yes |
Yes |
|
|
Custom OAuth |
||||
|
OAuth2AccessTokenUrl |
String |
No |
|
|
|
CustomOAuthAuthRequestInputs |
serialized string from JSon Array of objects |
Yes |
No |
|
|
CustomOAuthProtectedAuthRequestInputs |
serialized string from JSon Array of objects |
Yes |
No |
|
|
CustomOAuthAuthRefreshRequestInputs |
serialized string from JSon Array of objects |
Yes |
No |
|
|
CustomOAuthAuthProtectedRefreshRequestInputs |
serialized string from JSon Array of objects |
Yes |
No |
|
|
CustomOAuthContentEncoding |
String |
Yes |
No |
Options: • application/json • application/x-www-form-urlencoded |
|
OAuth2RefreshTokenUrl |
String |
Yes |
No |
|
|
CustomOAuthTokenExpiresInFieldName |
String |
Yes |
No |
|
|
CustomOAuthAuthenticationSchema |
String |
Yes |
No |
|
|
CustomOAuthAuthHeaderMappingField |
String |
Yes |
No |
Name of access token field in response or value to be used in Authorization header while executing Connector operations. |
|
OAuth2 Client Credentials Grant |
||||
|
ClientAuthentication |
String |
Yes |
No |
Options: • Send as Basic Auth header • Send as client credentials in body |
|
OAuth2Scope |
String |
No |
|
|
|
OAuth2AccessTokenUrl |
String |
Yes |
No |
|
|
OAuth2RefreshTokenUrl |
String |
Yes |
No |
|
|
OAuth2 Authorization Code Grant |
||||
|
ClientAuthentication |
String |
Yes |
No |
Options: • Send as Basic Auth header • Send as client credentials in body |
|
authOAuthRedirectUrl |
String |
No |
|
|
|
OAuth2Scope |
String |
No |
|
|
|
OAuth2AccessTokenUrl |
String |
Yes |
No |
|
|
OAuth2AccessToken |
String |
No |
|
|
|
OAuth2AccessTokenExpiration |
String |
No |
UTC DateTime string |
|
|
OAuth2RefreshTokenUrl |
String |
No |
|
|
|
OAuth2RefreshToken |
String |
No |
|
|
|
OAuth2 Implicit Grant |
||||
|
OAuth2AccessTokenExpiration |
String |
No |
|
|
|
authOAuthRedirectUrl |
String |
Yes |
No |
|
|
OAuth2Scope |
String |
No |
|
|
|
OAuth2RefreshToken |
String |
Yes |
No |
|
|
OAuth2RefreshTokenUrl |
String |
No |
|
|
|
OAuth2 Password Grant |
||||
|
ClientAuthentication |
String |
Yes |
No |
Options: • Send as Basic Auth header • Send as client credentials in body |
|
BasicUsername |
String |
Yes |
No |
|
|
BasicPassword |
String |
Yes |
Yes |
|
|
OAuth2Scope |
String |
No |
|
|
|
OAuth2AccessTokenUrl |
String |
No |
|
|
|
OAuth2RefreshTokenUrl |
String |
No |
|
|
|
OAuth2 Device Code Grant |
||||
|
ClientAuthentication |
String |
Yes |
No |
Options: • Send as Basic Auth header • Send as client credentials in body |
|
OAuth2Scope |
String |
No |
|
|
|
OAuth2AccessTokenUrl |
String |
Yes |
No |
|
|
OAuth2RefreshTokenUrl |
String |
Yes |
No |
|
|
OAuth2AccessToken |
String |
No |
Required if creating the connection via the API. |
|
|
OAuth2RefreshTokenExpiration |
String |
No |
|
|
|
OAuth2RefreshToken |
String |
No |
|
|
License Agreement
The TIBCO Scribe® Online End User License Agreement for the REST Web Services Connector describes TIBCO and your legal obligations and requirements. TIBCO suggests that you read the End User License Agreement.
More Information
For additional information on this Connector, refer to the Knowledge Base and Discussions in the TIBCO Community.