
Source Text Connection — Location Tab
Use the Location tab on the Text File As A Source Connection dialog to specify the physical location and access properties for your text file. For specific instructions, select the link for one of the possible File Locations listed.
- Local Directory
- FTP (unencrypted) server
- FTPS (encrypted using SSL)
- SFTP (SSH File Transfer Protocol)
- Dropbox
- OneDrive
- OneDrive Business
Accessing The Location Tab
- Select More > Connections from the menu.
- From the Connections page, select Add
 to open the Add a New Connection dialog or select Edit from the Gear menu
  for the Connection.
 - Select the Location tab.
- Choose one File Location option and configure it using the appropriate set of instructions below the graphic.
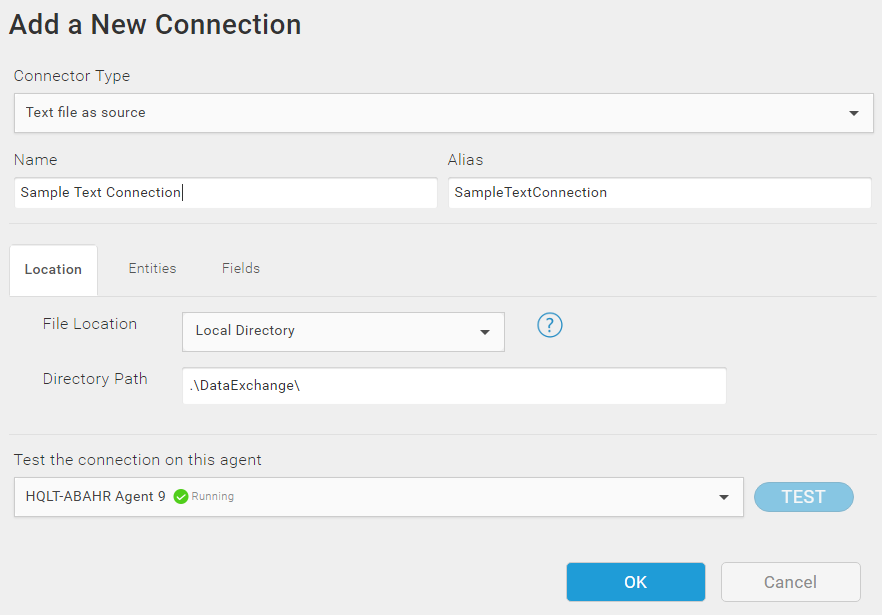
Configuring The Location Tab
Use the field definitions in the table and the specific step-by-step instructions for each location type to configure a File Location for your text files.
| Property | Definition |
|---|---|
|
Local Directory Location Properties |
|
|
Directory path |
Path to the directory where your text files are stored. The default directory path, .\DataExchange\ is located under the default directory on the computer on which the TIBCO Scribe® Online Agent is installed: ..\Scribe Software\TIBCO Scribe® Online Agent n\, where n is the Agent number if you have multiple On-Premise Agents installed. You can specify an absolute , relative, or a network host and directory path. The relative path is relative to the ..\TIBCO Scribe® Online Agent n\ folder. |
|
FTP (unencrypted) & FTPS (Encrypted Using SSL) Location Properties |
|
|
Host Name |
Name, IP address, or URL of the FTP server host. If you do not know the FTP server host name, see your System Administrator. |
|
Port |
Default port number is 21. Do not change the port number unless instructed to do so by your System Administrator. |
|
User / Password |
User name and password to access the FTP host. Required unless your FTP server allows anonymous connections. |
|
Remote Directory Path |
For text files stored in a directory on the FTP site, enter the directory name including forward slashes. Examples: /MyTextFiles/Sales or /MyTextFiles/Leads |
|
SFTP (SSH File Transfer Protocol) |
|
|
Host name |
Name, IP address, or URL of the FTP server host. If you do not know the FTP server host name, see your System Administrator. |
|
Port |
Default port number is 22. Do not change the port number unless instructed to do so by your System Administrator. |
|
User / Password |
User name and password to access the FTP host. Required unless your FTP server allows anonymous connections. |
|
Remote Directory Path |
For text files stored in a directory on the FTP site, enter the directory name including forward slashes. Examples: /MyTextFiles/Sales or /MyTextFiles/Leads |
|
Fingerprint |
Populated automatically when you verify that the Agent can access the FTP site and accept the certificate. |
|
Dropbox, OneDrive, & OneDrive Business Location Properties |
|
|
Remote Directory Path |
For files stored in a directory on Dropbox, OneDrive, or OneDrive Business specify the directory name. If this option has only a /, TIBCO Scribe® Online uses the main directory. A blank path is not supported. |
Local Directory
Note: For files in a Local Directory, the Text File Connectors only connect to text files from folders listed in the FolderAccess.txt file. Configure the FolderAccess.txt file before selecting Local Directory. See Providing Access To Local Text Files for more information.
For text files stored on the computer where the TIBCO Scribe® Online On-Premise Agent is installed:
- Select Local directory.
- Use the Location Properties Table above to complete the configuration for the Location.
- Select the Entities tab to continue defining the Connection.
Note: If you store or create text files in a local directory, make sure that directory is not under one of your Connector folders. Any time a Connector is updated, the Connector folder and all of its contents are deleted and replaced with the updated Connector files. A best practice is to local text files in a folder under the Data Exchange folder, which is typically found in the following location: C:\Program Files (x86)\Scribe Software\TIBCO Scribe® Online Agent\DataExchange
FTP (unencrypted)
For text files stored on an FTP (File Transfer Protocol) Server:
- Select FTP (unencrypted).
- Use the Location Properties Table above to complete the configuration for the Location.
- Select Validate to verify that the TIBCO Scribe® Online Agent can access the FTP site. See Troubleshooting Connections To FTP Text File Locations if you have problems validating.
- After you successfully validate, select the Entities tab to continue defining the Connection.
FTPS (Encrypted Using SSL)
Note: Only explicit FTPS is supported.
For text files stored on an SSL-encrypted FTP Server:
- Select FTPS (encrypted using SSL).
- Use the Location Properties Table above to complete the configuration for the Location.
- Select Validate to verify that the TIBCO Scribe® Online Agent can access the FTP site. See Troubleshooting Connections To FTP Text File Locations if you have problems validating.
The first time you validate the Connection, you receive a certificate warning similar to the following:

- Select Accept if you trust this certificate and continue to the FTP site.
- After you successfully validate, select the Entities tab to continue defining the Connection.
SFTP (SSH File Transfer Protocol)
Note: Only explicit SFTP is supported.
For text files stored on a Secure FTP Server:
- Select SFTP (SSH File Transfer Protocol) .
- Use the Location Properties Table above to complete the configuration for the Location.
- Select Validate to verify that the TIBCO Scribe® Online Agent can access the FTP site. See Troubleshooting Connections To FTP Text File Locations if you have problems validating.
The first time you validate the Connection, you receive a certificate warning similar to the following:
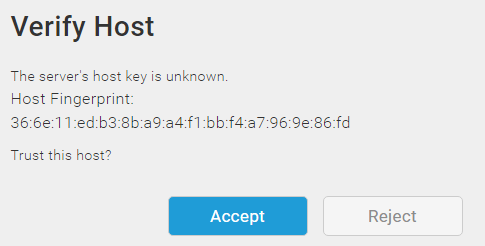
- Select Accept to accept the fingerprint for this SFTP location.
- After you successfully validate, Select the Entities tab to continue defining the Connection.
Retry Logic
When a timeout occurs, the Text Connector retries three times. Each time a retry fails, the time between retries is increased by 1 second.
Dropbox
Note: TIBCO is not affiliated with or otherwise sponsored by Dropbox, Inc.
- Dropbox requires OAuth authentication.
- Supports Dropbox API version 2.
- If needed, you can troubleshoot your Dropbox Connection by selecting the following Dropbox link: https://status.dropbox.com/
Important: Do not try to create or reset a Dropbox-based Text Connection when a Solution that uses a Dropbox Text Connection is running or the Solution will fail.
- Select Dropbox as your location. The Connection dialog contacts Dropbox and displays the Authenticate button.
- Select Authenticate. Dropbox opens a new page in your browser asking you to log into Dropbox.
- Log into Dropbox. The following Authentication message is displayed:
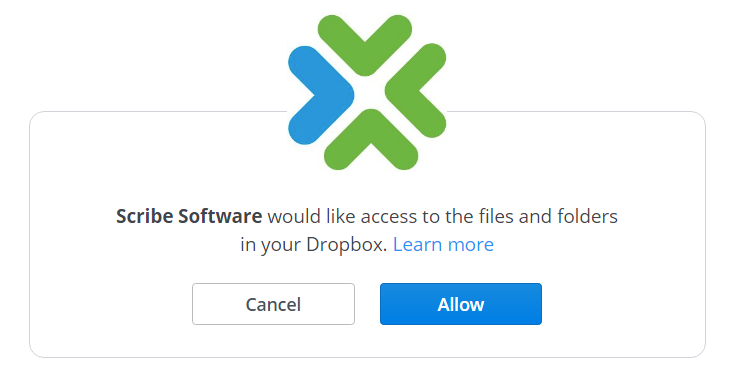
- Select Allow to complete the OAuth authorization. The following page displays:

- Select Close to continue. After a moment, the message below the Authenticate button reads Authentication Complete and asks you to Validate the directory location:
- Specify the directory name in the Remote Directory Path field. If this option is blank, TIBCO Scribe® Online uses the Dropbox main directory. It must contain at least a slash (/).
- Select Validate after the Authentication complete message displays to verify that the TIBCO Scribe® Online Agent can access the Dropbox site.
- After you successfully validate, select the Entities tab to continue defining the Connection.
Note: When you configure a Text File Connection that uses Dropbox, TIBCO Scribe® Online adds App Links to your Dropbox account under Settings > Apps Linked. If you delete those links, TIBCO Scribe® Online cannot access Dropbox.
OneDrive and OneDrive Business
Note: TIBCO is not affiliated with or otherwise sponsored by Microsoft OneDrive.
- Select OneDrive or OneDrive Business as your location. After a few moments, the following message displays: OAuth URL received. Ready to authenticate.
- Select Authenticate.
- The Microsoft sign in page displays. Sign into your Microsoft account.

- The following page displays: (This is only applicable to OneDrive and is not applicable to OneDrive Business.)

- Select Yes to allow TIBCO Scribe® Online to access OneDrive or OneDrive Business. The following page displays:
- Select Close to continue. After a moment, the message below the Authenticate button reads Authentication Complete and asks you to Validate the directory location:
- For OneDrive
Specify the directory name in the Remote Directory Path. If this option is blank, TIBCO Scribe® Online uses the OneDrive main directory. It must contain at least a slash (/).
For OneDrive Business
TIBCO Scribe® Online uses the OneDrive Business main directory. It must contain at least a slash (/).
- Select Validate after the Authentication complete message displays to verify that the TIBCO Scribe® Online Agent can access the OneDrive site.
- After you successfully verify, select the Entities tab to continue defining the Connection.
Related Topics
TIBCO Scribe® Online Text File as Source