
Cvent HData Connector For TIBCO Scribe® Online
Use the Cvent HData Connector for TIBCO Scribe® Online to create and schedule events such as Webinars.
Connector Specifications
This Connector supports version V20061 of the Cvent API.
| Supported | |
|---|---|
|
Agent Types |
|
| On Premise | X |
| Cloud | X |
|
Replication Services |
|
| Source | |
| Target | |
|
Integration Services |
|
| Source | X |
| Target | X |
|
Migration Services |
|
| Source | |
| Target | |
|
Maps |
|
| Integration | X |
| Request-Reply | X |
| Message | X |
Note: This Connector is available from the TIBCO Scribe® Online Marketplace. See Marketplace TIBCO Scribe® Certified Connectors for more information.
Supported Entities
The Connector for Cvent HData supports the following entities. Select a linked entity name for additional information when using that entity in TIBCO Scribe® Online. For a list of additional operations by entity see Special Operations.
Standard Operations
| Entity | Query | Create | Update | Delete | Upsert |
|---|---|---|---|---|---|
|
Contact |
X |
X |
X |
|
X |
|
X |
X |
|
|
|
|
|
EmailRequest |
|
X |
|
|
|
|
X |
X |
X |
|
|
|
|
EventQuestion |
X |
|
|
|
|
|
Guest |
X |
|
|
|
|
|
Invitee |
X |
X |
|
|
|
|
|
|
|
|
|
|
|
X |
X |
X |
|
|
|
|
X |
X |
X |
|
|
|
|
Speaker |
X |
|
|
|
|
|
X |
X |
|
|
|
|
|
|
|
|
|
X |
Special Operations
| Entity | Operations |
|---|---|
|
ContactGroup |
-Add |
|
Event |
-Copy |
|
Participant |
Setup Considerations
The Cvent HData Connector requires that you have a Cvent account.
Webhooks
To use Cvent webhooks to send messages to TIBCO Scribe® Online based on actions in Cvent:
- Contact your Cvent account manager to enable webhooks for your Cvent account.
- Make sure your network’s firewall accepts traffic from the “Cvent-Webhooks” user agent that Cvent uses for webhooks.
- Create a Webhooks configuration in Cvent in Admin > Integrations > Push API Integrations, which requires the following:
- Default Endpoint — Enter https://app.scribesoft.com
- Authentication Token — The Authentication token is unique for every TIBCO Scribe® Online Organization. In TIBCO Scribe® Online select More > Security from the menu. Use the Event Solution Access Token displayed on the Security dialog.
- Within the new Cvent Webhooks configuration add the following:
- In the Endpoints section, add a TIBCO Scribe® Online endpoint for each Wait For Message Block used in a TIBCO Scribe® Online Map.
- In the Integration Points section, add an Integration Point containing a Cvent action and associate it with one of the TIBCO Scribe® Online Endpoints.
- Activate Webhooks for each Event from which you wish to send messages to TIBCO Scribe® Online.
See Notes On Webhooks below for more information.
API Usage Limits
Connections to the Cvent API are limited to one hour sessions.
Selecting An Agent Type For Cvent HData
Refer to TIBCO Scribe® Online Agents for information on available Agent types and how to select the best Agent for your Solution.
Connecting To Cvent HData
Note: Best practice is to create Connections with credentials that limit permissions in the target system, following the principle of least privilege. Using Administrator level credentials in a Connection provides Administrator level access to the target system for TIBCO Scribe® Online users. Depending on the entities supported, a TIBCO Scribe® Online user could alter user accounts in the target system.
- From the Connections page, click New to open the Manage Connections: Create dialog box.
- Select Connector Name as the Type and then enter:
- Name — This can be any meaningful name, up to 25 characters.
- Alias — An alias for this Connection name. The alias is generated from the Connection name, and can be up to 25 characters. The Connection alias can include letters, numbers, and underscores. Spaces and special characters are not accepted. You can change the alias. For more information, see Connection Alias.
- API URL — Web address used to connect to the Cvent API. Default connection URLs include:
- Production — https://api.cvent.com/soap/V200611.ASMX
- Sandbox — https://sandbox-api.cvent.com/soap/V200611.ASMX
- Account Number — Account number used to log into Cvent.
- API User — User name used to log into the Cvent account.
- API Password — Password used to log into the Cvent account.
- Select Test to ensure that the Agent can connect to your database. Be sure to test the Connection against all Agents that use this Connection. See Testing Connections.
- Select OK/Save to save the Connection.
Metadata Notes
Naming
Connection metadata must have unique entity, relationship, and field names. If your Connection metadata has duplicate names, review the source system to determine if the duplicates can be renamed.
Data Fields And Entity Types
Consider the following for Cvent data fields and entity types.
- Custom fields are supported.
- Data Types supported include:
- Boolean
- DateTime
- Decimal
- Guid
- Integer
- String
Custom Fields
Cvent uses custom data types for its Custom fields. TIBCO Scribe® Online converts Cvent custom data types as follows:
|
Cvent Custom Data Type |
TIBCO Scribe® Online Data Type |
|---|---|
|
Open Ended Text - Date/Time |
DateTime |
|
Open Ended Text - One Line - General |
String — Max length 300 |
|
Open Ended Text - One Line - Number |
Integer32 |
|
Open Ended Text - One Line - Currency |
Decimal |
|
Open Ended Text - One Line - Decimal |
Decimal |
|
Open Ended Text - One Line - US Phone Number |
String |
|
Open Ended Text - One Line - Email Address |
String |
|
Open Ended Text - Comment Box |
String — Max length 4000 |
|
Choice - Single Answer |
String Custom picklist field — Picklist values display in the Description field accessed using the Info icon |
|
Choice - Multiple Answer |
String Custom picklist field — Picklist values display in the Description field accessed using the Info icon |
|
Auto-Increment |
String |
Cvent HData Connector As IS Source
Consider the following when using the Cvent HData Connector as an Integration Solution source.
Query
- TIBCO Scribe® Online provides a virtual field, ScribeLastModifiedDate, to retrieve parent records that have been added or modified and associated child records. This field can also be used to return records where only the child records have been modified. In TIBCO Scribe® Online, if you are working with the ScribeLastModifiedDate field:
- When using the ScribeLastModifiedDate field as a filter:
- Query fails if ScribeLastModifiedDate is used as a filter and combined with any other filter fields.
- Only the greater than (>), greater than or equal to (>=), and less than (<) operators are supported.
- Only AND is supported.
- The greater than (>), greater than or equal to (>=) operators are both treated as greater than or equal to (>=).
- The maximum number of records that can be returned for a single query that uses the ScribeLastModifiedDate field as a filter is 10,000. If you have more than 10,000 records, refer to the Initial Synchronization section for steps to retrieve all records by using a starting and ending date.
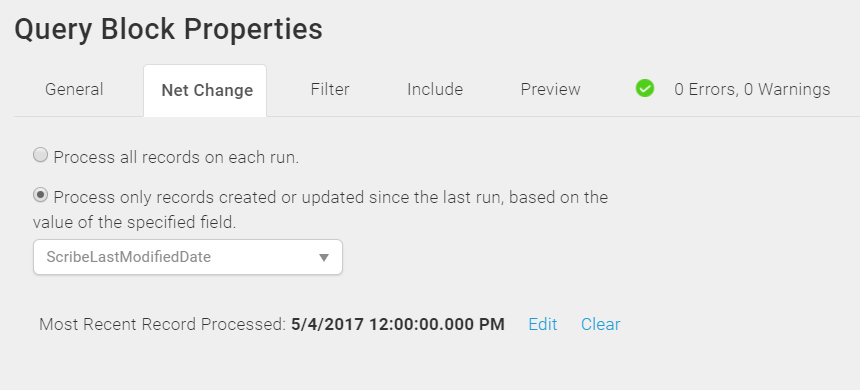
- Records received from Cvent are not returned in ascending order. When using the ScribeLastModifiedDate field on the Net Change tab, if there is a fatal error and the Solution stops, the most recent date in the ScribeLastModifiedDate field of the records processed is stored as the new date filter parameter. If that stored date is more recent than any unprocessed records, those records are skipped in the next execution of the Solution. In this case, edit the value for the Most Recent Record Processed date on the Net Change tab to a date old enough to process the missed records. To log the previous Most Recent Record Processed date in case you need to go back to a prior date and reprocess records, see Agent Logging
- Records in Cvent store the date of each change made to a record. Therefore, the same record may be returned multiple times in a Query depending on the dates selected either on the Net Change tab or the Filters tab.
- Parents where only the child records have been modified are processed regardless of whether or not the children have been selected on the Include tab.
- When using the ScribeLastModifiedDate field as a filter:
- The maximum number of records that can be returned for a single query that uses filters other than the ScribeLastModifiedDate is 25,000. Use one or more filters to reduce the number of records returned. If the maximum number of records is exceeded, TIBCO Scribe® Online displays an error message similar to the following:
ERROR: Exception Type: InvalidExecuteQueryException Message: The following error has occurred in the Cvent Connector: CV20012 - TOO_MANY_ID_RETURNED
Net Change
In TIBCO Scribe® Online, the Most Recent Record Processed date in the Query Block Properties Net Change tab is used as filter to return only new and updated records. Each time the Map is executed, the Most Recent Record Processed date is updated when at least one record is successfully processed by a target operation. For Cvent, typically the virtual field, ScribeLastModifiedDate, is used for Net Change.
In some cases, when a Map executes, there are many records returned by the Query, but none of the records matches the criteria for the subsequent target operations and no records are processed. If the Most Recent Records Processed date is not moved forward, as time goes by, the pool of records returned by the Query increases each time the Map executes until at least one record is processed successfully by a target operation. In an organization with many Events, the number of records that match the Query filters could eventually exceed the capacity of 10,000 records set by the Cvent API.
To prevent exceeding the 10,000 record limit, use the Advance Block and the NetChange virtual entity to trigger an update to the Most Recent Record Processed date in the Query Block Properties Net Change tab. See NetChange in the Notes On Standard Entities section of the Help for additional information.
Relationships
- Only parent -to -child relationships and outer joins are supported, unless otherwise noted for a specific entity. For an outer join, select Return Records with or without this relationship on the Query or Fetch Block Include tab.
Note: For this Connector, only one level of relationship, Parent/Child, is supported for the entity selected in the Query or Fetch Block. For records with multiple levels of relationships, such as Parent, Child, Grandchild, only the selected Parent entity and related Child entities can be retrieved. Additional levels beneath Child entities, such as Grandchildren, cannot be accessed for this Connector using the Include tab. See Block Properties Include Tab — Relational Data.
Filters
When a datetime is configured on the Query Block on the Block Properties Net Change Tab to query for new and updated records, that configuration is treated as an additional filter. The Net Change datetime filter is applied as an AND after any other filters specified on the Block Properties Filter Tab. TIBCO Scribe® Online builds a query combining both the Net Change filter and the filters on the Filter tab. See Net Change And Filters for an example.
Some Connectors for TIBCO Scribe® Online only support one filter. For those Connectors you can use either Net Change or one filter on the Filter tab, not both.
Note: The Net Change date is ignored when previewing data on the Preview tab. Filters on the Block Properties Filters tab are used to filter the data on the Preview tab.
- Supports either ANDs or ORs but not both. If both are used, the following error message is generated:
ERROR: Exception Type: InvalidExecuteQueryException Message: The filter criteria must have either all 'And' or all 'Or' operators. This expression contains both.
- When filtering by an Id field, such as ContactId, only the equals operator is supported.
- Support the following operators:
- Equals
- Not Equal to
- Less than
- Greater than
- Less than or Equal to
- Greater than or Equal to
- Contains
- Does not contain
- Starts with
- Is Like
The Is Like operator in TIBCO Scribe® Online corresponds to the Contains operator in Cvent.
- Is Not Like
The Is Not Like operator in TIBCO Scribe® Online corresponds to the Does Not Contain operator in Cvent.
Ends With is not supported when used as part of the Is Like or Is Not Like operators when filtering in a Query. For example:
EmailAddress is not like "john%"
EmailAddress is like "john%"
Filtering using Ends With generates the following error
ERROR: Exception Type: InvalidExecuteQueryException Message: The following error has occurred in the Cvent Connector: The 'ends with' wild card formatting is not supported on the 'like' or 'not like' operator.
Initial Synchronization
The Cvent API limits the number of records that can be returned by a Query. If you need to retrieve all records for a particular entity and there are more than 10,000 records, you may need to break the job up into several Solution executions. Use the ScribeLastDateModified field as both a starting and ending date to return a smaller set of records for a specific window in time. Records are not returned in ascending order.
For example, assume that you need to retrieve 30,000 records. To retrieve them all you would do the following:
- Select the entity in the Query Block.
- On the Query Block Net Change Tab, enable the Process Only records created or updated option.
- In the drop-down select, ScribeLastModifiedDate.
- On the Filter tab, add a Filter for ScribeLastModifiedDate is less than or equal to the end date of the batch of records you want to retrieve.
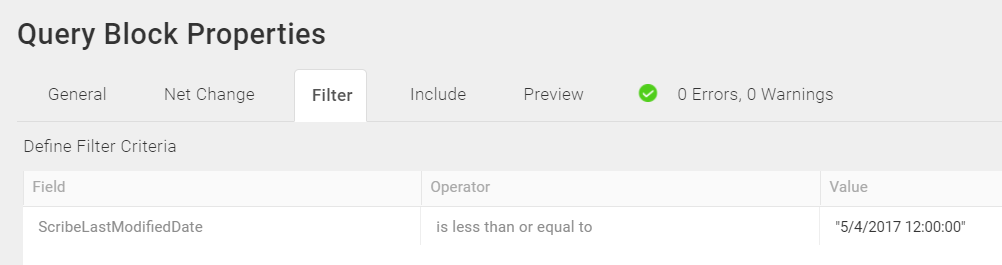
- Run the Solution. When the Solution completes successfully, TIBCO Scribe® uses the date in the filter to update the date on the Net Change tab to be used as the starting point for the next execution.
- Modify the ScribeLastModifiedDate value on the Filter tab to provide a new end date.
- Run the Solution again.
- If you think that you have not retrieved all of the records, repeat the process until you have all of your records.
- Then, modify the query to only retrieve new records by removing the filter for ScribeLastModifiedDate. From this point forward, the number of records that have been modified or added should be small enough that you do not need to configure a starting and ending date. The ScribeLastModifiedDate value on the Net Change tab serves as the starting date with the implied end date of the date and time of the Solution execution.
Cvent HData Connector As IS Target
Consider the following when using the Cvent HData Connector as an Integration Solution target.
- Supports batch processing. See Batch Processing for additional information.
- Picklists — Valid values for Cvent picklist fields are displayed in the field description by selecting the Info icon
 for the field in the Source side of the Fields tab when mapping fields. You may need to temporarily configure a Cvent HData Create Block with to view picklist values.
Add And Remove Operations
Use the Add and Remove Blocks to add Contacts to or remove Contacts from a ContactGroup.
CheckIn Target Operation
The CheckIn Block is available to CheckIn an Invitee at an Event. The CheckIn operation uses a virtual entity called Participant.
Copy Target Operation
Use the Copy Block to create a new Event from an existing Event.
Notes On Standard Entities
Contact
- Query —
- Querying Contacts using the ScribeLastModifiedDate field as a filter returns both active and inactive Contacts.
- Querying Contacts with filters other than ScribeLastModifiedDate returns only active Contacts.
ContactGroup
- Net Change —Filtering for new or updated records using the options on the Query Block Net Change tab is not supported for this entity.
Event
- Two virtual fields, EventStartDateUTC and EventEndDateUTC, are provided to contain the UTC date and time calculated from the combination of the time zone stored in the Timezone field and the datetime stored in EventStartTime and EventEndTime fields. When using a Lookup Block with the Event entity, if you select either of the two virtual fields, EventStartDateUTC or EventEndDateUTC, in the Fields tab, you must select all of the following date time fields.
- EventStartDate
- EventStartDateUTC
- EventEndDate
- EventEndDateUTC
- Timezone
Note: If any of the fields listed are not selected, the Lookup Block fails to process the record and generates an error similar to the following:
Error title: Error in calling Operation Query (Lookup Block)
Error description: Operation failed. Label: Lookup Event, Name: EventLookup, Message: The given key was not present in the dictionary.: Error in calling Operation Query (Lookup Block) - Create — Creating Events that do not allow Online Registration is supported.
- CustomFields —
- Query — For the Event child entity, Event.EventProductDetail, query returns a virtual field named CustomFields. That virtual field contains a series of custom field names and associated values in name:value pairs for any EventProductDetail that is type Session. For example, the field might contain data similar to the following:
- Target Operations — To map those custom field values individually to target fields, you must know the name of the specific custom field and you must use a formula similar to the following to extract a single field value:
MATCHREGEX( Event.EventProductDetail.CustomFields, $"(?<=""<FieldNameNeeded>"":"").*?(?=("",|""}))")
For each field you want to map to a target, use the formula above and change the <FieldNameNeeded> section to the name of the custom field with the value you want to map. For example, if you have the following fields, AccountRep:Smith, AccountCity:Manchester,AccountState:NH, and you want to map the AccountRep field value, replace <FieldNameNeeded> with AccountRep.
To map another custom field value to a target, copy the formula into the appropriate target field and change the <FieldNameNeeded> section to the name of the custom field.
See MATCHREGEX for additional information on this function.

AccountRep:Smith,
AccountCity:Manchester,
AccountState:NH
NetChange
- Advance — Target operation used in conjunction with the NetChange virtual entity to trigger an update to the Most Recent Record Processed date in the Query Block Properties Net Change tab. The only available target field in the Advance Block Properties Fields tab for the NetChange entity is id, however, mapping that field is not required.
Place the Advance Block at the beginning of the map to update the date regardless of whether or not any records are processed by other target operations. Place the Advance Block at the end of the Map to prevent the date from being updated if all the records generate errors. Note that if just one record is successful, the date is moved forward.
See Net Change in the Cvent HData As A Source section for more information.
Registration
- Query — Include tab supports multi-level hierarchical relationships. See Hierarchical Data and Block Properties Include Tab — Hierarchical Entities for additional information.
Session
- Query —
- Filter — Requires at least one filter field. If no filter is provided, the following error message is generated:
Error: Exception Type: InvalidOperationException Message: Sequence contains more than one matching element
- Net Change — Filtering for new or updated records using the options on the Query Block Net Change tab is not supported for this entity.
- Filter — Requires at least one filter field. If no filter is provided, the following error message is generated:
Transaction
- Create — Requires the following fields:
- EventId
- InviteeId
- TransactionType
- PaymentType
- Amount
- PaidInFull
- TransactionDate
Note: Currently only transactions where the PaidInFull field is set to true are supported. When PaidInFull is set to true, the value of the Amount field is ignored and the amount owed is used.
UpdateInviteeInternalInfo
- UpdateInviteeInternalInfo is a virtual entity used to update or insert internal information answers and internal information questions for one or more invitees within an Event.
- When mapping to the QuestionId field, only Text Field, Comment Box, and Single Answer type questions are supported. Use the Query Block Preview tab to preview EventQuestion records and find QuestionText, QuestionId, and QuestionType field values.
- Upsert — Invitees must be registered for the selected Event to update or insert answers and questions. Attempting to Upsert questions and answers for an unregistered Invitee generates the following error: Question ID does not exist for this Event
Notes On Webhooks
Use Cvent Webhooks to send a JSON message containing updated data to TIBCO Scribe® Online when data in Cvent has changed, and trigger appropriate changes in a target datastore.
Cvent Webhooks are referred to in Cvent as Integration Points. An Integration Point is a configuration that contains the Cvent action and the TIBCO Scribe® Online endpoint that should be notified when the action occurs. For example, when a new Contact is created in Cvent the Contact Create action is triggered and can send a message to a TIBCO Scribe® Online endpoint with the data for that new Contact. See Using Cvent Webhooks To Create A New Contact for an outline on configuring the scenario described in the new Contact example.
Cvent Integration Points Supported By Entity
Note: Custom fields are not returned in Webhook messages. Only a subset of possible fields is returned for entities with associated Webhooks.
|
Entity |
Webhook |
|---|---|
|
Contact |
• Contact Created • Contact Edited • Contact Deleted • Contact Opted Out • Contact Un-Opted Out • Contact Confirmed • Opted In |
|
Event |
• Event Modified • Event Cancelled • Event Deleted |
|
Invitee |
• Invitee Added to Invitee List • Invitee or Guest Email Sent • Invitee or Guest Email Opened • Invitee or Guest Email Bounced • Invitee Unsubscribed • Invitee Resubscribed • Invitee or Guest Accepted • Invitee Declined • Invitee or Guest Modified • Invitee or Guest Cancelled • Invitee Substituted out of Registration • Invitee or Guest Marked as Participant • Invitee or Guest Unmarked as Participant • Invitee or Guest Registers for Session • Invitee or Guest Cancels Registration for Session • Invitee Attends Session • Invitee Marked as Session No Show |
|
Session |
• Session Created • Session Modified • Session Deleted |
|
Speakers |
• Speaker Created • Speaker Modified • Speaker Deleted |
Using Cvent Webhooks To Create A New Contact
- Make sure you have met the requirements for Cvent Webhooks outlined in the Setup Considerations section of this document.
- In TIBCO Scribe® Online, configure a Connection to your Cvent account. See Connecting To Cvent HData.
- Add an Integration Event Solution.
- Add an Event Map to that Solution. See Defining An Event Message Map.
- In the Map add the Cvent Connection.
- Drag a Wait for Message Block on to the Map canvas.
- Configure the Wait for Message Block with the Contact entity, for this example. See Wait For Message Block.
- Save the Block and the Map to generate the TIBCO Scribe® Online endpoint where Cvent can send a message.
- Open the Map and open the Wait for Message Block to display the TIBCO Scribe® Online endpoint for that Block. Copy the endpoint URL.
- In Cvent, navigate to Admin > Integrations > Push API Integrations and select your Push API Integration to open it.
- In the Endpoints section, add an endpoint called Contact Create and paste in the TIBCO Scribe® Online endpoint you copied from the Wait for Message Block.
- In the Integration Points section, add an Integration Point for Contact Created and associate it with the Endpoint called Contact Create that you just added in the Endpoints section.
Note: Cvent is now configured to send a JSON message with new Contact data to the TIBCO Scribe® Online Wait For Message Block whenever a new Contact is created in Cvent.
- Open the Event that you want to send messages to TIBCO Scribe® Online and activate Webhooks for that event.
- Return to TIBCO Scribe® Online and complete the Event Map to write the new Contact data to a target datastore.
TIBCO Scribe® Online API Considerations
To create connections with the TIBCO Scribe® Online API, the Cvent HData Connector requires the following information:
|
Connector Name |
CventHdata |
|
Connector ID |
5B920324-A4D2-43A2-9EC4-EF1ECF336AB1 |
TIBCO Scribe® Online Connection Properties
In addition, this Connector uses the Connection properties shown in the following table.
Note: Connection property names are case-sensitive.
| Name | Data Type | Required | Secured | Usage |
|---|---|---|---|---|
|
ApiUrl |
string |
Yes |
No |
|
|
AccountNumber |
string |
Yes |
No |
|
|
ApiUser |
string |
Yes |
No |
|
|
ApiPassword |
string |
Yes |
Yes |
|
More Information
For additional information on this Connector, refer to the Knowledge Base and Discussions in the TIBCO Community.