
Defining An Event Request/Reply Map
Use a TIBCO Scribe® Online Request/Reply Map to use data from any TIBCO Scribe® Online Connection with another application, if that application can call a REST API.
Performance
Each Solution containing one or more Request/Reply Maps is bound to a single TIBCO Scribe® Online Agent which limits the number of requests that can be processed. In addition, you should be aware of the following restrictions when using Request/Reply:
- If the time to send a reply exceeds the default timeout of 90 seconds, a timeout error is generated.
- Request processing wait times increase as you increase the number of calls, which may create a backlog of requests. As the backlog grows, wait times continue to increase.
- When using a Cloud Service, on average, Request/Reply can only support 1 call every 2 seconds.
- When using an On-Premise Agent the number of calls per second might be improved depending on the CPU and available memory on the server where the Agent is installed. Performance testing in your specific environment would be required to determine the capacity of the server.
- If, over time, the application that is calling TIBCO Scribe® Online is exceeding the 1 call every 2 seconds limit, the response times take longer creating a backlog of messages. When the backlog reaches 100 or more, the system starts returning 429 errors for new messages and does not add them to the backlog until enough messages are processed to reduce the backlog.
- Individual message size is limited to a maximum of 10 MB.
Exceeding these limits could trigger governance thresholds causing automatic controls in TIBCO Scribe® Online to restrict your IP address. If you find that your IP address has been restricted, contact Support to request that the restriction be lifted. See section 9 of the TIBCO Cloud Service Terms.
Tips
- Request/Reply is meant for quick transactions using synchronous requests where a reply is needed.
- If you have more than one Request/Reply Map in a Solution, consider separating the Maps into different Solutions with each Solution assigned to a different Agent to distribute the workload.
- Consider using Message Maps.
- If you are using TIBCO Cloud ™ Integration, consider implementing TIBCO Flogo®.
- When configuring an application to send a request to TIBCO Scribe® Online, be sure to account for transient fault errors that may result in messages that are not processed. TIBCO Scribe® Online can be configured to send a reply to the application that sent the original request using the Build Reply and Send Reply operation Blocks. The reply can serve as a notification that the message was received. Any message that does not trigger a reply, may have been lost due to a transient fault and should be considered for retry/reprocess from the calling Map.
- The system used to send requests to TIBCO Scribe® Online receives errors when it can no longer contact TIBCO Scribe® Online. Implement error trapping and monitor your system for those errors so they can be addressed as soon as possible.
Request/Reply Example
For example, assume you have a custom application and you want that application to add new leads to a Dynamics CRM account. With a Request/Reply Map, you can:
- Design the schema for your input fields in the Wait For Request Block, such as the Name, Address, and Phone fields for the lead.
- Define the schema for the fields you want returned in the Build Reply Block. In this example it might just be a Boolean value that says whether the lead was successfully created in Dynamics CRM.
- Add the Endpoint URL generated in the Wait for Request Block to the part of your source code or application that sends the leads. The code for your custom application also requires a web request body that provides values for the fields you designed in the Wait for Request Block. See Request/Reply Map Example. For more information on how to format the request body, see the JSON.org site.
- Write code in your custom application that parses the body of the web reply and retrieves any return values. See Request/Reply Map Example. For more information on how the reply body is formatted, see the JSON.org site.
- Write code in your custom application that sends a lead again if no web reply is received from TIBCO Scribe® Online.
As illustrated below, the request pings the TIBCO Scribe® Online cloud endpoint, which is a unique URL for each Map. The Map runs and TIBCO Scribe® Online sends a reply to your Agent with the data returned by the Map.

Tip: Using the TIBCO Scribe® Online API you can generate an OAS 2.0 document for a Request/Reply Map. This can be helpful when configuring the outbound message in the application sending messages to TIBCO Scribe® Online. See Generate An OAS Document For Request/Reply Maps.
To use a Request/Reply Map within an Event Solution, you need to:
- Set up the Request/Reply Map in TIBCO Scribe® Online, starting with the Wait For Request Block.
- Set up your custom application to call the TIBCO Scribe® Online REST API. When you first save the Wait For Request Block in your Map, the Endpoint URL required by your custom application displays. You can copy the Endpoint URL and paste it to the code in your custom application.
Using Build Reply And Send Reply Blocks
For Request/Reply Maps the Build Reply Block and Send Reply Block display in the Connections panel on the Map canvas. While these Blocks are optional, they may provide useful information.
- Build Reply — Defines the data fields that this Map returns to your application. The size of the reply message is limited to 1MB.
- Send Reply — Causes the Reply to be sent back to the requester. Similar to the Map Exit Block, use this Block to exit out of the Map early or to trigger an error message. While you can use Send Reply to change the error handling for this Map, Send Reply is optional. When Send Reply is used, it has a 90 second window of time to be sent before the reply times out with a Gateway Timeout error.
Note: For an example of a Request/Reply Map using two Build Reply Blocks to create a hierarchical reply, see Request/Reply Map Example.
Creating Maps
When you open a Map the Connections panel and workspace display. The Connections panel contains all of the Blocks required to easily create Maps used to integrate your source data into one or more target datastores. To build your Map, move the Blocks into the workspace.
Each time you save your Map a separate revision of the Map is stored. Before saving, enter a comment in the Comment field at the bottom of the workspace to associate a comment with the new revision. You can revert to a prior revision from the Revisions dialog. See Map Revisions for additional information.
Selecting Connections
Each Connection in a Map can be used for both Source and Target operations based on what the Connector and the associated datastore support. For example, if you have a Salesforce Connection and you use a Query Block for that Connection in the Map, the Query is a Source operation, therefore, Salesforce is the Source for that Block. If you use a Create Block for the Salesforce Connection in the Map, Create is a Target operation, and Salesforce is the Target for that Block.
Connections are sorted based on the order in which they were added to the Map. The color of the Blocks associated with a Connection is determined by the order of the Connections. Control Blocks are always light blue, the first Connection Blocks are always orange, and Blocks for the second Connection are yellow, Blocks for the third Connection are green, and so on up to eleven Connections.
TIBCO Scribe® Online supports multiple target datastores in Integration Maps. You can integrate data from one source into multiple targets. For example, while integrating your Microsoft Dynamics GP data into Salesforce, you can also send data from the same run to a CSV Text file for reporting purposes. Add Connections to a Map to connect to one or more target datastores.
The first step is to select or create Connections in the Connections panel on the left side of the Map. From the Connections panel, you can either:
- Select Add Connection and select an existing Connection from the Connection dialog.
- Select Add Connection and select Create a New Connection in the Connection dialog.
- After selecting a Connection, you can use the Gear menu
 to do the following:
- Edit — Make changes to the selected Connection. See Editing Connections.
- Reassign Connections — Change a Connection within a Map without recreating each Block that calls that Connection.
- Reset Metadata — Update the metadata for this Connection.
See Resetting Metadata.
Note: Metadata for Text Connections cannot be reset here. See Resetting Metadata For Text Connections.
- Metatdata Status — View a list of the most recent set of metadata requests and the request status for this Connection. See Metadata Status.
- Remove — Delete the Connection. Connections can only be removed if they are not used in the Map.
As soon as a valid Connection is selected, all of the Blocks supported by the Connection display in the Connection panel.
Starting A Map
After you select your Connections, you can begin to create a Map. A Map is a visual representation of the instructions needed to integrate your data. For Message Maps, the Map must start with a Wait For Request Block.
- From the Connections panel, select the Wait For Request Block associated with the Connection you want to use as a data source and drag it to the workspace.
Tip: As you drag and drop Blocks, the top border always changes color. If the color of the Block is transparent, you have not attached it correctly to the previous Block and the Map does not run.
When you first drag Blocks over, they often display an error in the corner. This is expected because the Block is missing important configuration information, such as the entity you want to use.
- Select the Wait For Request Block.
- Select the Request link in the Properties panel to open the Wait For Request Block Properties.
- Enter your input fields as described in Wait For Request Block.
- When you are done configuring request schema, save your Map.
Note: After saving the Map the first time, TIBCO Scribe® Online generates a unique Endpoint URL which displays on the Block Properties — General tab of the Wait For Request Block. This may take a few minutes.
You must copy and paste the Endpoint URL into the code in the application sending the message to TIBCO Scribe® Online.
You can also use the Endpoint URL to generate an OAS document. See Generate An OAS Document For Request/Reply Maps.
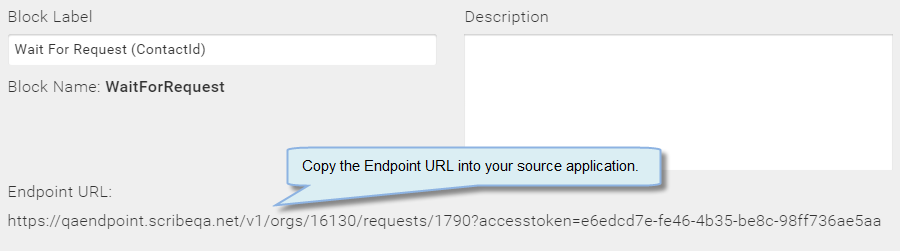
Endpoint URL
- Continue adding Blocks to your Map. Unlike a regular Map, the For Each Result Block is not required or available.
As you build your Map, keep in mind that you only define the processing for one record at a time. If a message contains multiple records, your Map runs once for each record.
Adding More Blocks
- Once you have added the Wait for Request Block, you can drag and drop the Blocks you need from the Connections panel.
- As you add Blocks to your Map, use the links in the Properties panel to access and configure the Block Properties dialog for each Block. The information available on the Properties dialog depends on the specific Block.
Note: Fields and entities available in one Block can access the values returned in preceding Blocks.
- Select Apply to save the Map in its current state. You must save the Map before debugging. See Debugging Maps.
- Continue to add Blocks as needed. See Working With Blocks.
Additional Steps
Configure your source datastore or application code to call the Endpoint URL shown on the General tab of the Wait For Request Block.
Note: String values sent in a Request to a TIBCO Scribe® Online Request Reply Map must be in quotes, such as, “ABC” not ABC.
Set Security Rules
From the Security dialog under More > Security, specify the security rules for the Event Solutions in this Organization.
Important: When an Event Solution runs, TIBCO Scribe® Online sends a response to Messages or Requests for data from any one of three static IP addresses. Configure your Proxy Server, Firewall, or other network security devices to allow responses from these IP addresses to access your network. Static IP Addresses include:
- 54.204.16.213
- 54.83.47.195
- 23.23.251.57